Buick Enclave: Repair Instructions
INTERMEDIATE STEERING SHAFT BOOT REPLACEMENT
Removal Procedure
1. Turn the steering wheel to the straight forward position and lock the steering column.
CAUTION: With wheels of the vehicle facing straight ahead, secure the steering wheel utilizing steering column anti-rotation pin, steering column lock or a strap to prevent rotation. Locking of the steering column will prevent damage and a possible malfunction of the SIR system.
En M?xico bonos por registro opini?nThe steering wheel must be secured in position before disconnecting the following components:
- The steering column
- The intermediate shaft(s)
- The steering gear
After disconnecting these components, do not rotate the steering wheel or move the front tires and wheels. Failure to follow this procedure may cause the SIR coil assembly to become un-centered and cause possible damage to the SIR coil. If you think the SIR coil has become un-centered, refer to your specific SIR coil's centering procedure to re-center SIR Coil.
2. Raise and support the vehicle. Refer to Lifting and Jacking the Vehicle.
3. Remove the left front tire and wheel assembly. Refer to Tire and Wheel Removal and Installation.
4. Disengage the intermediate steering shaft boot from the steering gear and from the intermediate steering shaft upper seal.
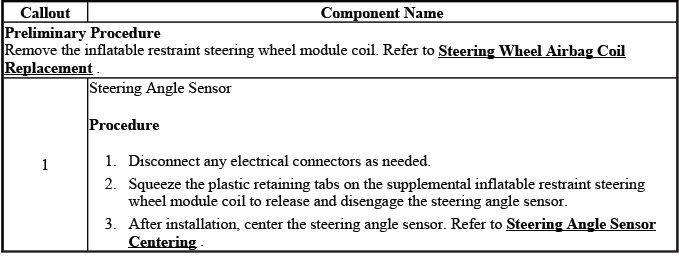
5. Remove the intermediate steering shaft lower bolt (1). Discard the bolt.
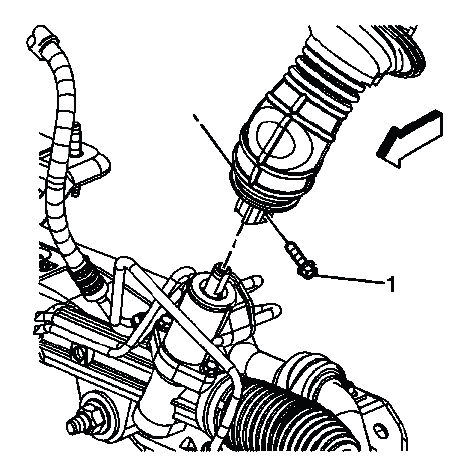
Fig. 7: Identifying Intermediate Steering Shaft Bolt
6. Disconnect the intermediate steering shaft from the steering gear.
7. Remove the intermediate steering shaft boot (1).
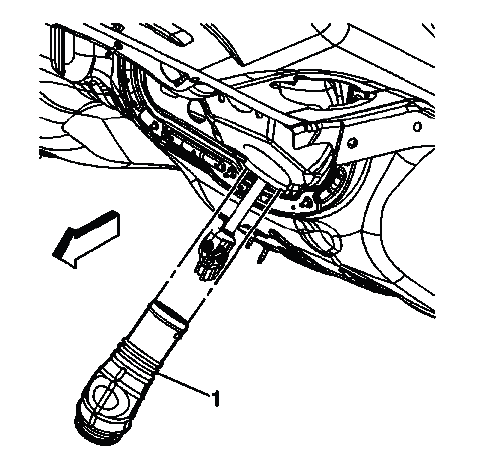
Fig. 8: Identifying Intermediate Steering Shaft Boot
NOTE: Do not tear the intermediate steering shaft boot.
Installation Procedure
1. Install the intermediate steering shaft boot (1).
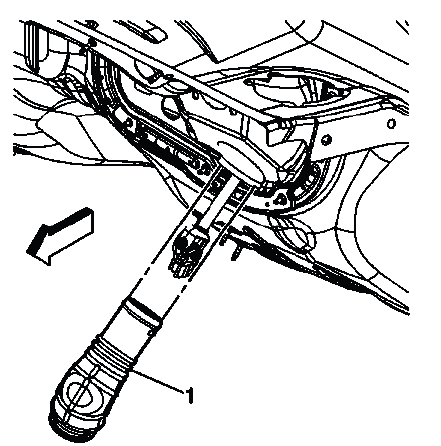
Fig. 9: Identifying Intermediate Steering Shaft Boot
2. Connect the intermediate steering shaft to the steering gear. Install the NEW intermediate steering shaft lower bolt (1) and tighten to 25 N.m (18 lb ft).
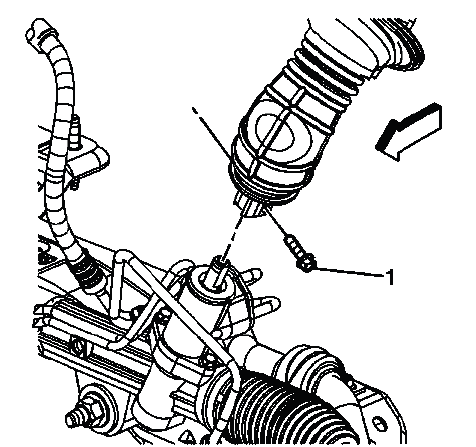
Fig. 10: Identifying Intermediate Steering Shaft Bolt
CAUTION: Refer to Fastener Caution.
NOTE: A NEW intermediate steering shaft lower bolt has a thread locking adhesive patch on the threads.
3. Install the intermediate steering shaft boot to the steering gear and to the intermediate steering shaft upper seal.
NOTE: Install the intermediate steering shaft boot in the correct position.
4. Install the left front tire and wheel assembly. Refer to Tire and Wheel Removal and Installation.
5. Lower the vehicle.
INTERMEDIATE STEERING SHAFT REPLACEMENT
Removal Procedure
1. Turn the steering wheel to the straight forward position and lock the steering column.
CAUTION: With wheels of the vehicle facing straight ahead, secure the steering wheel utilizing steering column anti-rotation pin, steering column lock or a strap to prevent rotation. Locking of the steering column will prevent damage and a possible malfunction of the SIR system.
The steering wheel must be secured in position before disconnecting the following components:
- The steering column
- The intermediate shaft(s)
- The steering gear
After disconnecting these components, do not rotate the steering wheel or move the front tires and wheels. Failure to follow this procedure may cause the SIR coil assembly to become un-centered and cause possible damage to the SIR coil. If you think the SIR coil has become un-centered, refer to your specific SIR coil's centering procedure to re-center SIR Coil.
2. Raise and support the vehicle. Refer to Lifting and Jacking the Vehicle.
3. Disengage the intermediate steering shaft boot from the steering gear and from the intermediate steering shaft upper seal.
4. Remove the intermediate steering shaft lower bolt (1). Discard the bolt.
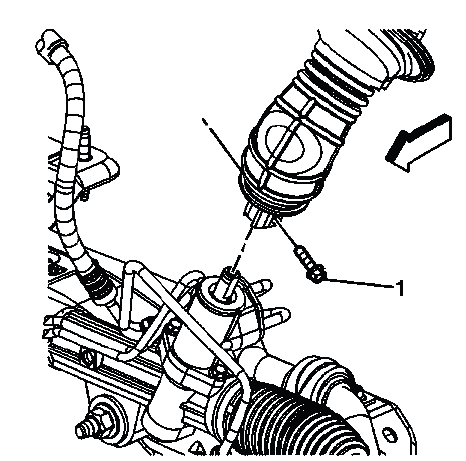
Fig. 11: Identifying Intermediate Steering Shaft Bolt
5. Disconnect the intermediate steering shaft from the steering gear.
6. Remove the left side instrument panel insulator panel. Refer to Instrument Panel Insulator Panel Replacement - Left Side.
7. Remove the intermediate steering shaft upper bolt (1). Discard the bolt.
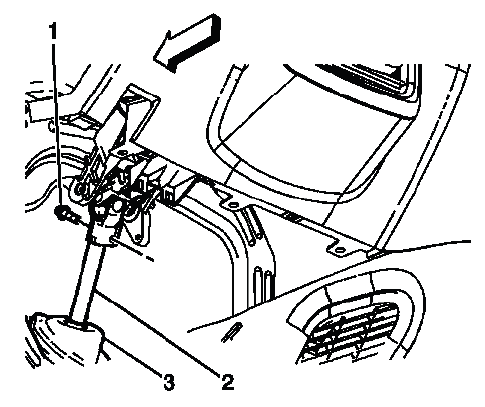
Fig. 12: Identifying Intermediate Steering Shaft Components
8. Disconnect the intermediate steering shaft (2) from the steering column shaft.
9. Disconnect the intermediate steering shaft upper seal (3) from the dash panel.
10. Remove the intermediate steering shaft from the vehicle.
NOTE: Spreading both ends of the new or removed intermediate steering shaft while out of the vehicle will help with the installation.
Installation Procedure
1. Position the intermediate steering shaft (2) in the vehicle.
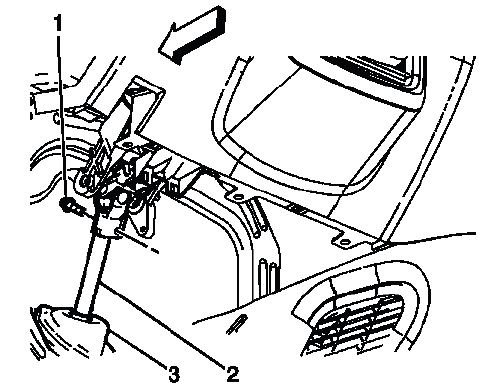
Fig. 13: Identifying Intermediate Steering Shaft Components
2. Connect the intermediate steering shaft to the steering column shaft.
3. Install the NEW intermediate steering shaft upper bolt (1) and tighten to 22 N.m (16 lb ft).
CAUTION: Refer to Fastener Caution.
NOTE: A NEW intermediate steering shaft upper bolt has a thread locking adhesive patch on the threads.
4. Connect the intermediate steering shaft upper seal (3) to the dash panel.
5. Install the left side instrument panel insulator panel. Refer to Instrument Panel Insulator Panel Replacement - Left Side.
6. Connect the intermediate steering shaft to the steering gear. Install the NEW intermediate steering shaft lower bolt (1) and tighten to 25 N.m (18 lb ft).
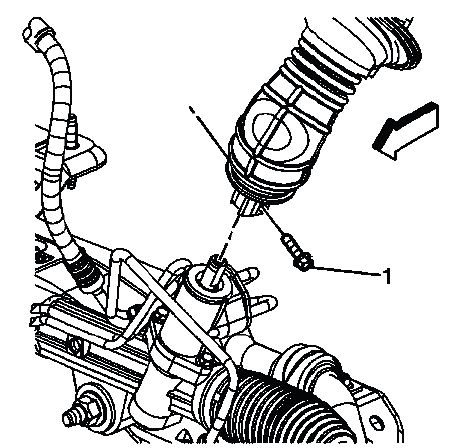
Fig. 14: Identifying Intermediate Steering Shaft Bolt
NOTE: A NEW intermediate steering shaft lower bolt has a thread locking adhesive patch on the threads.
7. Install the intermediate steering shaft boot to the steering gear and to the intermediate steering shaft upper seal.
NOTE: Do not tear the intermediate steering shaft boot. Install the boot in the correct position.
8. Lower the vehicle.
STEERING COLUMN ACCIDENT DAMAGE INSPECTION
Inspection Procedure
1. Inspect the capsules on the steering column bracket assembly. Verify that the capsules are seated securely in the bracket slots and inspect the capsules for any loose conditions when pushed or pulled by hand. If the capsules are not secure, perform one of the following procedures:

Fig. 15: Inspecting Capsules On Steering Column Bracket Assembly
- If the bracket is bolted to the jacket assembly, replace the bracket.
- If the bracket is welded to the jacket assembly, replace the jacket assembly.
2. Inspect the jacket assembly for collapse by measuring the distance from the lower edge of the upper jacket to a defined point on the lower jacket. If measured dimensions (A), are not within specifications (100 mm), install a steering column.
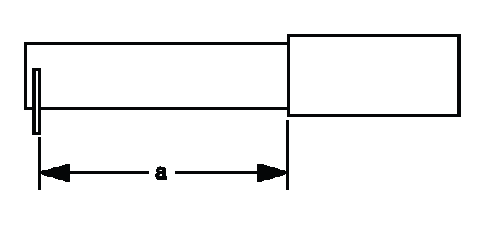
Fig. 16: Inspecting Jacket Assembly Dimensions
NOTE: Measurement procedure only for manually adjusted steering columns.
STEERING COLUMN UPPER TRIM COVER REPLACEMENT
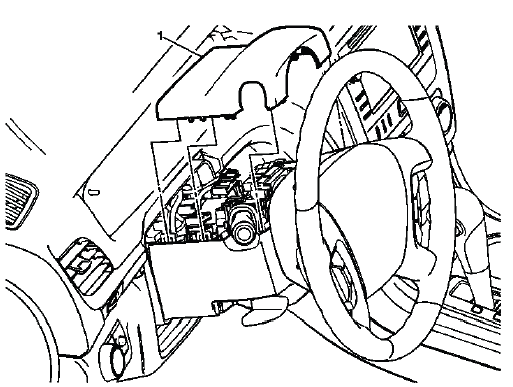
Fig. 17: Steering Column Upper Trim Cover
Steering Column Upper Trim Cover Replacement
STEERING COLUMN LOWER TRIM COVER REPLACEMENT
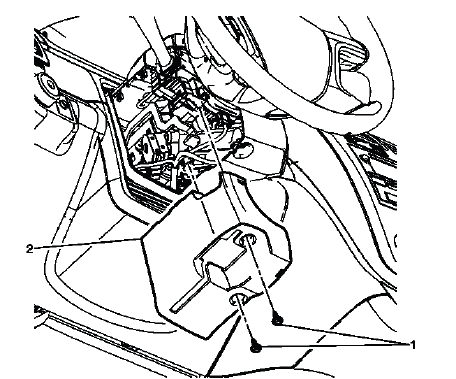
Fig. 18: Steering Column Lower Trim Cover
Steering Column Lower Trim Cover Replacement
TELESCOPING STEERING COLUMN CALIBRATION
Tilt/Telescoping Soft Stops
After replacement of the memory seat module (MSM), it is necessary to program the tilt/telescoping soft stops.
Each soft stop is a programmable end of travel that is set approximately 1.3 cm (0.5 in) from the mechanical end of travel. The steering column has a soft stop set at each end of the telescoping in/out and tilt up/down movement. The system uses soft stops to prevent wear on the system by ensuring that the steering column movement stops before it reaches its mechanical end of travel in any direction. The soft stops are initially programmed at the factory. The stop positions may be reprogrammed, which is necessary any time the MSM, the tilt actuator or telescope actuators replaced, as described in the following procedure.
Tilt/Telescoping Soft Stop Programming Procedure
- Turn ON the ignition, with the engine OFF.
- Connect a scan tool to the vehicle.
- Select Model Year.
- Select LD Truck.
- Select Brand.
- Product Line.
- Select Body.
- Select Memory Seat
- Select Special Functions
- Select Driver Seat.
- Select Learn Column Soft Stops.
- Follow the scan tool on-screen instructions.
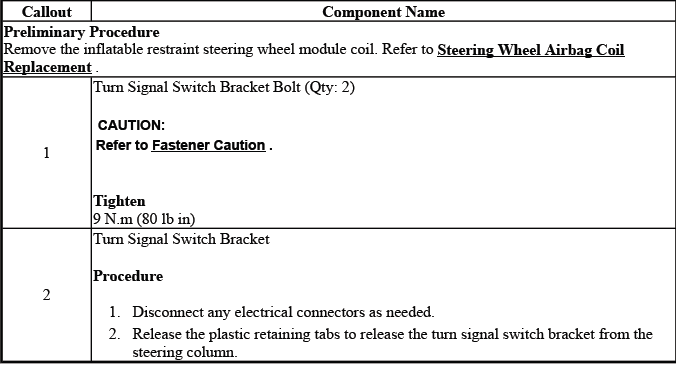
TURN SIGNAL SWITCH BRACKET REPLACEMENT
Fig. 19: Identifying Turn Signal Switch Bracket
Turn Signal Switch Bracket Replacement
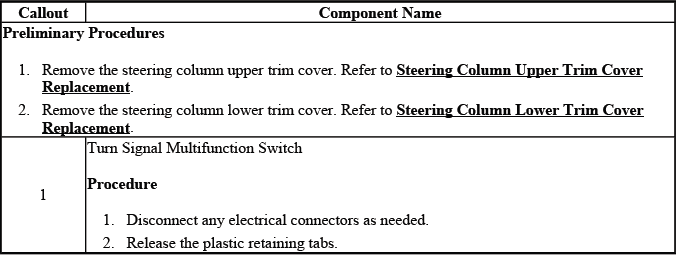
TURN SIGNAL MULTIFUNCTION SWITCH REPLACEMENT
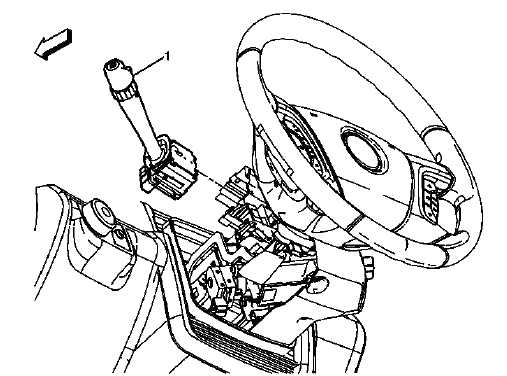
Fig. 20: Identifying Turn Signal Multifunction Switch
Turn Signal Multifunction Switch Replacement
STEERING WHEEL HEAT CONTROL MODULE REPLACEMENT (TRAVERSE)
Fig. 21: Steering Wheel Heat Control Module
Steering Wheel Heat Control Module Replacement (Traverse)

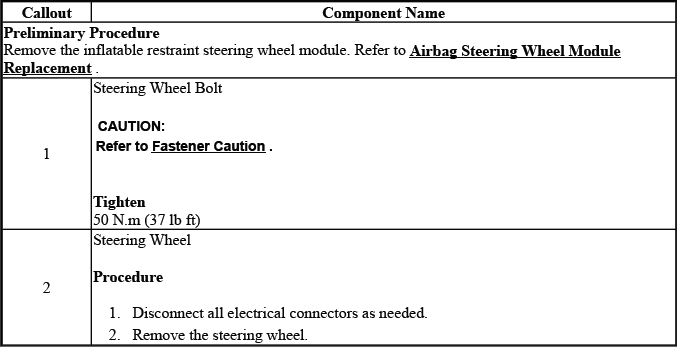
STEERING WHEEL REPLACEMENT
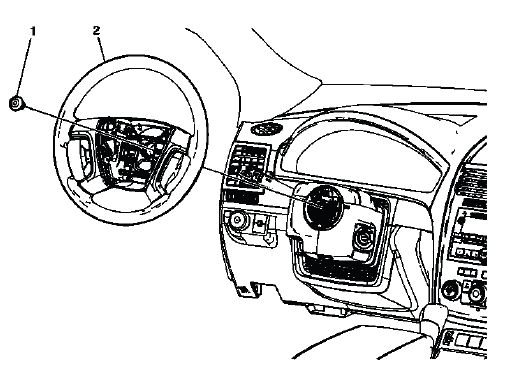
Fig. 22: Identifying Steering Wheel
Steering Wheel Replacement
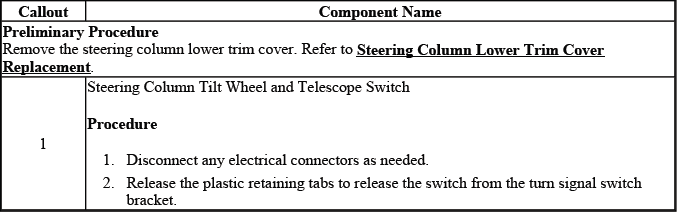
STEERING COLUMN TILT WHEEL AND TELESCOPE SWITCH REPLACEMENT
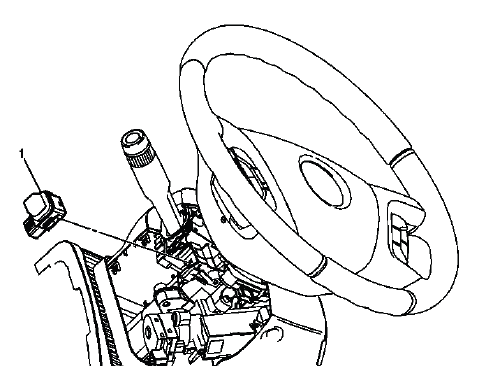
Fig. 23: View Of Steering Column Tilt Wheel and Telescope Switch
Steering Column Tilt Wheel and Telescope Switch Replacement
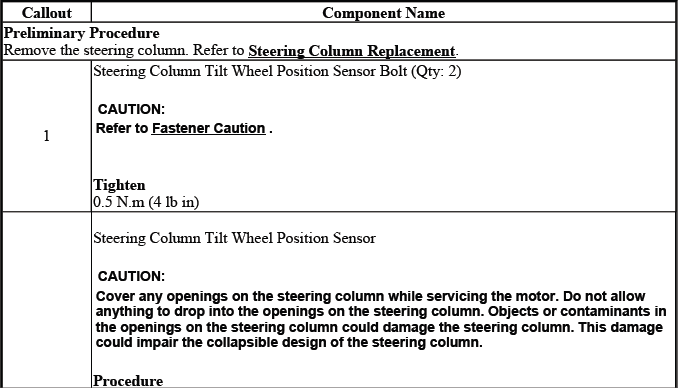
STEERING COLUMN TILT WHEEL POSITION SENSOR REPLACEMENT
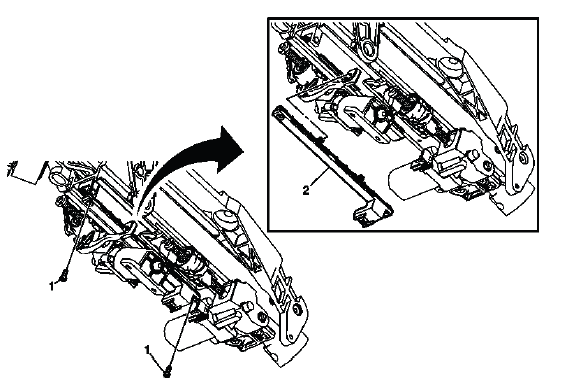
Fig. 24: Identifying Steering Column Tilt Wheel Position Sensor
Steering Column Tilt Wheel Position Sensor Replacement
STEERING COLUMN REPLACEMENT
Removal Procedure
1. Turn the steering wheel to the straight forward position and lock the steering column.
CAUTION: With wheels of the vehicle facing straight ahead, secure the steering wheel utilizing steering column anti-rotation pin, steering column lock or a strap to prevent rotation. Locking of the steering column will prevent damage and a possible malfunction of the SIR system.
The steering wheel must be secured in position before disconnecting the following components:
- The steering column
- The intermediate shaft(s)
- The steering gear
After disconnecting these components, do not rotate the steering wheel or move the front tires and wheels. Failure to follow this procedure may cause the SIR coil assembly to become un-centered and cause possible damage to the SIR coil. If you think the SIR coil has become un-centered, refer to your specific SIR coil's centering procedure to re-center SIR Coil.
2. Remove the left side instrument panel (I/P) insulator panel. Refer to Instrument Panel Insulator Panel Replacement - Left Side.
3. Remove the driver knee bolster. Refer to Driver Knee Bolster Replacement (Acadia) , Driver Knee Bolster Replacement (Enclave) and Driver Knee Bolster Replacement (Traverse).
4. Remove the I/P Instrument Cluster Trim Plate. Refer to Instrument Panel Cluster Trim Plate Replacement (Acadia) , Instrument Panel Cluster Trim Plate Replacement (Enclave) and Instrument Panel Cluster Trim Plate Replacement (Traverse).
5. Remove the steering column housing cover bolts. Refer to Steering Column Housing Cover Replacement.
6. Disconnect all electrical connectors as necessary.
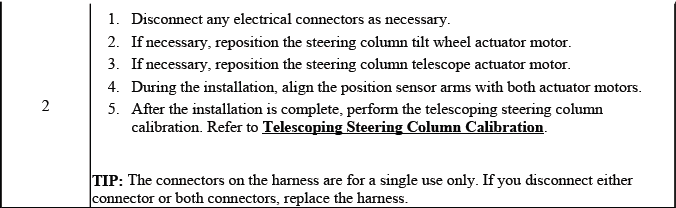
7. If equipped, remove the steering column lower support brace bolts (1) and the steering column lower support brace (2).
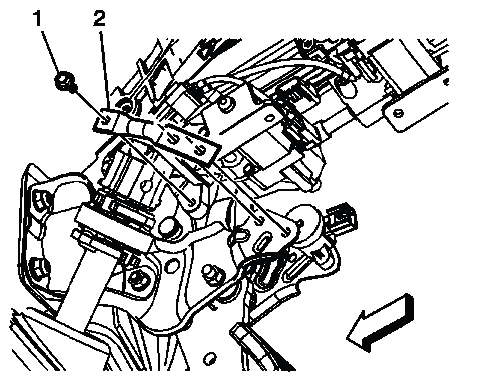
Fig. 25: Identifying Steering Column Lower Support Brace
8. Remove the intermediate steering shaft upper bolt (1). Discard the bolt.
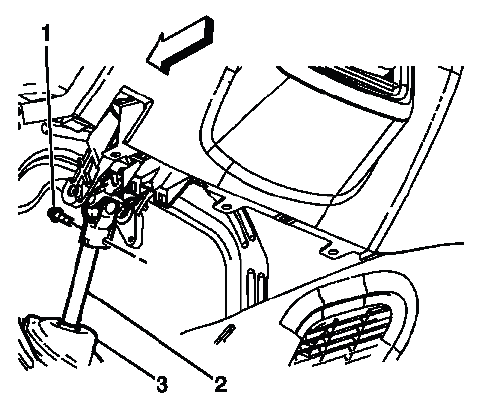
Fig. 26: Identifying Intermediate Steering Shaft Components
9. Disconnect the upper intermediate steering shaft (2) from the steering column. Do not pull the intermediate steering shaft lower seal (3) away from the body panel.
10. Remove the steering column nuts (2) and the steering column bolts (1).
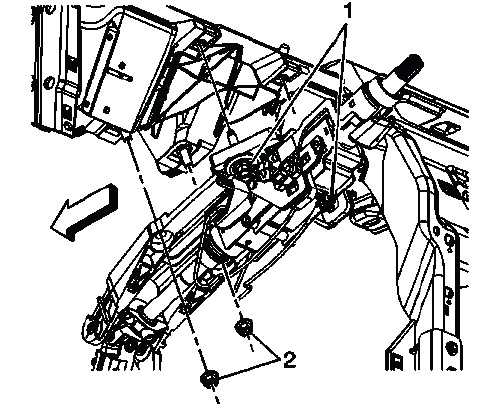
Fig. 27: Identifying Steering Column Nuts & Bolts
11. Remove the steering column from the vehicle.
12. Transfer any parts as necessary.
Installation Procedure
1. Install the steering column to the vehicle and start the steering column nuts (3, 4) and bolts (1, 2) by hand using the following sequence:
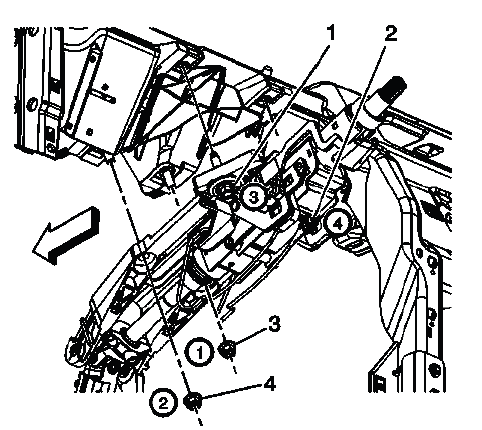
Fig. 28: Identifying Steering Column Nuts & Bolts
NOTE: Hand tighten the nuts and the bolts in sequence. DO NOT apply any clamping force.
- Position the steering column in the vehicle.
- Hand start the steering column nuts (3, 4).
- Hand start the steering column bolts (1, 2).
- Hold the steering column flush against the I/P carrier.
- Hand tighten steering column nut (3).
- Hand tighten steering column nut (4).
- Hand tighten steering column bolt (1).
- Hand tighten steering column bolt (2).
2. Tighten the steering column nuts (3, 4) and bolts (1, 2) in the following sequence:
CAUTION: Refer to Fastener Caution.
NOTE: Tighten the nuts and the bolts in sequence to the specification.
- Tighten steering column nut (3) to 27 (20 lb ft).
- Tighten steering column nut (4) to 27 (20 lb ft).
- Tighten steering column bolt (1) to 27 (20 lb ft).
- Tighten steering column bolt (2) to 27 (20 lb ft).
3. Connect the intermediate steering shaft (2) to the steering column shaft.
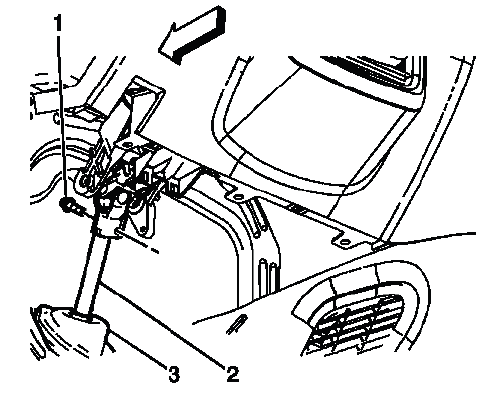
Fig. 29: Identifying Intermediate Steering Shaft Components
4. Install the NEW intermediate steering shaft upper bolt (1) and tighten to 22 (16 lb ft).
NOTE: A NEW intermediate steering shaft upper bolt has a thread locking adhesive patch on the threads.
5. Ensure the intermediate steering shaft upper seal (3) is seated correctly.
6. If equipped, install the steering column lower support brace (2) and the steering column lower support brace bolts (1) and tighten to 10 (89 lb in).
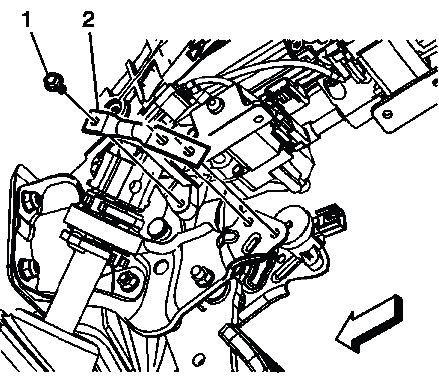
Fig. 30: Identifying Steering Column Lower Support Brace
7. Connect all electrical connectors as necessary.
8. Install the steering column housing cover bolts. Refer to Steering Column Housing Cover Replacement.
9. Install the I/P Instrument Cluster Trim Plate. Refer to Instrument Panel Cluster Trim Plate Replacement (Acadia) , Instrument Panel Cluster Trim Plate Replacement (Enclave) , Instrument Panel Cluster Trim Plate Replacement (Traverse).
10. Install the left side I/P insulator panel. Refer to Instrument Panel Insulator Panel Replacement - Left Side.
11. If equipped with a power tilting and telescoping steering column, calibrate the telescoping steering column. Refer to Telescoping Steering Column Calibration.
STEERING ANGLE SENSOR REPLACEMENT
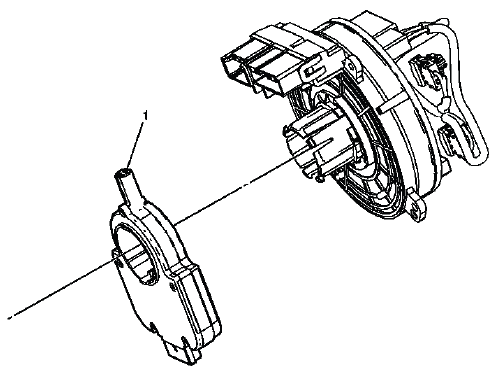
Fig. 31: Identifying Steering Angle Sensor
Steering Angle Sensor Replacement