Buick Enclave: Repair Instructions
ODOR CORRECTION
Eliminating Air Conditioning Odor
Odors may be emitted from the air conditioning system primarily at start up in hot, humid climates. The following conditions may cause the odor:
- Debris is present in the HVAC module.
- Microbial growth on the evaporator core
When the blower motor fan is turned on, the microbial growth may release an unpleasant musty odor into the passenger compartment. To remove odors of this type, the microbial growth must be eliminated. Perform the following procedure: Deodorize the evaporator core using Deodorizing Aerosol Kit.
Perform the following steps in order to deodorize the A/C system:
1. Ensure that the plenum that draws outside air into the HVAC module is clear of debris.
2. Disable the A/C compressor clutch operation by disconnecting the clutch coil electrical connector.
3. Dry the evaporator core by performing the following steps:
- Start the engine.
- Select the maximum temperature setting.
- Select the recirculation mode.
- Run the blower motor on high for 10 minutes.
4. Locate an area in the air conditioning duct between the blower motor and the evaporator core downstream of the blower motor.
5. Drill a 3.175 mm (0.125 in) hole where the hole will not interfere with or damage the following components:
- The blower motor
- The evaporator core
- Any other operating part the of system
6. Wear safety goggles and latex gloves in order to perform the following actions:
- Select the maximum blower speed.
- Insert the deodorizer extension tube into the hole to the mark on the extension tube.
- Use short spray bursts and vary the direction of spray for a 2-3 minute period of time.
7. Shut the engine OFF. Allow the vehicle to sit for 3-5 minutes.
8. Seal the 3.175 mm (0.125 in) hole with body sealer or RTV gasket compound.
9. Start the engine.
10. Operate the blower motor on high for 15-20 minutes to dry.
11. Reconnect the A/C compressor clutch coil electrical connector.
12. Verify proper clutch operation.
REFRIGERANT RECOVERY AND RECHARGING
Special Tools
- J 43600 ACR 2000 Air Conditioning Service Center
- J 45037 A/C Oil Injector
For equivalent regional tools, refer to Special Tools.
WARNING: To prevent personal injury, avoid breathing A/C Refrigerant and lubricant vapor or mist. Work in a well ventilated area. To remove refrigerant from the A/C System, use service equipment designed for recovery that is certified to meet the requirements of the appropriate SAE Standards. If an accidental system discharge occurs, ventilate the work area before continuing service. Additional health and safety information may be obtained from the refrigerant, refrigerant recovery and lubricant manufacturers.
WARNING: For personal protection, goggles and lint-free gloves should be worn and a clean cloth wrapped around fittings, valves and connections when doing work that includes opening the refrigerant system. If refrigerant comes in contact with any part of the body severe frostbite and personal injury can result. The exposed area should be flushed immediately with cold water and prompt medical help should be obtained.
CAUTION: You must replace the desiccant if the A/C refrigerant system has been open to atmosphere for more than four hours or if the A/C refrigerant oil has been contaminated. Failure to replace the desiccant will result in damage to the A/C refrigerant system.
CAUTION: R-134a is the only approved refrigerant for use in this vehicle. The use of any other refrigerant may result in poor system performance or component failure.
CAUTION: To avoid system damage use only R-134a dedicated tools when servicing the A/C system.
CAUTION: Use only Polyalkylene Glycol Synthetic Refrigerant Oil (PAG) for internal circulation through the R-134a A/C system and only 525 viscosity mineral oil on fitting threads and O-rings. If lubricants other than those specified are used, compressor failure and/or fitting seizure may result.
CAUTION: R-12 refrigerant and R-134a refrigerant must never be mixed, even in the smallest of amounts, as they are incompatible with each other. If the refrigerants are mixed, compressor failure is likely to occur. Refer to the manufacturer instructions included with the service equipment before servicing.
The J 43600 ACR 2000 air conditioning service center is a complete air conditioning service center for R-134a.
The ACR 2000 recovers, recycles, evacuates and recharges A/C refrigerant quickly, accurately and automatically. The unit has a display screen that contains the function controls and displays prompts that will lead the technician through the recover, recycle, evacuate and recharge operations. R-134a is recovered into and charged out of an internal storage vessel. The ACR 2000 automatically replenishes this vessel from an external source tank in order to maintain a constant 5.45-6.82 kg (12-15 lbs) of A/C refrigerant.
The ACR 2000 has a built in A/C refrigerant identifier that will test for contamination, prior to recovery and will notify the technician if there are foreign gases present in the A/C system. If foreign gases are present, the ACR 2000 will not recover the refrigerant from the A/C system.
The ACR 2000 also features automatic air purge, single pass recycling and an automatic oil drain.
Refer to the J 43600 ACR 2000 air conditioning service center ACR 2000 manual for operation and setup instruction. Always recharge the A/C System with the proper amount of R-134a. Refer to Refrigerant System Specifications for the correct amount.
A/C Refrigerant System Oil Charge Replenishing
If oil was removed from the A/C system during the recovery process or due to component replacement, the oil must be replenished. Oil can be injected into a charged system using J 45037 A/C oil injector. For the proper quantities of oil to add to the A/C refrigerant system, refer to Refrigerant System Specifications.
FLUSHING
Tools Required
- J 43600 ACR 2000 Air Conditioning Service Center
- J 45268 A/C Flushing Adapter Kit
- J 41447 Leak Detection Dye
- J 42220 R-134A A/C Tracer Dye - Box of 24
IMPORTANT: Flushing with the J 43600 ACR 2000 air conditioning service center is not intended to remove metal from the A/C system.
Flushing is intended to remove the following contaminants:
- Contaminated polyalkylene glycol (PAG) oil
- Desiccant, following a desiccant bag failure
- Overcharge of PAG oil
- Refrigerant contamination
1. Recover the refrigerant. Refer to Refrigerant Recovery and Recharging.
IMPORTANT: Warmer engine or ambient temperature decreases the refrigerant recovery time during the A/C flush procedure.
2. Remove the front thermal expansion valve (TXV). Refer to Air Conditioning Evaporator Thermal Expansion Valve Replacement.
3. Install the J 45268-121 in place of the TXV.
4. Remove the A/C compressor. Refer to Air Conditioning Compressor Replacement.
5. Install J 45268-5 to the discharge hose.
6. Install J 45268-4 to the suction hose.
7. Forward flow refrigerant flushing is recommended for contaminated refrigerant or PAG oil.
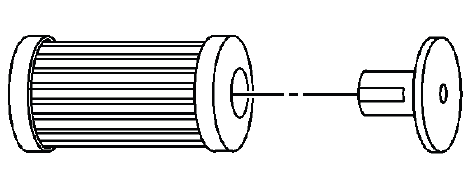
Fig. 1: View Of A/C Filter & Check Valve
Perform the following procedure:
- Service the filter with ACDelco P/N GF 470 before each flush.
IMPORTANT: The filter inside J 45268-1 is serviceable. Remove and discard the check valve from the filter.
- Connect J 45268-1 to the suction port of J 45268-4.
- Connect the blue hose from J 43600 ACR 2000 air conditioning service center to J 45268-1 flush filter adapter.
- Connect the red hose from J 43600 ACR 2000 air conditioning service center to J 45268-5 flush adapter.
8. Reverse flow refrigerant flushing is recommended for desiccant failure. Replace the desiccant when the A/C flush is complete and perform the following procedure:
- Service the filter with ACDelco P/N GF 470 before each flush.
IMPORTANT: The filter inside J 45268-1 is serviceable.
- Connect J 45268-1 to the discharge port of J 45268-5.
- Connect the blue hose from J 43600 ACR 2000 air conditioning service center to J 45268-1 flush filter adapter.
- Connect the red hose from J 43600 ACR 2000 air conditioning service center to the suction port of J 45268-4 flush adapter.
9. Flush the front A/C system. Follow the instructions supplied with the J 43600 ACR 2000 air conditioning service center.
IMPORTANT: Close the valve on the external refrigerant tank before starting the flush process.
10. If the vehicle is equipped with rear A/C, flush the auxiliary A/C system separately.
IMPORTANT: Flush the front A/C system before flushing the auxiliary A/C system.
- Remove J 45268-121 from the front evaporator.
- Inspect the front TXV for debris. Clean or replace as needed.
- Install the front TXV. Refer to Air Conditioning Evaporator Thermal Expansion Valve Replacement.
- Install J 45268-121 in place of the auxiliary TXV.
11. Flush the auxiliary A/C system. Follow the instructions supplied with J 43600 ACR 2000 air conditioning service center.
12. Remove J 45268-5 from the discharge hose.
13. Remove J 45268-4 from the suction hose.
14. If the removed A/C compressor is being reinstalled, perform the following procedure:
IMPORTANT: Flushing will remove all the PAG oil from the A/C system. The A/C system must be replenished with the correct amount of PAG oil.
- Drain the PAG oil from the A/C compressor.
Rotate the compressor input shaft to assist in draining the PAG oil from the compressor.
- Add the total system capacity of PAG oil to the A/C compressor. Refer to Refrigerant System Specifications.
15. If you will replace the A/C compressor after flushing the system, perform the following procedure:
- A new service compressor is shipped with PAG oil. Refer to the Refrigerant System Specifications.
- If the service compressor is shipped with PAG oil, DO NOT drain the new PAG oil from the compressor.
- Deduct the amount of PAG oil shipped with the service compressor from
the amount of PAG oil
listed in the capacities table. Refer to Refrigerant System Specifications.
Add the calculated amount to the compressor, as needed.
16. Add one bottle of J 41447 leak detection dye directly to the A/C compressor.
IMPORTANT: Flushing will remove the fluorescent leak detection dye from the A/C system.
17. Install the A/C compressor. Refer to Air Conditioning Compressor Replacement.
18. Remove J 45268-121.
19. Inspect the auxiliary TXV for debris. Clean or replace as needed.
20. Install the auxiliary TXV. Refer to Auxiliary Air Conditioning Evaporator Thermal Expansion Valve Replacement.
21. Evacuate and recharge the A/C system. Refer to Refrigerant Recovery and Recharging.
22. Leak test the fittings using J 42220 R-134A A/C Tracer Dye - Box of 24.
AIR CONDITIONING COMPRESSOR OIL BALANCING
Draining Procedure
1. Drain the oil from both the suction and discharge ports of the removed compressor into a clean, graduated container.
IMPORTANT: Drain and measure as much of the refrigerant oil as possible from the removed compressor.
Rotate the compressor shaft to assist in draining the compressor.
2. Measure and record the amount of oil drained from the removed compressor.
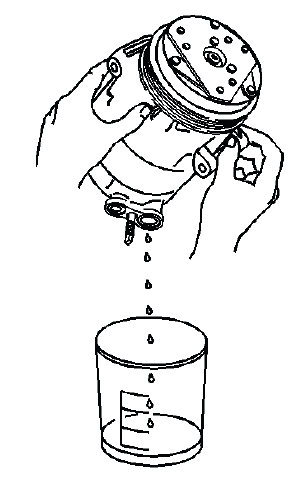
Fig. 2: Draining A/C Refrigerant Oil From Compressor
This measurement will be used during installation of the replacement compressor.
3. Inspect the oil drained from the compressor. Refer to Air Conditioning Compressor Oil Diagnosis.
4. Properly discard the used refrigerant oil.
Balancing Procedure
1. The replacement compressor is shipped with 74 ml (2.5 oz) of refrigerant oil.
IMPORTANT: The refrigerant oil in the A/C system must be balanced during compressor replacement.
2. Compare the amount of refrigerant oil recorded during compressor removal to the amount of refrigerant oil shipped in the replacement compressor.
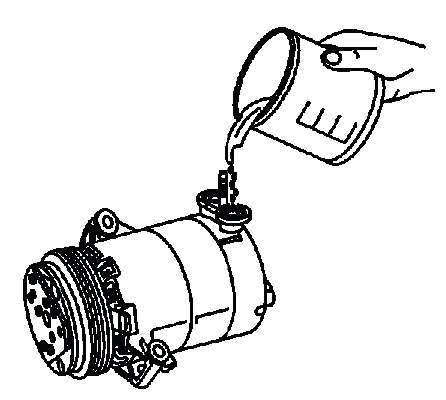
Fig. 3: Replacing Measured Compressor Oil
If the amount of refrigerant oil drained and recorded from the removed compressor is:
- Less than 74 ml (2.5 oz)
Leave the 74 ml (2.5 oz) in the replacement compressor.
- More than 74 ml (2.5 oz)
Add to the compressor the difference between the 74 ml (2.5 oz) and the amount drained.
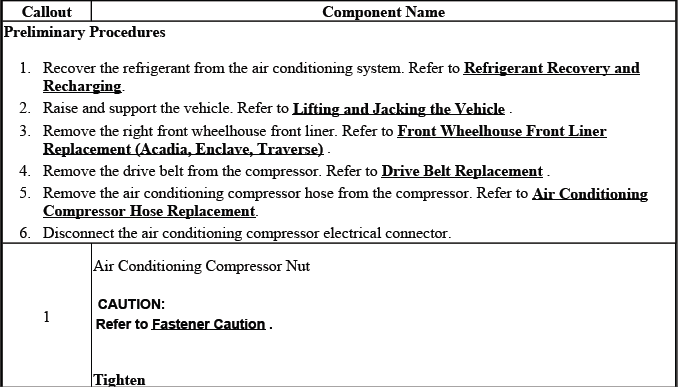
AIR CONDITIONING COMPRESSOR REPLACEMENT
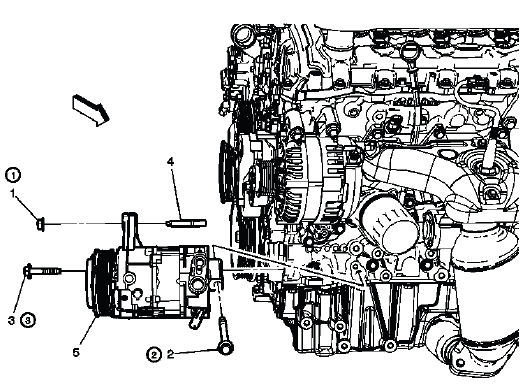
Fig. 4: Air Conditioning Compressor
Air Conditioning Compressor Replacement
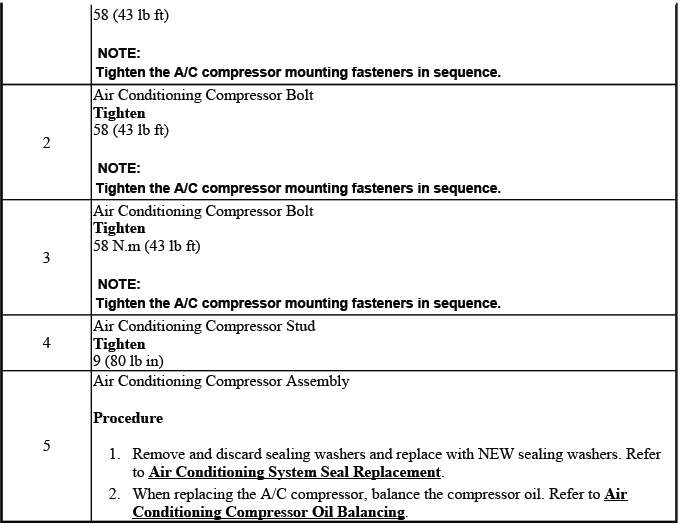
AIR CONDITIONING CLUTCH ASSEMBLY REPLACEMENT
Fig. 5: Air Conditioning Clutch Assembly Components (With V4U)
Air Conditioning Clutch Assembly Replacement
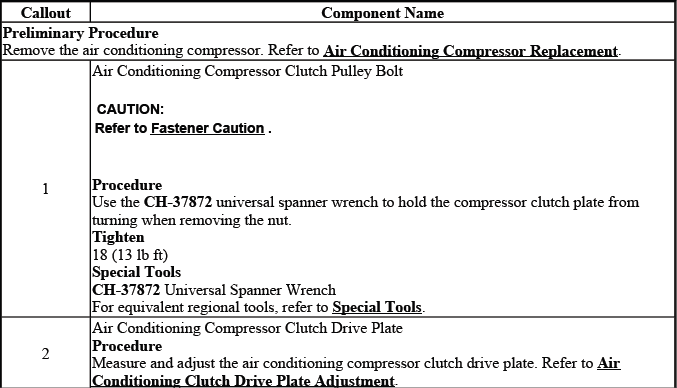

AIR CONDITIONING CLUTCH DRIVE PLATE ADJUSTMENT
1. Install the air conditioning clutch plate assembly (2).
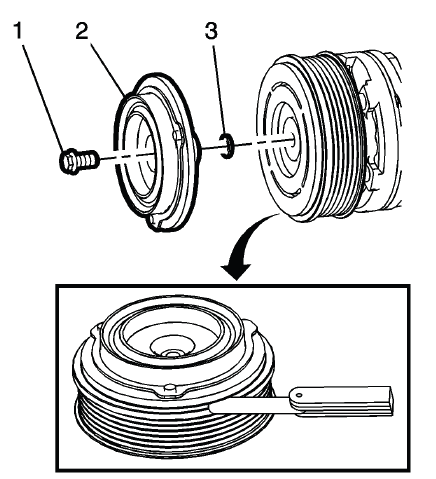
Fig. 6: AC Clutch Plate Assembly, Clutch Pulley Bolt And Shims
2. Measure the air gap between the pulley and the drive plate. Adjust the shims (3) to achieve a 0.21-0.55 mm (0.008-0.022 in) air gap.
NOTE: Ensure the drive plate does not drag against the pulley when the pulley is rotated.
3. Install the air conditioning compressor clutch pulley bolt (1) and tighten to 18 N.m (13 lb ft).
CAUTION: Refer to Fastener Caution.
AIR CONDITIONING SYSTEM SEAL REPLACEMENT
Removal Procedure
1. Remove the seal washer from the A/C refrigerant component.
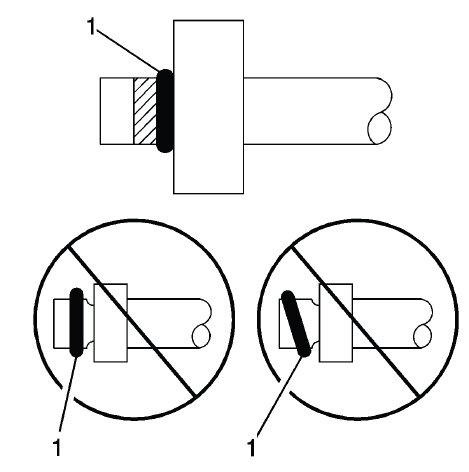
Fig. 7: Identifying Good & Bad Sealing Washer Positions
2. Inspect the seal washer for any signs of damage.
3. Inspect the A/C refrigerant components for damage or burrs. Repair if necessary.
4. Discard the sealing washer.
IMPORTANT: DO NOT reuse sealing washer.
Installation Procedure
1. Inspect the new seal washer for any signs of cracks, cuts or damage.
IMPORTANT: Flat washer type seals do not require lubrication.
Do not use a damaged seal washer.
2. Using a lint-free clean, dry cloth, clean the sealing surfaces of the A/C refrigerant components.
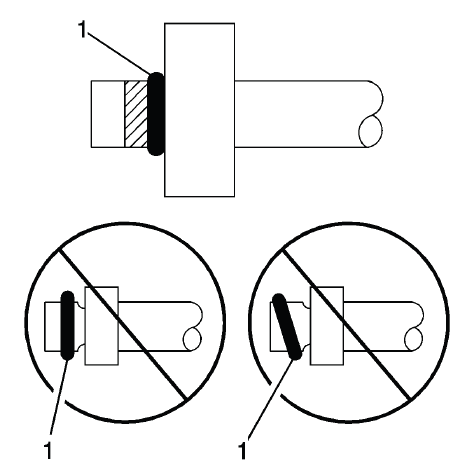
Fig. 8: Identifying Good & Bad Sealing Washer Positions
3. Carefully install the new seal washer onto the A/C refrigerant component.
4. The washer must completely bottom against the surface of the fitting.
5. Assemble the remaining A/C refrigerant components. Refer to the appropriate repair procedure.
IMPORTANT: After tightening the A/C components, there should be a slight sealing washer gap of approximately 1.2 mm (3/64 in) between the A/C line and the A/C component.
AIR CONDITIONING O-RING SEAL REPLACEMENT
Removal Procedure
1. Disassemble the A/C refrigerant components. Refer to the appropriate repair procedure
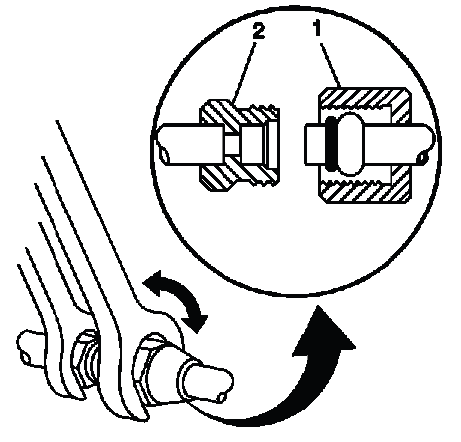
Fig. 9: Disassembling/Reassembling A/C Line Fittings
- For compression style fittings use a back up wrench on the fitting (2) and loosen the fitting nut (1).
- For banjo style fittings remove the bolt retaining the banjo type fitting.
2. Remove the O-ring seal from the A/C refrigerant component.
3. Inspect the O-ring seal for signs of damage.
4. Inspect the A/C refrigerant components for damage or burrs. Repair if necessary.
5. Discard the O-ring seal.
Installation Procedure
1. Inspect the new O-ring seal for any sign or cracks, cuts or damage. Replace if necessary.
2. Using a lint-free clean, dry cloth, carefully clean the sealing surfaces of the A/C refrigerant components.
3. Lightly coat the new O-ring seal with mineral base 525 viscosity refrigerant oil.
IMPORTANT: DO NOT allow any of the mineral base 525 viscosity refrigerant oil on the new O-ring seal to enter the refrigerant system.
4. Carefully slide the new O-ring seal onto the A/C refrigerant component.
IMPORTANT: DO NOT reuse O-ring seals.
5. The O-ring seal must be fully seated.
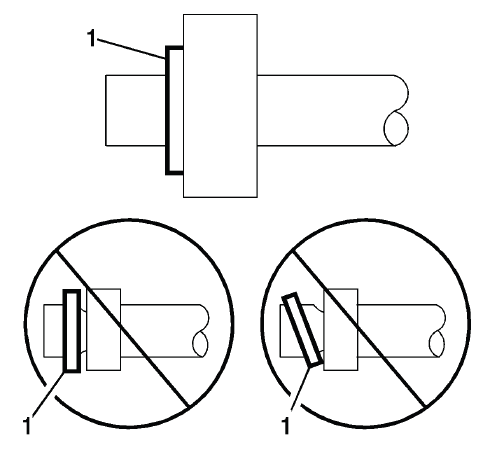
Fig. 10: Identifying Proper Seating Of A/C Refrigerant O-Ring
6. Assemble the A/C components.

Fig. 11: Disassembling/Reassembling A/C Line Fittings
Refer to the appropriate repair procedure.
- For compression style fittings use a back up wrench on the fitting (2) and tighten the fitting nut (1) to specification.
- For banjo style fittings install the bolt retaining the banjo type fitting and tighten to specification.
AIR CONDITIONING COMPRESSOR HOSE REPLACEMENT
Removal Procedure
1. Remove the front compartment front sight shield. Refer to Front Compartment Front Sight Shield Replacement (Enclave) , Front Compartment Front Sight Shield Replacement (Traverse) , Front Compartment Front Sight Shield Replacement (Acadia).
2. Recover the refrigerant from the A/C system. Refer to Refrigerant Recovery and Recharging.
3. Remove the coolant recovery reservoir. Refer to Coolant Recovery Reservoir Replacement.
4. Remove the air conditioning compressor hose nut (1) at the air conditioning refrigerant heat exchange.

Fig. 12: Air Conditioning Compressor Hose Nut
5. Remove the air conditioning compressor hose (2) from air conditioning refrigerant heat exchange.
6. Remove and discard the sealing washer (3).
7. Remove the air conditioning compressor hose nut (1) at the compressor.
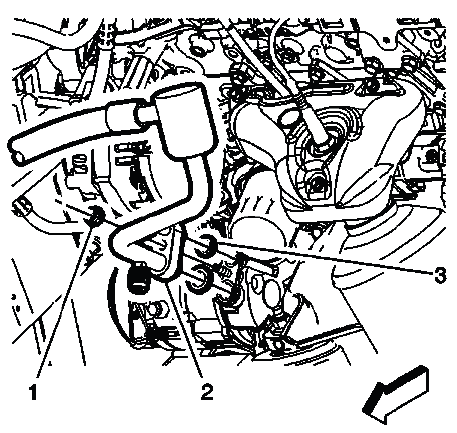
Fig. 13: Compressor Hose Nut And Compressor
8. Remove the air conditioning compressor hose (2) from the compressor.
9. Remove and discard the sealing washers (3).
10. Raise and support the vehicle. Refer to Lifting and Jacking the Vehicle.
11. Remove the front bumper fascia. Refer to Front Bumper Fascia Replacement (Acadia) , Front Bumper Fascia Replacement (Enclave) , Front Bumper Fascia Replacement (Traverse).
12. Remove the air conditioning compressor hose nut (1) at the condenser.
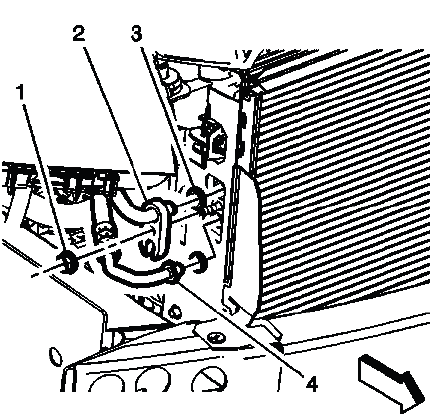
Fig. 14: Air Conditioning Compressor Hose And Condenser
13. Remove the air conditioning compressor hose (2) from the condenser.
14. Remove and discard the sealing washer (3).
15. Remove the air conditioning refrigerant heat exchange from the condenser (4).
16. Remove and discard the sealing washer (3).
17. Remove the air conditioning compressor hose (1) from to top of the vehicle.
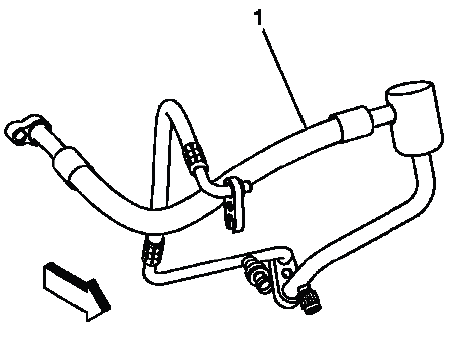
Fig. 15: Air Conditioning Compressor Hose
Installation Procedure
1. Install NEW sealing washers (3) to the air conditioning compressor hose and the air conditioning refrigerant heat exchange (4). Refer to Air Conditioning System Seal Replacement.
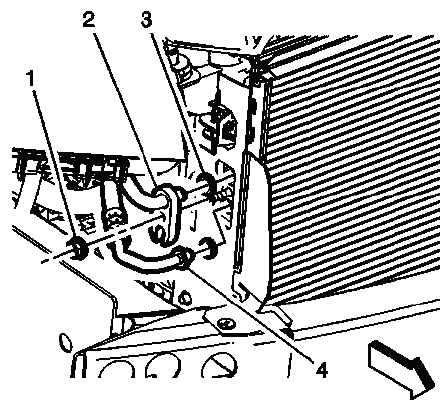
Fig. 16: Air Conditioning Compressor Hose And Condenser
2. Install the air conditioning refrigerant heat exchange to the condenser (4).
3. Install the air conditioning compressor hose (2) to the condenser.
4. Install the air conditioning compressor hose nut (1) at the condenser and tighten to 22 N.m (16 lb ft).
CAUTION: Refer to Fastener Caution.
5. Install the front bumper fascia. Refer to Front Bumper Fascia Replacement (Acadia) , Front Bumper Fascia Replacement (Enclave) , Front Bumper Fascia Replacement (Traverse).
6. Lower the vehicle.
7. Install NEW sealing washers (3) to the air conditioning compressor hose. Refer to Air Conditioning System Seal Replacement.
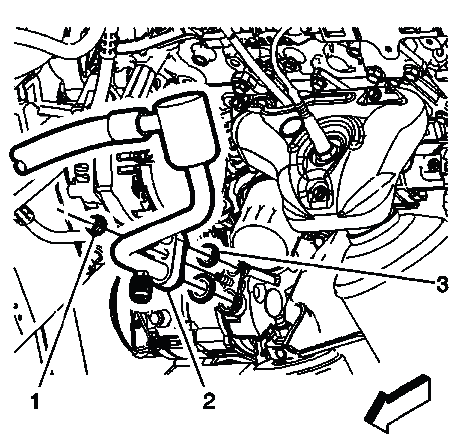
Fig. 17: Compressor Hose Nut And Compressor
8. Install the air conditioning compressor hose (2) to the compressor.
9. Install the air conditioning compressor hose nut (1) at compressor and tighten to 22 N.m (16 lb ft).
10. Install NEW sealing washers (3) to the air conditioning compressor hose. Refer to Air Conditioning System Seal Replacement.
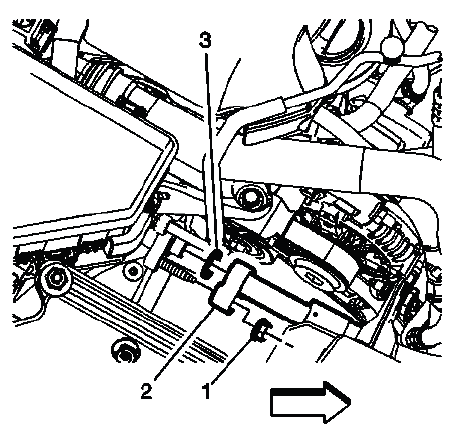
Fig. 18: Air Conditioning Compressor Hose Nut
11. Install the air conditioning compressor hose (2) to the air conditioning refrigerant heat exchange.
12. Install the air conditioning compressor hose nut (1) to air conditioning refrigerant heat exchange and tighten to 22 N.m (16 lb ft).
13. Install the coolant recovery reservoir. Refer to Coolant Recovery Reservoir Replacement.
14. Evacuate and charge the A/C system. Refer to Refrigerant Recovery and Recharging.
15. Install the front compartment front sight shield. Refer to Front Compartment Front Sight Shield Replacement (Enclave) , Front Compartment Front Sight Shield Replacement (Traverse) , Front Compartment Front Sight Shield Replacement (Acadia).
AIR CONDITIONING REFRIGERANT HEAT EXCHANGER REPLACEMENT
Removal Procedure
1. Remove the front compartment front sight shield. Refer to Front Compartment Front Sight Shield Replacement (Enclave) , Front Compartment Front Sight Shield Replacement (Traverse) , Front Compartment Front Sight Shield Replacement (Acadia).
2. Remove the fuel injector sight shield. Refer to Fuel Injector Sight Shield Replacement.
3. Recover the refrigerant from the air conditioning system. Refer to Refrigerant Recovery and Recharging.
4. Remove the coolant recovery reservoir. Refer to Coolant Recovery Reservoir Replacement.
5. Remove the air cleaner outlet duct. Refer to Air Cleaner Outlet Duct Replacement.
6. Reposition the power brake booster vacuum hose out of the way. Refer to Power Brake Booster Vacuum Check Valve and Hose Replacement.
7. Remove the engine strut mount-right side. Refer to Engine Mount Strut Replacement - Right Side.
8. Remove the air conditioning compressor hose nut (1) at the air conditioning refrigerant heat exchanger.
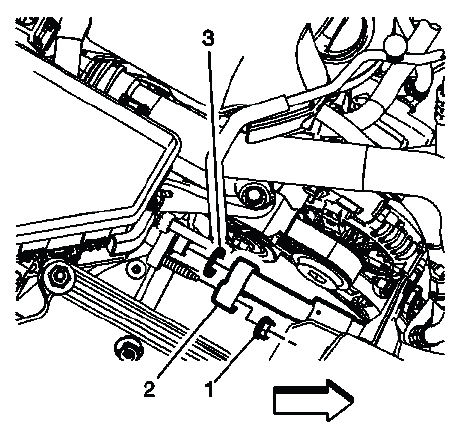
Fig. 19: Air Conditioning Compressor Hose Nut
9. Remove the air conditioning compressor hose (2) from air conditioning refrigerant heat exchanger.
10. Remove and discard the sealing washer (3).
11. Raise and support the vehicle. Refer to Lifting and Jacking the Vehicle.
12. Remove the front bumper fascia. Refer to Front Bumper Fascia Replacement (Acadia) , Front Bumper Fascia Replacement (Enclave) , Front Bumper Fascia Replacement (Traverse).
13. Remove the air conditioning compressor hose nut (1) at the air conditioning condenser.
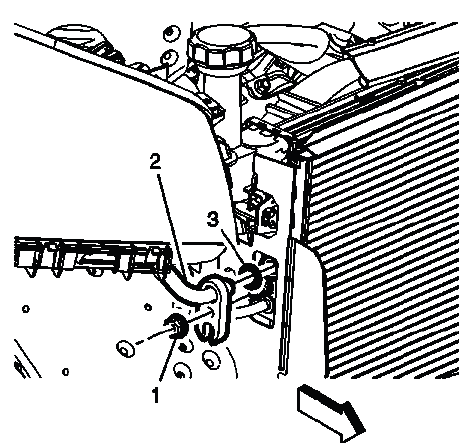
Fig. 20: Air Conditioning Compressor Hose Nut And Air Conditioning Condenser
14. Remove the air conditioning compressor hose (2) from the air conditioning condenser.
15. Remove and discard the sealing washer (3).
16. Remove the air conditioning refrigerant heat exchanger (1) from the air conditioning condenser.
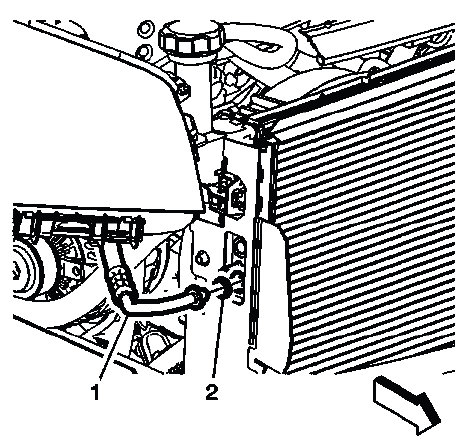
Fig. 21: Refrigerant Heat Exchanger And Washer
17. Remove and discard the sealing washer (2).
18. Lower the vehicle.
19. Remove the air conditioning refrigerant heat exchanger nuts (1) from the air conditioning refrigerant heat exchanger (3) at the auxiliary air conditioning evaporator tubes.
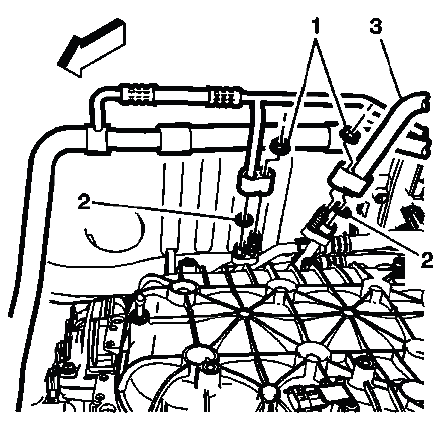
Fig. 22: Refrigerant Heat Exchanger And Auxiliary Air Conditioning Evaporator
Tubes
20. Remove the air conditioning refrigerant heat exchanger from the auxiliary air conditioning evaporator tubes.
21. Remove and discard the sealing washers (2).
22. Remove the air conditioning refrigerant heat exchanger nut (1) from the air conditioning refrigerant heat exchanger (3) at the air conditioning evaporator thermal expansion valve.
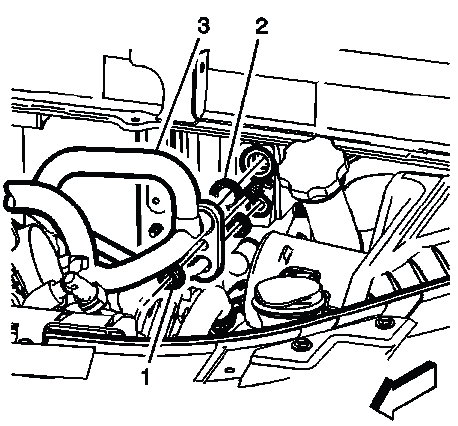
Fig. 23: Air Conditioning Refrigerant Heat Exchanger Nut
23. Remove the air conditioning refrigerant heat exchanger (3) from the air conditioning evaporator thermal expansion valve.
24. Remove and discard the sealing washers (2).
25. Remove the air conditioning refrigerant heat exchanger fasteners (1) from the air conditioning refrigerant heat exchanger (2).
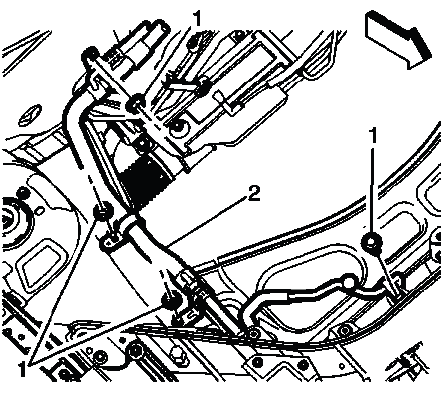
Fig. 24: Air Conditioning Refrigerant Heat Exchanger And Fasteners
26. Remove the air conditioning refrigerant heat exchanger (1) from to top of the vehicle.
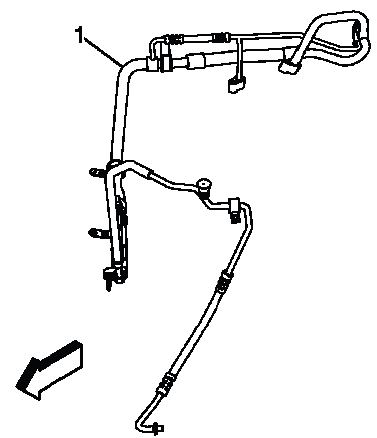
Fig. 25: Refrigerant Heat Exchanger
Installation Procedure
1. Install NEW sealing washers to the air conditioning refrigerant heat exchanger (1). Refer to Air Conditioning System Seal Replacement.

Fig. 26: Refrigerant Heat Exchanger
2. Install the air conditioning refrigerant heat exchanger (1) to the vehicle.
3. Install the air conditioning refrigerant heat exchanger fasteners (1) to the vehicle and tighten to 9 (80 lb in).
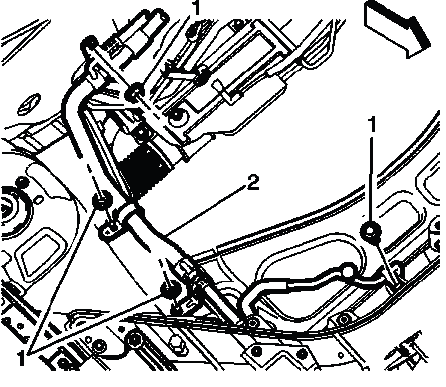
Fig. 27: Air Conditioning Refrigerant Heat Exchanger And Fasteners
CAUTION: Refer to Fastener Caution.
4. Install NEW sealing washers (2) to the air conditioning refrigerant heat exchanger (3). Refer to Air Conditioning System Seal Replacement.
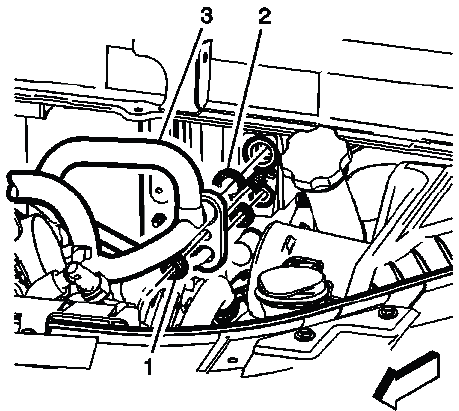
Fig. 28: Air Conditioning Refrigerant Heat Exchanger Nut
5. Install the air conditioning refrigerant heat exchanger (3) to the air conditioning evaporator thermal expansion valve.
6. Install the air conditioning refrigerant heat exchanger nut (1) to the air conditioning evaporator thermal expansion valve and tighten to 22 (16 lb ft).
7. Install NEW sealing washers (2) to the air conditioning refrigerant heat exchanger. Refer to Air Conditioning System Seal Replacement.
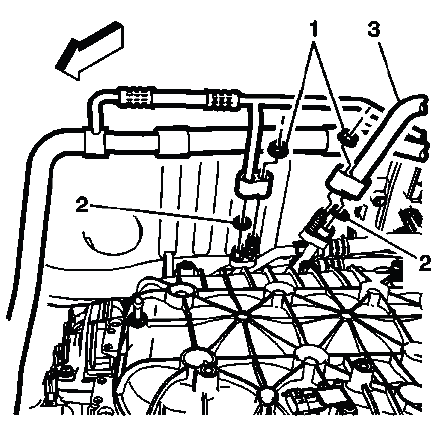
Fig. 29: Refrigerant Heat Exchanger And Auxiliary Air Conditioning Evaporator
Tubes
8. Install the air conditioning refrigerant heat exchanger (3) to the auxiliary air conditioning evaporator tubes.
9. Install the air conditioning refrigerant heat exchanger nuts (1) to the auxiliary air conditioning evaporator tubes and tighten to 22 (16 lb ft).
10. Raise and support the vehicle. Refer to Air Cleaner Assembly Replacement.
11. Install NEW sealing washers (2) to the air conditioning refrigerant heat exchanger (1). Refer to Air Conditioning System Seal Replacement.
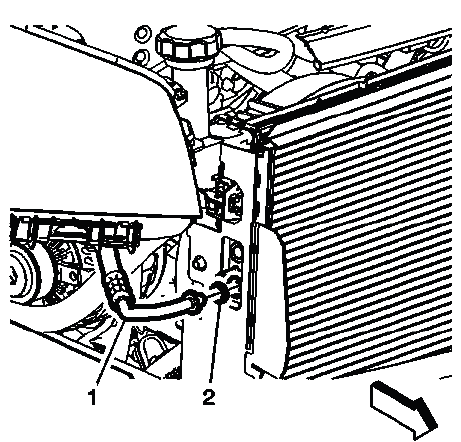
Fig. 30: Refrigerant Heat Exchanger And Washer
12. Install the air conditioning refrigerant heat exchanger (1) to the air conditioning condenser.
13. Install NEW sealing washers (3) to the air conditioning compressor hose (2). Refer to Air Conditioning System Seal Replacement.
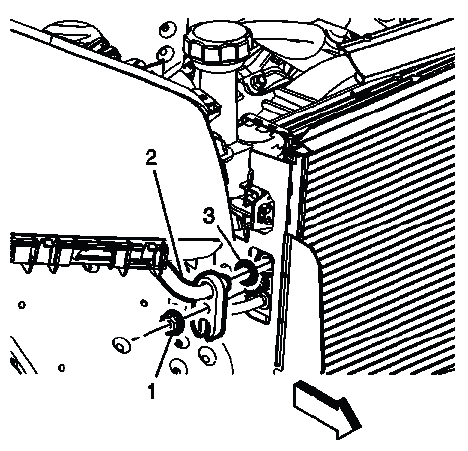
Fig. 31: Air Conditioning Compressor Hose Nut And Air Conditioning Condenser
14. Install the air conditioning compressor hose (2) to the air conditioning condenser.
15. Install the air conditioning compressor hose nut (1) to the air conditioning condenser and tighten to 22 (16 lb ft).
16. Install the front bumper fascia. Refer to Front Bumper Fascia Replacement (Acadia) , Front Bumper Fascia Replacement (Enclave) , Front Bumper Fascia Replacement (Traverse).
17. Lower the vehicle.
18. Install NEW sealing washers (3) to the air conditioning refrigerant heat exchanger. Refer to Air Conditioning System Seal Replacement.
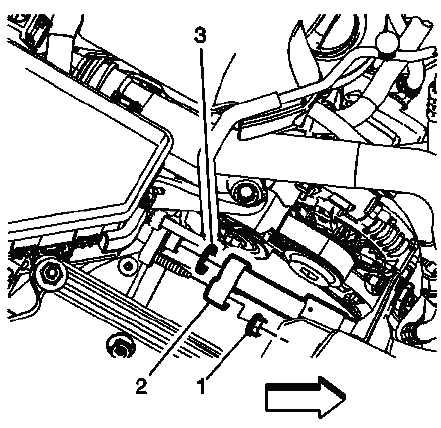
Fig. 32: Air Conditioning Compressor Hose Nut
19. Install the air conditioning compressor hose (2) to the air conditioning refrigerant heat exchanger.
20. Install the air conditioning compressor hose nut (1) to air conditioning refrigerant heat exchanger and tighten to 22 N.m (16 lb ft).
21. Install the engine strut mount-right side. Refer to Engine Mount Strut Replacement - Right Side.
22. Reposition the power brake booster vacuum hose to the vehicle. Refer to Power Brake Booster Vacuum Check Valve and Hose Replacement.
23. Install the air cleaner outlet duct. Refer to Air Cleaner Outlet Duct Replacement.
24. Install the coolant recovery reservoir. Refer to Coolant Recovery Reservoir Replacement.
25. Evacuate and charge the air conditioning system. Refer to Refrigerant Recovery and Recharging.
26. Install the fuel injector sight shield. Refer to Fuel Injector Sight Shield Replacement.
27. Install the front compartment front sight shield. Refer to Front Compartment Front Sight Shield Replacement (Enclave) , Front Compartment Front Sight Shield Replacement (Traverse) , Front Compartment Front Sight Shield Replacement (Acadia).
AIR CONDITIONING (AC) REFRIGERANT FILTER REPLACEMENT
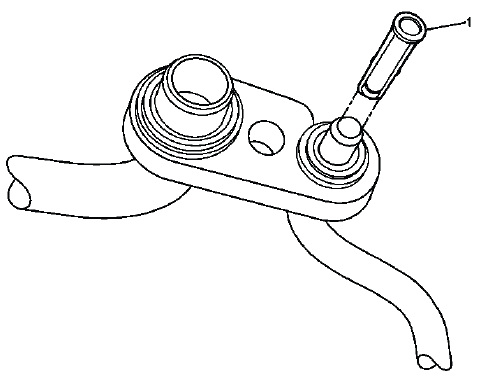
Fig. 33: Locating Air Conditioning (AC) Refrigerant Filter (Auxiliary)
Air Conditioning (AC) Refrigerant Filter Replacement

AIR CONDITIONING REFRIGERANT SERVICE VALVE CORE REPLACEMENT
Special Tools
- GE 50078 Electronic Leak Detector
- GE 46246 Valve Core Tool
For equivalent regional tools. Refer to Special Tools.
Removal Procedure
1. Recover the refrigerant from the A/C system. Refer to Refrigerant Recovery and Recharging.
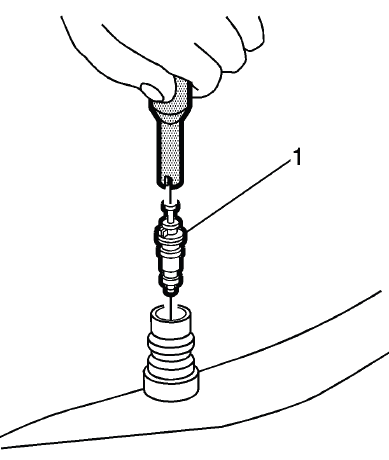
Fig. 34: Valve Core
2. Using the GE 46246 Valve Core Tool, remove the valve core (1) from the service port.
Installation Procedure
1. Install the valve core (1) to the service port.
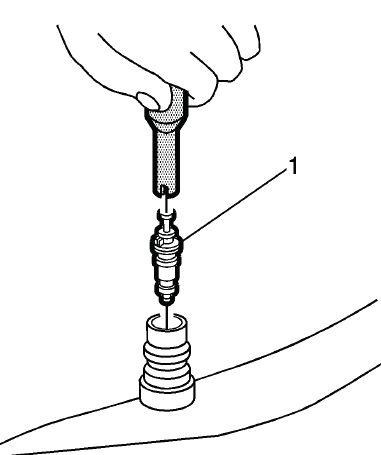
Fig. 35: Valve Core
CAUTION: Refer to Fastener Caution.
2. Using the GE 46246 Valve Core Tool, tighten the valve core.
3. Evacuate and recharge the A/C system. Refer to Refrigerant Recovery and Recharging.
4. Leak test the fittings of the component using GE 50078 Electronic Leak Detector.
AIR CONDITIONING REFRIGERANT DESICCANT REPLACEMENT

Fig. 36: Air Conditioning Refrigerant Desiccant
Air Conditioning Refrigerant Desiccant Replacement
AIR CONDITIONING EVAPORATOR THERMAL EXPANSION VALVE REPLACEMENT
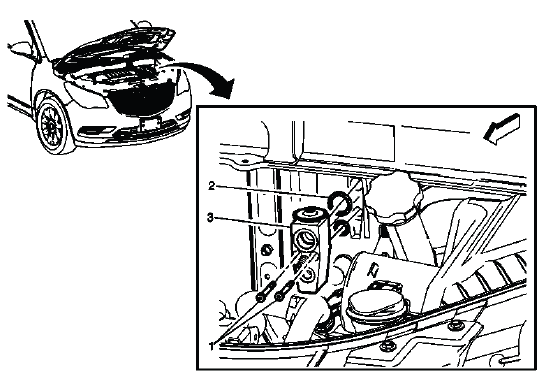
Fig. 37: Air Conditioning Evaporator Thermal Expansion Valve
Air Conditioning Evaporator Thermal Expansion Valve Replacement

AIR CONDITIONING (A/C) REFRIGERANT PRESSURE SENSOR REPLACEMENT
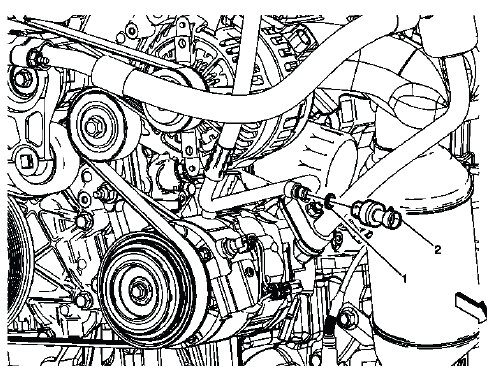
Fig. 38: Air Conditioning (A/C) Refrigerant Pressure Sensor
Air Conditioning (A/C) Refrigerant Pressure Sensor Replacement

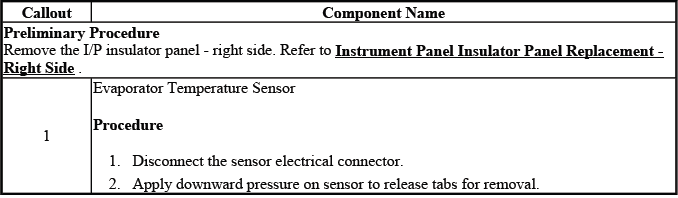
EVAPORATOR AIR TEMPERATURE SENSOR REPLACEMENT
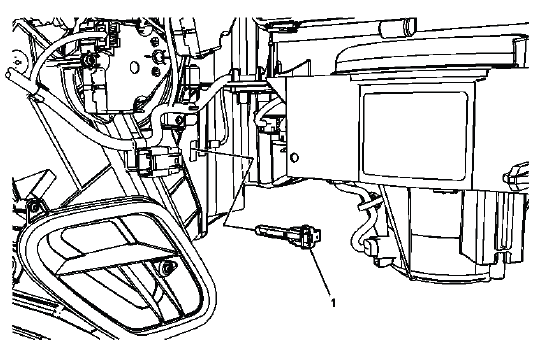
Fig. 39: View Of Evaporator Temperature Sensor
Evaporator Air Temperature Sensor Replacement
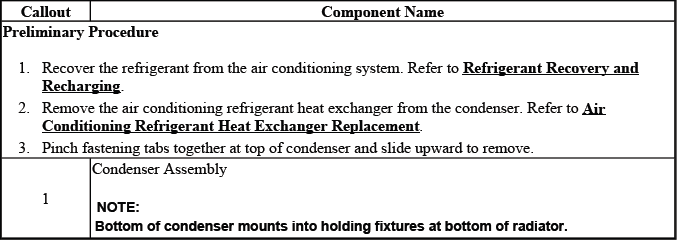
AIR CONDITIONING CONDENSER REPLACEMENT
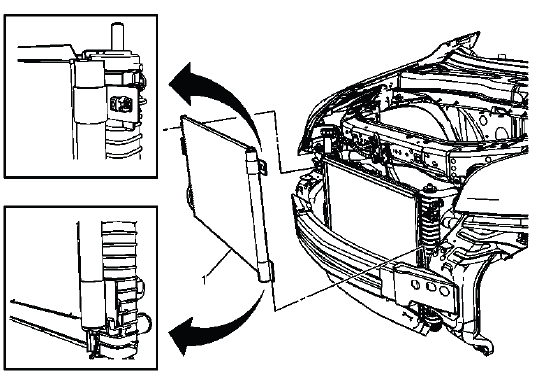
Fig. 40: Air Conditioning Condenser
Air Conditioning Condenser Replacement
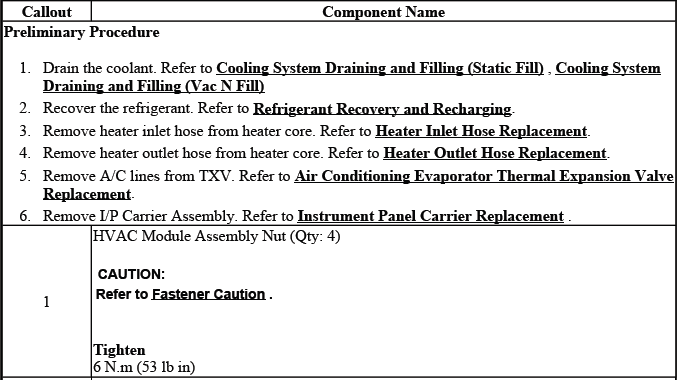
AIR CONDITIONING AND HEATER MODULE ASSEMBLY REMOVAL AND INSTALLATION
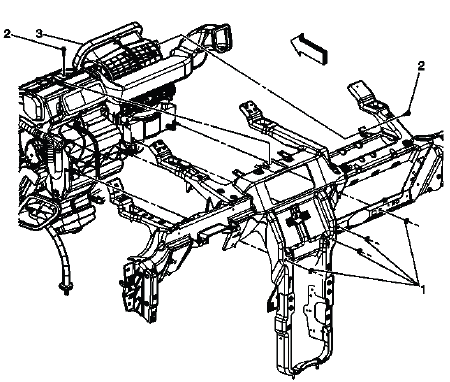
Fig. 41: Identifying HVAC Module Assembly
Air Conditioning and Heater Module Assembly Removal and Installation

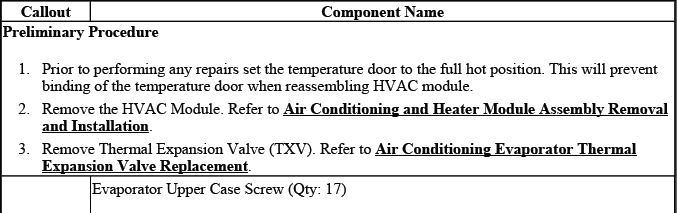
AIR CONDITIONING EVAPORATOR CORE REPLACEMENT
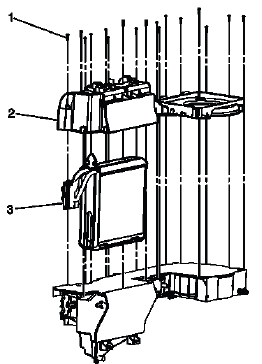
Fig. 42: Identifying Air Conditioning Evaporator Core
Air Conditioning Evaporator Core Replacement
AIR CONDITIONING EVAPORATOR AND BLOWER MODULE DRAIN HOSE REPLACEMENT
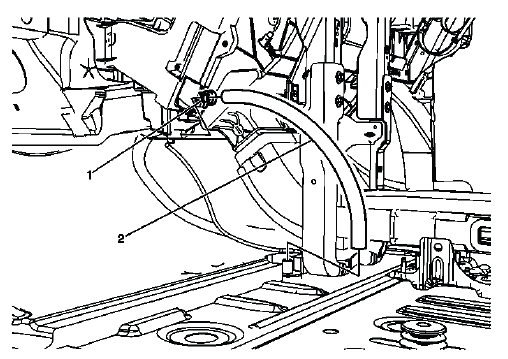
Fig. 43: View Of Air Conditioning Evaporator & Blower Module Drain Hose
Air Conditioning Evaporator and Blower Module Drain Hose Replacement


HEATER INLET HOSE REPLACEMENT
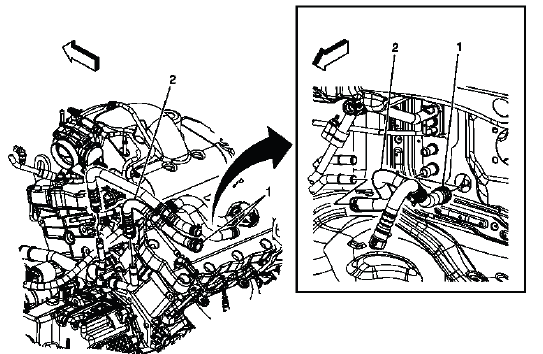
Fig. 44: View Of Heater Inlet Hose
Heater Inlet Hose Replacement
HEATER OUTLET HOSE REPLACEMENT
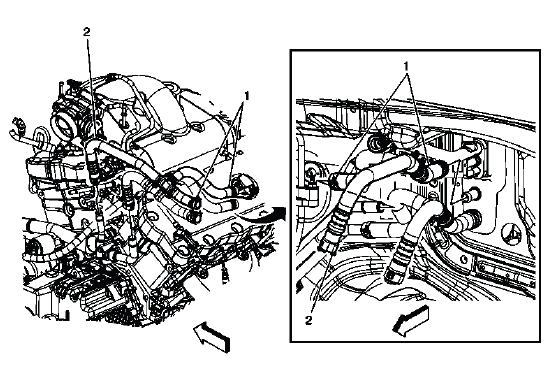
Fig. 45: Identifying Heater Outlet Hose
Heater Outlet Hose Replacement
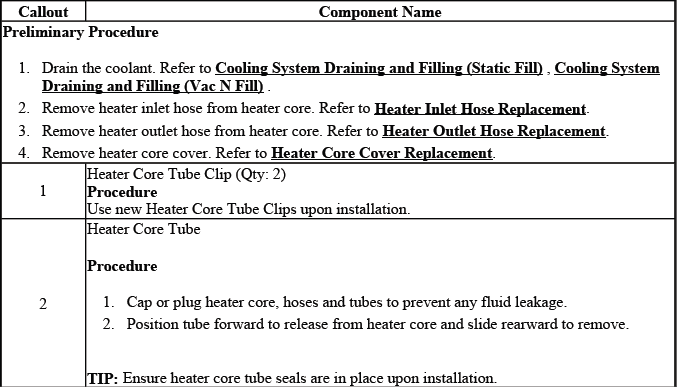
HEATER CORE TUBE REPLACEMENT

Fig. 46: View Of Heater Core Tube
Heater Core Tube Replacement
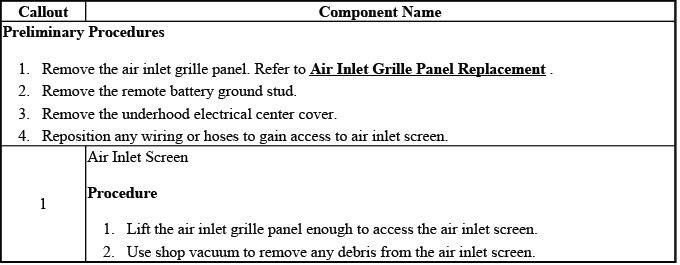
AIR INLET SCREEN CLEANING
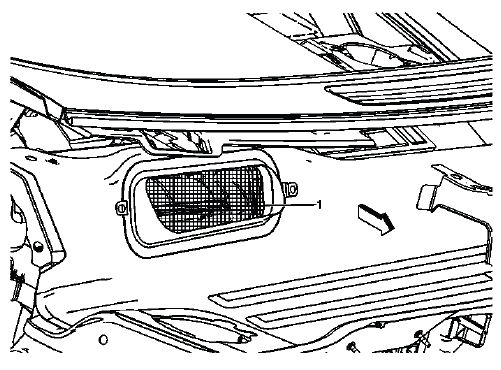
Fig. 47: Identifying Air Inlet Screen
Air Inlet Screen Cleaning
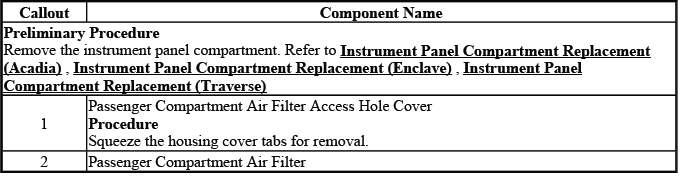
PASSENGER COMPARTMENT AIR FILTER HOUSING REPLACEMENT
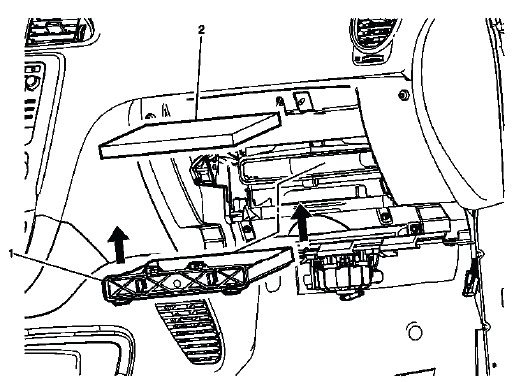
Fig. 48: Passenger Compartment Air Filter Housing
Passenger Compartment Air Filter Housing Replacement
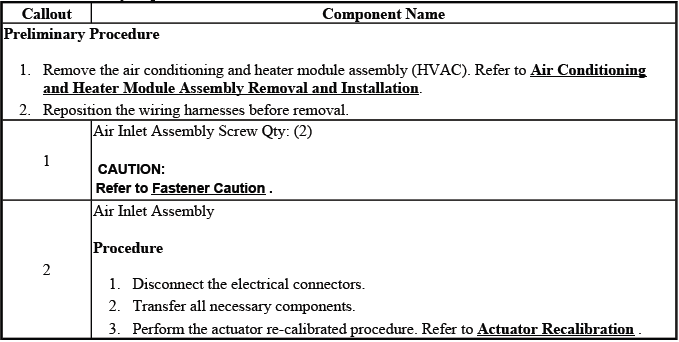
AIR INLET ASSEMBLY REPLACEMENT
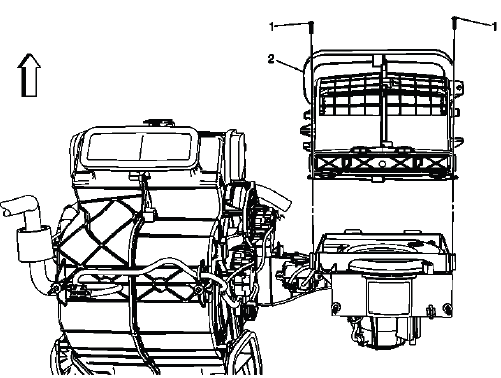
Fig. 49: Locating Air Distributor Case
Air Inlet Assembly Replacement
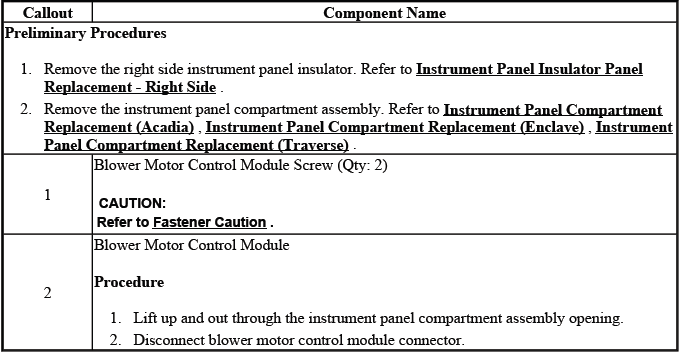
BLOWER MOTOR CONTROL MODULE REPLACEMENT
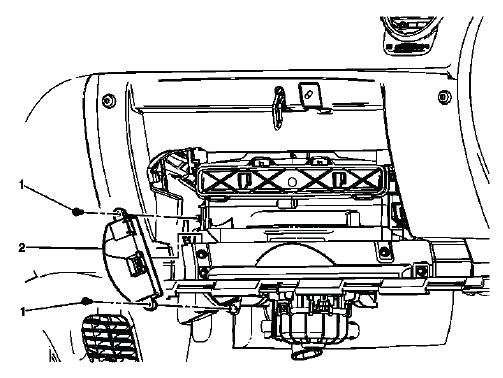
Fig. 50: Blower Motor Control Module
Blower Motor Control Module Replacement
BLOWER MOTOR REPLACEMENT
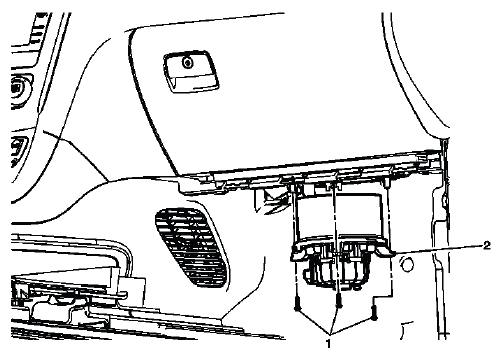
Fig. 51: Blower Motor
Blower Motor Replacement
SIDE WINDOW DEFOGGER OUTLET GRILLE REPLACEMENT - LEFT SIDE (ACADIA)
Fig. 52: Side Window Defogger Outlet Grille - Left Side (Acadia)
Side Window Defogger Outlet Grille Replacement - Left Side (Acadia)

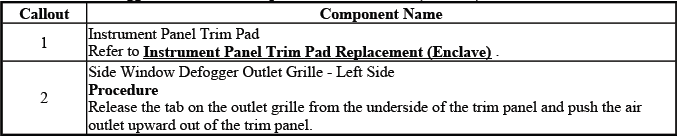
SIDE WINDOW DEFOGGER OUTLET GRILLE REPLACEMENT - LEFT SIDE (ENCLAVE)
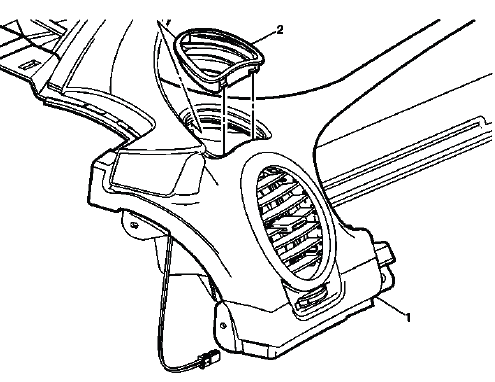
Fig. 53: Side Window Defogger Outlet Grille - Left Side (Enclave)
Side Window Defogger Outlet Grille Replacement - Left Side (Enclave)
SIDE WINDOW DEFOGGER OUTLET GRILLE REPLACEMENT - LEFT SIDE (TRAVERSE)
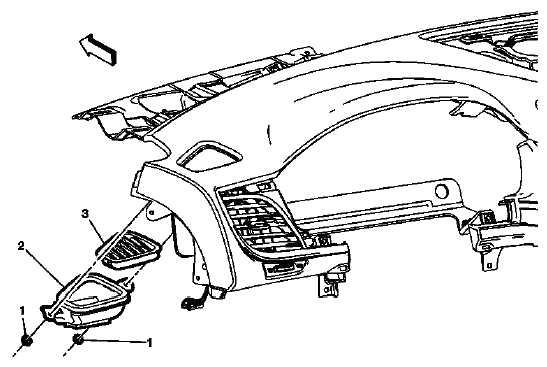
Fig. 54: Side Window Defogger Outlet Grille - Left Side (Traverse)
Side Window Defogger Outlet Grille Replacement - Left Side (Traverse)
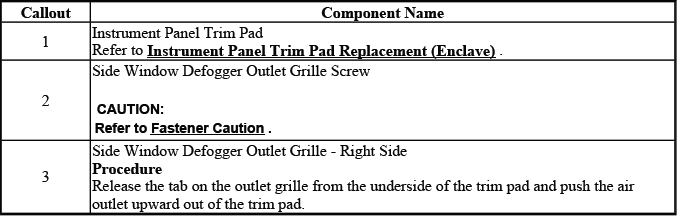
SIDE WINDOW DEFOGGER OUTLET GRILLE REPLACEMENT - RIGHT SIDE (ACADIA)
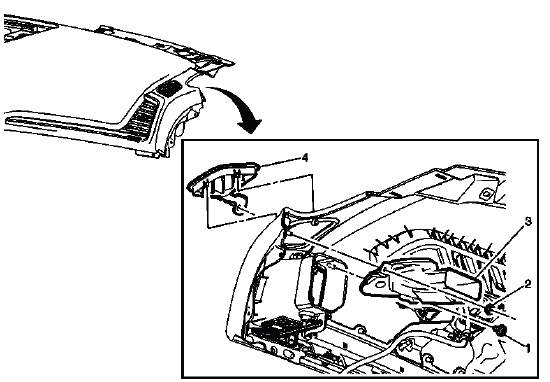
Fig. 55: Side Window Defogger Outlet Grille - Right Side (Acadia)
Side Window Defogger Outlet Grille Replacement - Right Side (Acadia)
SIDE WINDOW DEFOGGER OUTLET GRILLE REPLACEMENT - RIGHT SIDE (ENCLAVE)
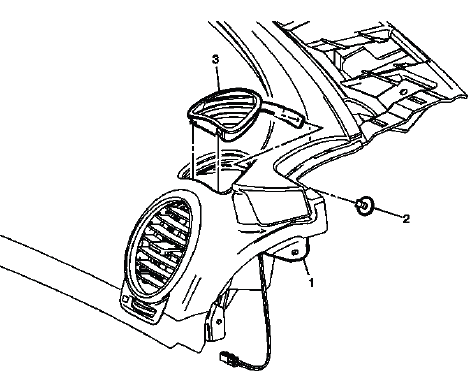
Fig. 56: Side Window Defogger Outlet Grille - Right Side (Enclave)
Side Window Defogger Outlet Grille Replacement - Right Side (Enclave)
SIDE WINDOW DEFOGGER OUTLET GRILLE REPLACEMENT - RIGHT SIDE (TRAVERSE)

Fig. 57: Side Window Defogger Outlet Grille - Right Side (Traverse)
Side Window Defogger Outlet Grille Replacement - Right Side (Traverse)
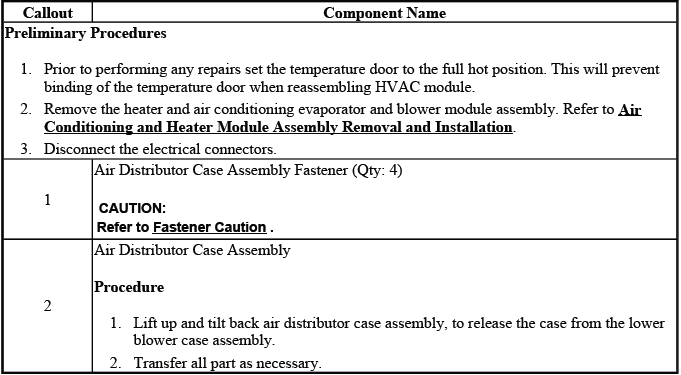
AIR DISTRIBUTOR CASE REPLACEMENT
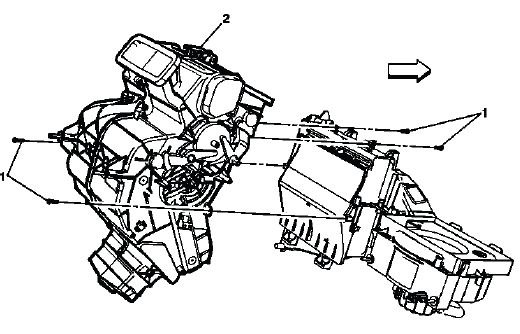
Fig. 58: Air Distributor Case
Air Distributor Case Replacement
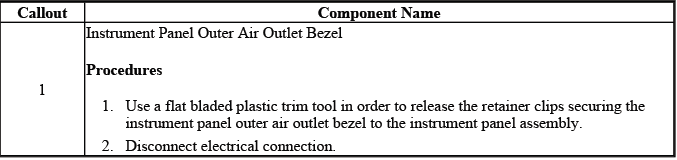
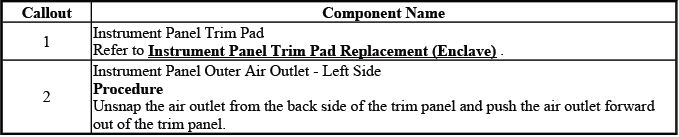
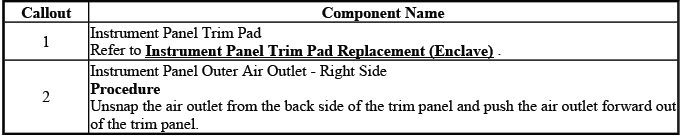
INSTRUMENT PANEL OUTER AIR OUTLET BEZEL REPLACEMENT (ENCLAVE)
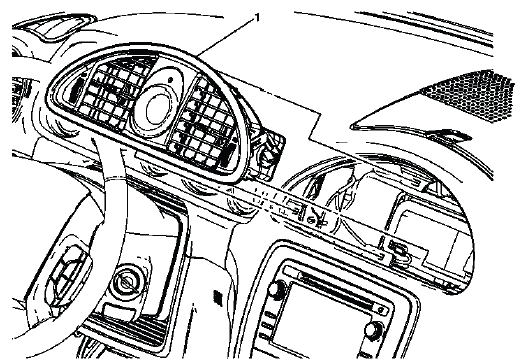
Fig. 59: Instrument Panel Outer Air Outlet Bezel (Enclave)
Instrument Panel Outer Air Outlet Bezel Replacement (Enclave)
INSTRUMENT PANEL OUTER AIR OUTLET REPLACEMENT - LEFT SIDE (ACADIA)
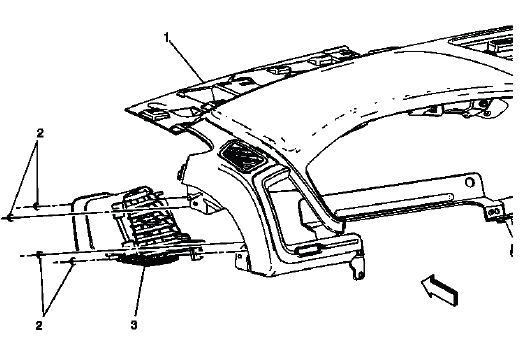
Fig. 60: Instrument Panel Outer Air Outlet - Left Side (Acadia)
Instrument Panel Outer Air Outlet Replacement - Left Side (Acadia)

INSTRUMENT PANEL OUTER AIR OUTLET REPLACEMENT - LEFT SIDE (ENCLAVE)
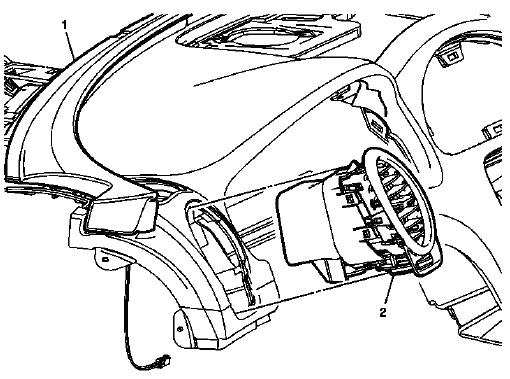
Fig. 61: Instrument Panel Outer Air Outlet - Left Side (Enclave)
Instrument Panel Outer Air Outlet Replacement - Left Side (Enclave)
INSTRUMENT PANEL OUTER AIR OUTLET REPLACEMENT - LEFT SIDE (TRAVERSE)
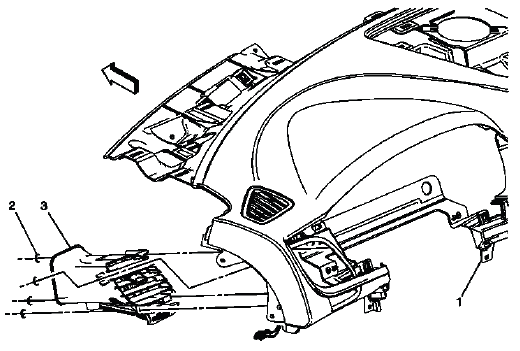
Fig. 62: Instrument Panel Outer Air Outlet - Left Side (Traverse)
Instrument Panel Outer Air Outlet Replacement - Left Side (Traverse)

INSTRUMENT PANEL CENTER AIR OUTLET REPLACEMENT (ACADIA)

Fig. 63: Instrument Panel Center Air Outlet (Acadia)
Instrument Panel Center Air Outlet Replacement (Acadia)

INSTRUMENT PANEL CENTER AIR OUTLET REPLACEMENT (ENCLAVE)
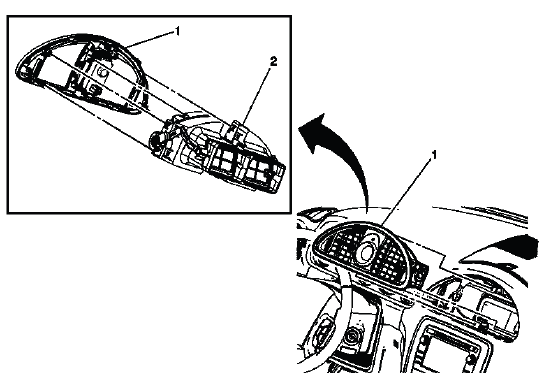
Fig. 64: Instrument Panel Center Air Outlet (Enclave)
Instrument Panel Center Air Outlet Replacement (Enclave)

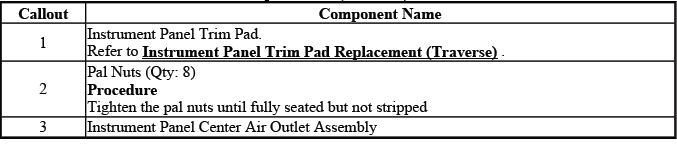
INSTRUMENT PANEL CENTER AIR OUTLET REPLACEMENT (TRAVERSE)
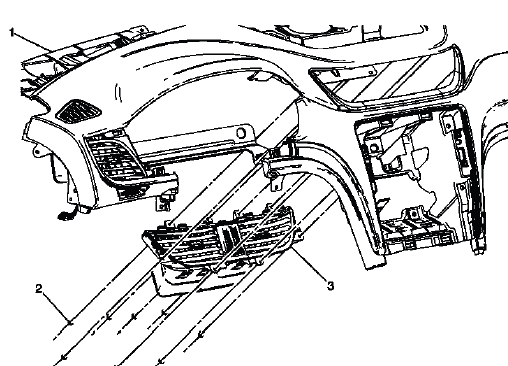
Fig. 65: Instrument Panel Center Air Outlet (Traverse)
Instrument Panel Center Air Outlet Replacement (Traverse)
INSTRUMENT PANEL OUTER AIR OUTLET REPLACEMENT - RIGHT SIDE (ACADIA)
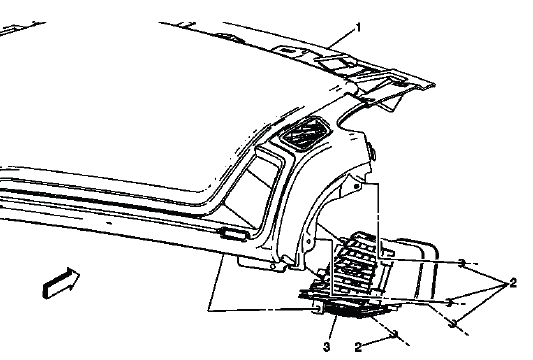
Fig. 66: Instrument Panel Outer Air Outlet - Right Side (Acadia)
Instrument Panel Outer Air Outlet Replacement - Right Side (Acadia)

INSTRUMENT PANEL OUTER AIR OUTLET REPLACEMENT - RIGHT SIDE (ENCLAVE)
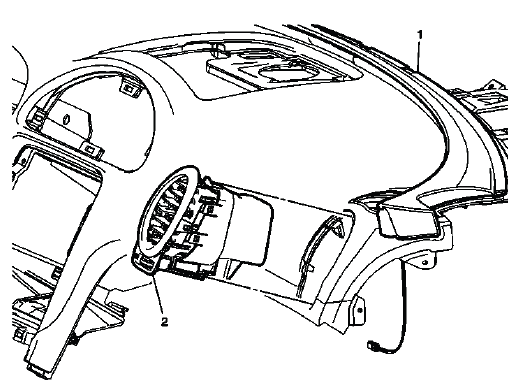
Fig. 67: Instrument Panel Outer Air Outlet - Right Side (Enclave)
Instrument Panel Outer Air Outlet Replacement - Right Side (Enclave)
INSTRUMENT PANEL OUTER AIR OUTLET REPLACEMENT - RIGHT SIDE (TRAVERSE)
Fig. 68: Instrument Panel Outer Air Outlet - Right Side (Traverse)
Instrument Panel Outer Air Outlet Replacement - Right Side (Traverse)

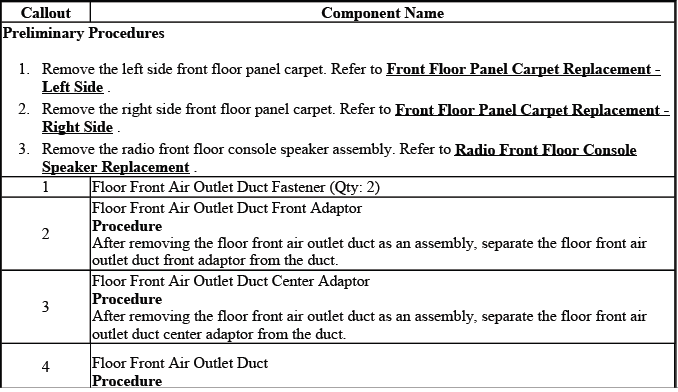
FLOOR FRONT AIR OUTLET DUCT REPLACEMENT
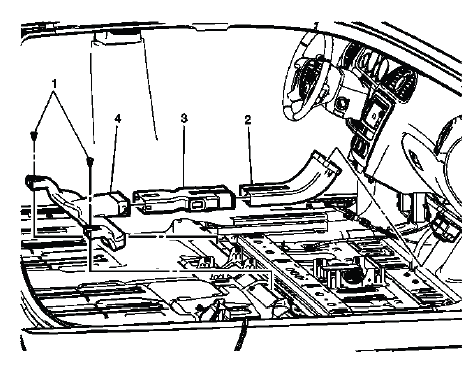
Fig. 69: Floor Front Air Outlet Duct
Floor Front Air Outlet Duct Replacement

FLOOR AIR OUTLET DUCT REPLACEMENT - LEFT SIDE
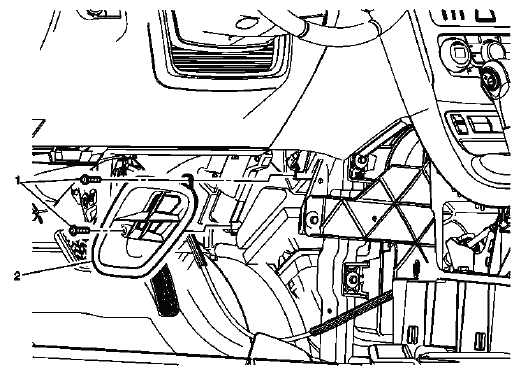
Fig. 70: Floor Air Outlet Duct - Left Side
Floor Air Outlet Duct Replacement - Left Side

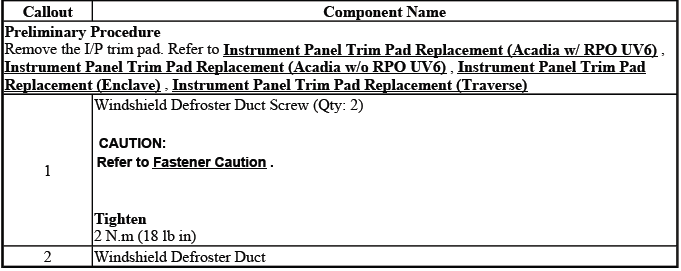
WINDSHIELD DEFROSTER DUCT REPLACEMENT
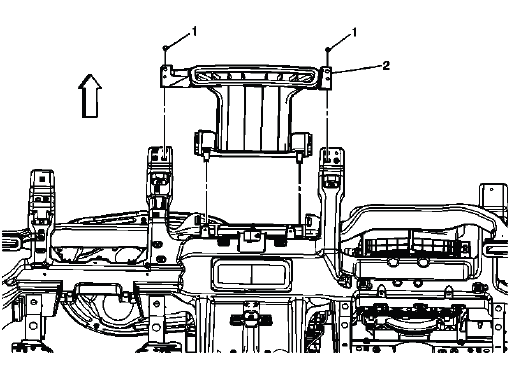
Fig. 71: Identifying Windshield Defroster Duct
Windshield Defroster Duct Replacemen
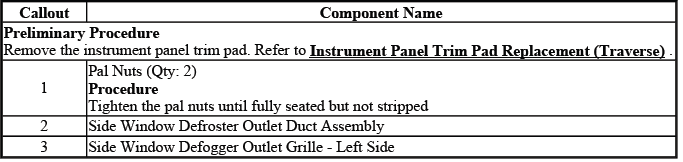
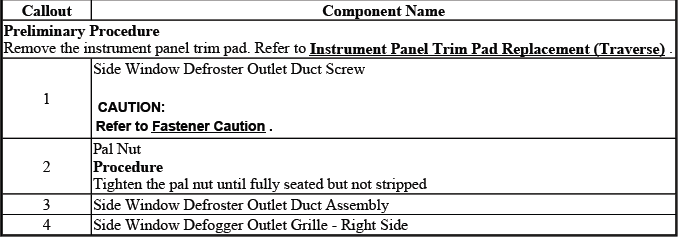
SIDE WINDOW DEFOGGER OUTLET DUCT REPLACEMENT - LEFT SIDE
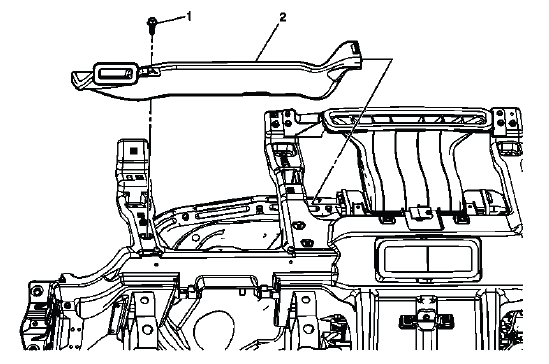
Fig. 72: View Of Side Window Defogger Outlet Duct - Left Side
Side Window Defogger Outlet Duct Replacement - Left Side
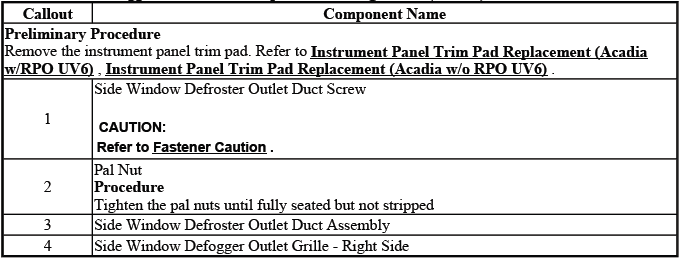
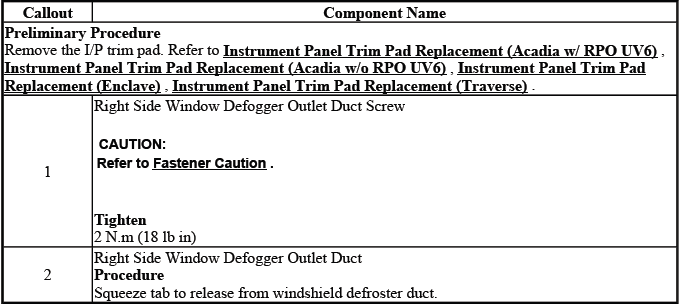
SIDE WINDOW DEFOGGER OUTLET DUCT REPLACEMENT - RIGHT SIDE
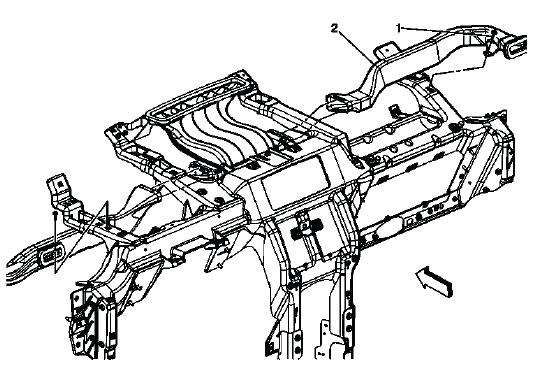
Fig. 73: Identifying Side Window Defogger Outlet Duct - Right Side
Side Window Defogger Outlet Duct Replacement - Right Side
FLOOR AIR OUTLET DUCT REPLACEMENT - RIGHT SIDE
Fig. 74: Floor Air Outlet Duct - Right Side
Floor Air Outlet Duct Replacement - Right Side
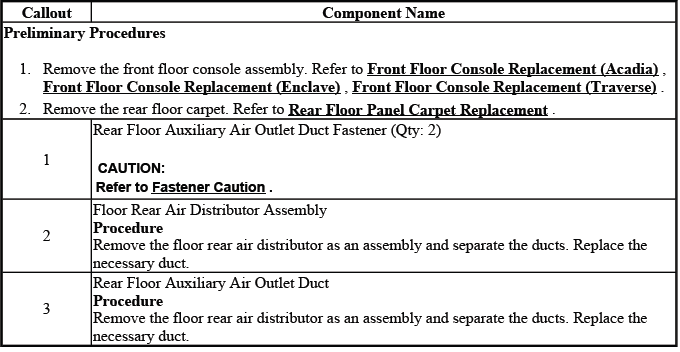
REAR FLOOR AUXILIARY AIR OUTLET DUCT REPLACEMENT
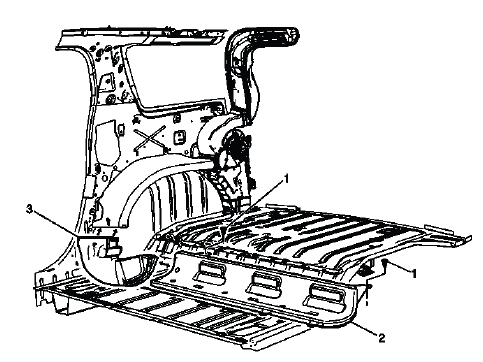
Fig. 75: Rear Floor Auxiliary Air Outlet Duct
Rear Floor Auxiliary Air Outlet Duct Replacement
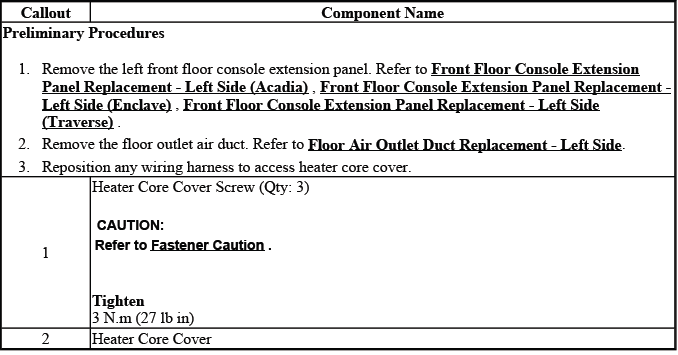
HEATER CORE COVER REPLACEMENT
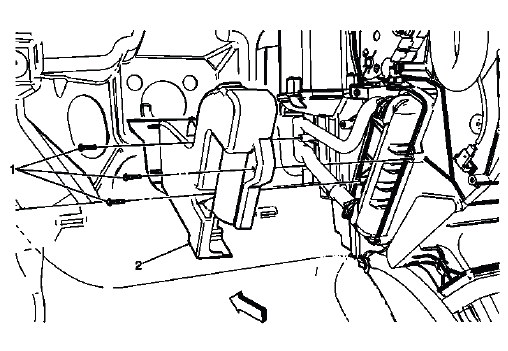
Fig. 76: Locating Heater Core Cover
Heater Core Cover Replacement
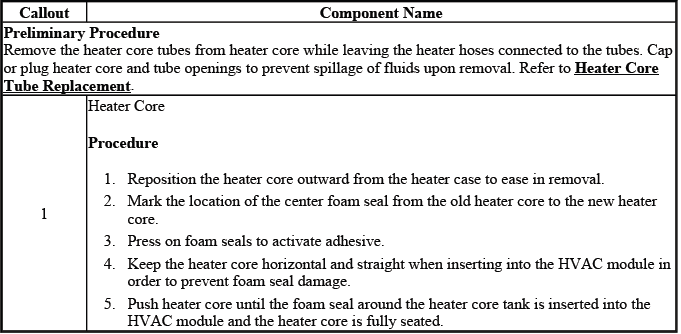
HEATER CORE REPLACEMENT

Fig. 77: Identifying Heater Core
Heater Core Replacement
AUXILIARY HEATER INLET AND OUTLET HOSE CONNECTOR RETAINER AND SEAL REPLACEMENT
Removal Procedure
1. Drain the cooling system. Refer to Cooling System Draining and Filling (Static Fill) , Cooling System Draining and Filling (Vac N Fill).
2. Before removing the quick connect fitting from the vehicle, clean area and remove any loose dirt or debris.
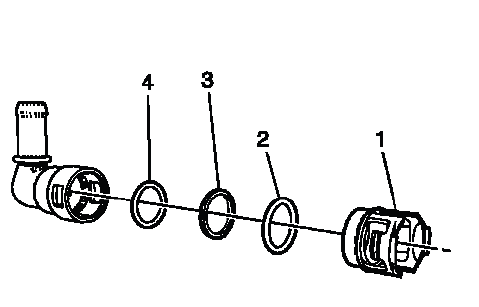
Fig. 78: Identifying Components Of Service Kit
3. Remove the fitting from the tube by squeezing the retainer clip legs together and pulling the fitting from the tube.
4. Remove the retainer from the tube by folding the legs back on themselves and sliding the retainer clip out of the tube (1).
5. Place a flat-blade tool through the window of the quick connect fitting to just below the outer bushing and above the top O-ring (2).
6. Remove the outer bushing with a gentle prying motion. Discard the outer bushing.
CAUTION: Do NOT damage the fitting while removing the outer bushing.
Damage may affect the seal integrity and cause a coolant leak.
7. Remove other components and discard.
8. Thoroughly clean and inspect the inside surface of the fitting for nicks, scratches or cracks.
Remove any dirt or debris using water and a lint free cloth.
Installation Procedure
1. Lubricate O-rings with coolant.
2. Install the first O-ring and gently push down into the O-ring pocket (4).
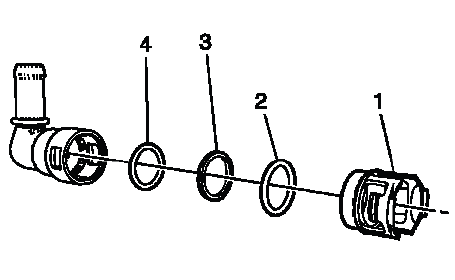
Fig. 79: Identifying Components Of Service Kit
3. Install the midspacer and gently push down to first O-ring (3).
4. Install the second O-ring and gently push down to the top of midspacer (2).
5. Install the retainer clip by lining up the retainer legs with windows on the fitting housing (1).
Push the retainer clip down until the retainer clip legs are engaged into the windows.
6. Clean and inspect the pipe end for any nicks, scratches or cracks.
7. Install the fitting to the vehicle by pushing the fitting onto the tube until an audible click is heard. Pull back to verify the connection is secure.
8. Fill the cooling system. Refer to Cooling System Draining and Filling (Static Fill) , Cooling System Draining and Filling (Vac N Fill).
AUXILIARY BLOWER CONTROL MODULE REPLREAD NEXT:
HEATING AND AIR CONDITIONING SYSTEM DESCRIPTION AND OPERATION
Engine Coolant
Engine coolant is the key element of the heating system. The engine
thermostat controls the normal engine
operating coolan
 Description and Operation
SEE MORE:
Transferring Service
Push to request account transfer
eligibility information. The Advisor can assist in canceling or removing account
information. If OnStar receives information that vehicle ownership has changed,
OnStar may send a voice message to the vehicle, requesting updated account in
OnStar Additional Information
Mirror Adjustment
Exterior Mirrors
To adjust each mirror:
1. Press (A) or (B) to select the mirror.
2. Press the control pad to adjust the mirror.
3. Press (A) or (B) again to deselect the mirror.
Folding Mirrors
For vehicles with power folding mirrors:
1. Press (C) to fold the mirrors out
Mirror Adjustment. Steering Wheel Adjustment. Interior Lighting
