Buick Enclave: Specifications, Repair Instructions
SPECIFICATIONS
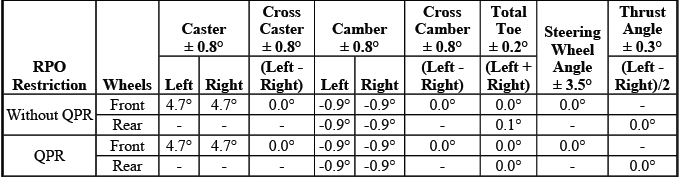
WHEEL ALIGNMENT SPECIFICATIONS
Alignment Condition: Full tank of fuel, no passengers and placed on flat level surface.
Wheel Alignment Specifications
FASTENER TIGHTENING SPECIFICATIONS
Fastener Tightening Specifications

REPAIR INSTRUCTIONS
WHEEL ALIGNMENT MEASUREMENT
Steering and vibration complaints are not always the result of improper alignment. One possible cause is wheel and tire imbalance. Another possibility is tire lead due to worn or improperly manufactured tires. Lead/pull is defined as follows: At a constant highway speed on a typical straight road, lead/pull is the amount of effort required at the steering wheel to maintain the vehicle's straight path. Lead is the vehicle deviation from a straight path on a level road without pressure on the steering wheel. Refer to Radial Tire Lead/Pull Correction in order to determine if the vehicle has a tire lead problem.
Before performing any adjustment affecting wheel alignment, perform the following inspections in order to ensure correct alignment readings:
- Inspect for visible damage to the suspension components and replace as necessary.
- Inspect the tires for the proper inflation and irregular tire wear. Refer to Vehicle Certification, Tire Placard, Anti-Theft and Service Parts ID Label and Tire Diagnosis - Irregular or Premature Wear.
- Inspect the runout of the wheels and the tires. Refer to Tire and Wheel Runout Specifications.
- Inspect the wheel bearings for backlash and excessive play. Refer to Wheel Bearings Diagnosis.
- Inspect the ball joints for looseness or wear.
- Inspect the tie rod ends for looseness or wear.
- Inspect the control arms and stabilizer shaft for looseness or wear.
- Inspect the steering gear for looseness at the frame. Refer to Fastener Tightening Specifications.
- Inspect the struts/shock absorbers for wear, leaks and any noticeable noises. Refer to Suspension Strut and Shock Absorber Testing - On Vehicle.
- Inspect the vehicle trim height. Refer to Trim Height Inspection.
- Inspect the steering wheel for excessive drag or poor return due to stiff or rusted linkage or suspension components.
- Inspect the fuel level. The fuel tank should be full or the vehicle should have a compensating load added.
Give consideration to excess loads, such as tool boxes, sample cases, etc. If normally carried in the vehicle, these items should remain in the vehicle during alignment adjustments. Give consideration also to the condition of the equipment being used for the alignment. Follow the equipment manufacturer's instructions.
Satisfactory vehicle operation may occur over a wide range of alignment settings. However, if the setting exceeds the service allowable specifications, correct the alignment to the service preferred specifications. Refer to Wheel Alignment Specifications.
Perform the following steps in order to measure the front and rear alignment angles:
1. Install the alignment equipment according to the manufacturer's instructions.
2. Jounce the front and the rear bumpers 3 times prior to checking the wheel alignment.
3. Measure the alignment angles and record the readings.
4. Adjust alignment angles to vehicle specification, if necessary. Refer to Wheel Alignment Specifications.
NOTE:
- Record the "Before" and "After" alignment measurements.
- When performing adjustments to vehicles requiring a 4-wheel alignment, set the rear toe adjustment first in order to obtain proper front alignment angles.
FRONT CAMBER ADJUSTMENT
1. Raise and support the vehicle. Refer to Lifting and Jacking the Vehicle.
2. Remove the tire and wheel. Refer to Tire and Wheel Removal and Installation.
3. Remove the strut lower bolt in order to inspect for an oblong strut lower hole (3). If the strut lower hole is oblong, loosen the strut upper bolt in order to allow for camber adjustment.
Fig. 1: Adjusting Front Camber
If the strut lower hole is NOT oblong, perform the following steps:
- Remove the upper strut bolt and separate lower part of the strut from the steering knuckle.
- File the strut lower hole laterally (3) in order to allow for camber adjustment.
- Move the strut back in to position with the steering knuckle.
4. Install the strut bolts, but do not fully tighten them.
5. Adjust the camber and tighten the strut nuts.
CAUTION: Refer to Fastener Caution.
Tighten
- Tighten the strut lower nuts to 195 N.m (144 lb ft).
6. Install the tire and wheel. Refer to Tire and Wheel Removal and Installation.
7. Lower the vehicle.
WHEEL ALIGNMENT - STEERING WHEEL ANGLE AND/OR FRONT TOE ADJUSTMENT
1. Remove the power steering gear seal small clamps.
2. Verify that the steering wheel is centered and the wheels are in the straight ahead position.
3. Loosen the left and right tie rod jam nuts (2).
Fig. 2: Identifying Tie Rod & Jam Nut
4. Rotate the inner tie rods in order to obtain the proper toe angle of 0º.
NOTE: Verify that the number of threads showing on both inner tie rod ends are approximately equal.
5. Tighten the tie rod end jam nuts.
CAUTION: Use the correct fastener in the correct location. Replacement fasteners must be the correct part number for that application.
Fasteners requiring replacement or fasteners requiring the use of thread locking compound or sealant are identified in the service procedure. Do not use paints, lubricants or corrosion inhibitors on fasteners or fastener joint surfaces unless specified. These coatings affect fastener torque and joint clamping force and may damage the fastener. Use the correct tightening sequence and specifications when installing fasteners in order to avoid damage to parts and systems.
Tighten
- Tighten the left and right tie rod jam nuts (2) to 75 N.m (55 lb ft).
6. Install the power steering gear seal small clamps.
NOTE: Verify that the power steering gear seal is not twisted.
REAR CAMBER ADJUSTMENT
1. Loosen the adjuster cam nut (1).
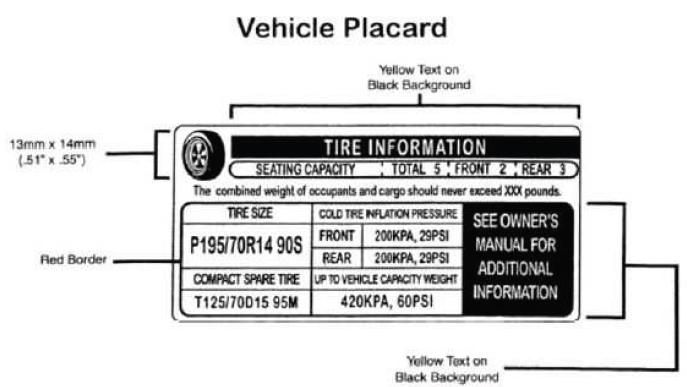
Fig. 3: Identifying Adjuster Cam Nut
2. Using a wrench to rotate the adjuster bolt (2), adjust the cam (3) to specifications.
3. Using a wrench to hold the adjuster bolt (2), tighten the adjuster nut (1).
NOTE: Ensure that the camber settings have not changed after torquing the adjuster nut to specifications. Readjust if necessary.
CAUTION: Refer to Fastener Caution.
Tighten
- Tighten the nut to 140 N.m (103 lb ft).
4. Check the toe alignment and adjust if required. Refer to Rear Toe Adjustment.
5. Test drive the vehicle.
REAR TOE ADJUSTMENT
1. Loosen the adjuster nut (1).
Fig. 4: Identifying Toe Adjuster Nut
NOTE: Make any adjustments to camber before setting toe.
NOTE: Left side toe adjustment is shown, right side toe adjustment is similar.
2. Using a wrench to rotate the adjuster bolt (2), adjust the cam (3) to specifications.
3. Using a wrench to hold the adjuster bolt (2), tighten the adjuster nut (1).
NOTE: Ensure that the toe settings have not changed after torquing the adjuster nut to specifications. Readjust if necessary.
CAUTION: Refer to Fastener Caution.
Tighten
- Tighten the nut to 140 N.m (103 lb ft).
4. Check the toe alignment and adjust if required. Refer to Rear Toe Adjustment.
5. Test drive the vehicle.

