Buick Enclave: Suspension General Diagnosis
SPECIFICATIONS
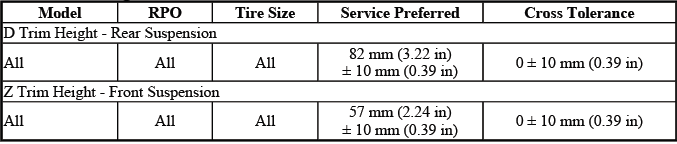
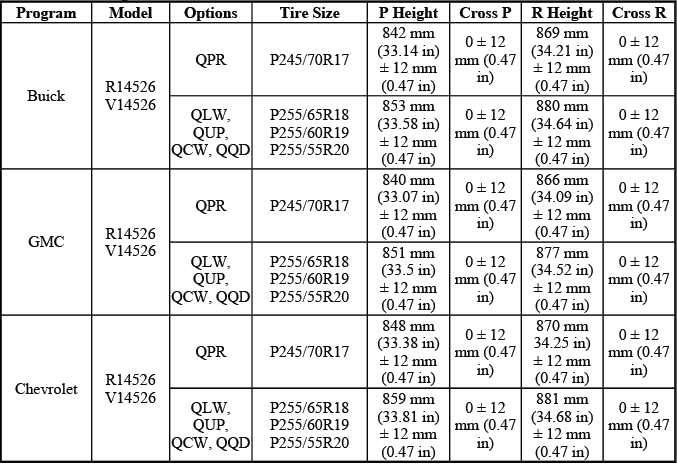
TRIM HEIGHT SPECIFICATIONS
D and Z Trim Height
P and R Trim Height
DIAGNOSTIC INFORMATION AND PROCEDURES
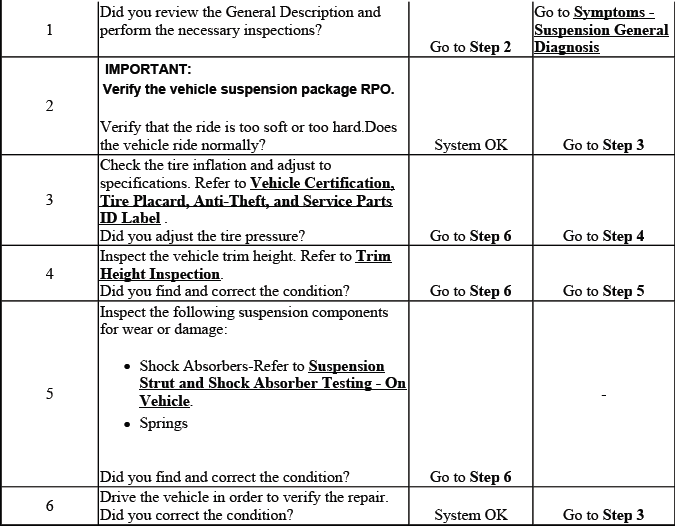
SYMPTOMS - SUSPENSION GENERAL DIAGNOSIS
IMPORTANT: The following steps must be completed before using the symptom tables.
Review the system description and operation in order to familiarize yourself with the system functions. Refer to the appropriate description and operation:
- Front Suspension Description and Operation
- Rear Suspension Description and Operation
- General Description
Visual/Physical Inspection
- Inspect for aftermarket devices which could affect the operation of any of the suspension subsystems.
- Inspect the easily accessible or visible system components for obvious damage or conditions which could cause the symptom.
- Inspect for proper tire size and inflation pressure. Refer to Vehicle Certification, Tire Placard, Anti- Theft, and Service Parts ID Label.
Symptom List
Refer to a symptom diagnostic procedure from the following list in order to diagnose the symptom:
- Ride Diagnosis
- Vehicle Leads/Pulls
- Body Leans or Sways in Corners
- Radial Tire Lead/Pull Correction
- Suspension Bottoms
- Torque Steer
- Memory Steer
- Noise Diagnosis - Front Suspension
- Noise Diagnosis - Rear Suspension
- Suspension Strut and Shock Absorber Testing - On Vehicle
- Wheel Bearings Diagnosis
- Trim Height Inspection
RIDE DIAGNOSIS
Ride Diagnosis

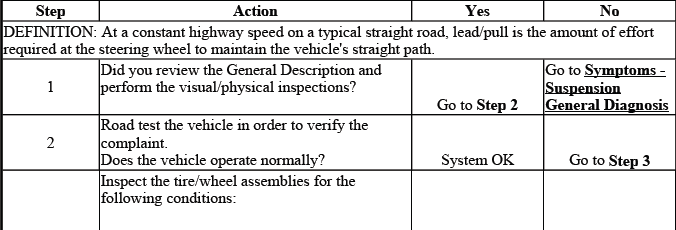
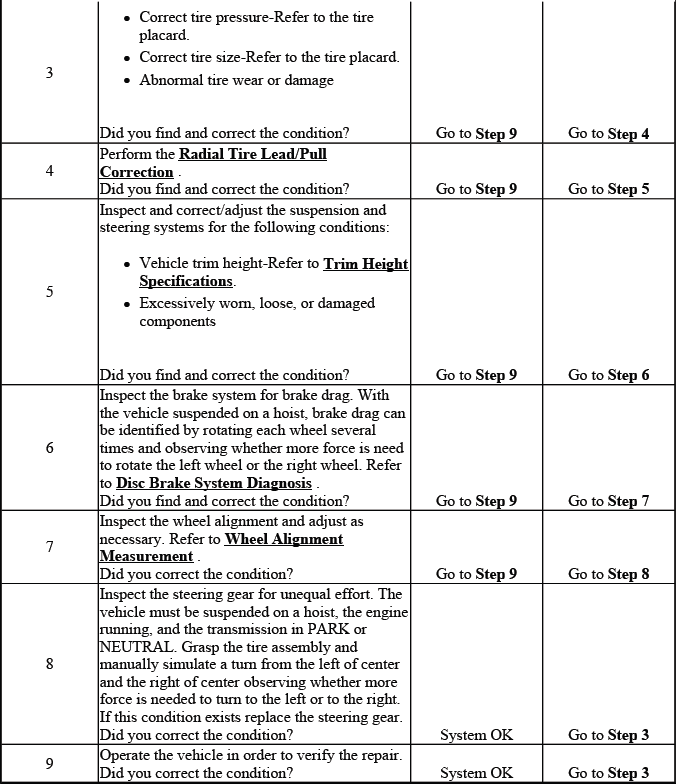
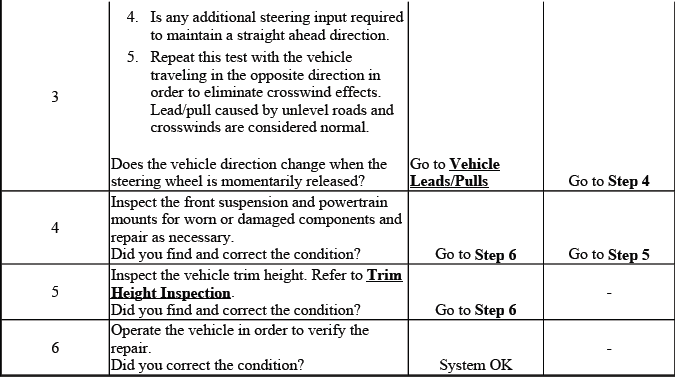
VEHICLE LEADS/PULLS
Vehicle Leads/Pulls
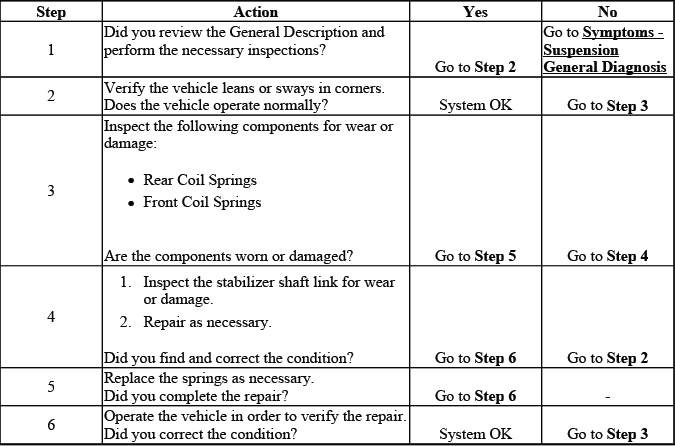
BODY LEANS OR SWAYS IN CORNERS
Body Leans or Sways in Corners
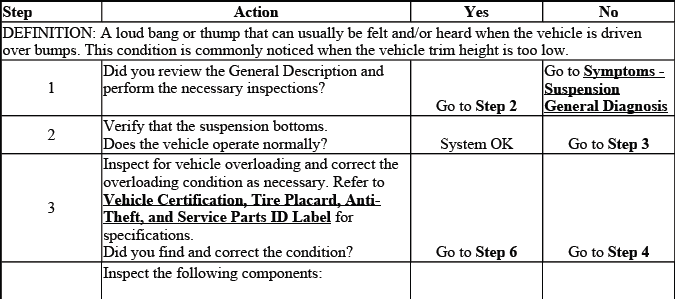
SUSPENSION BOTTOMS
Suspension Bottoms
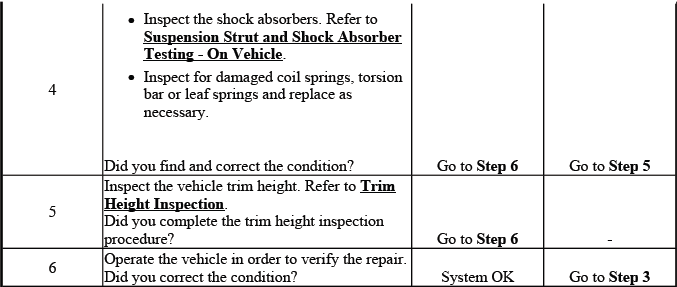
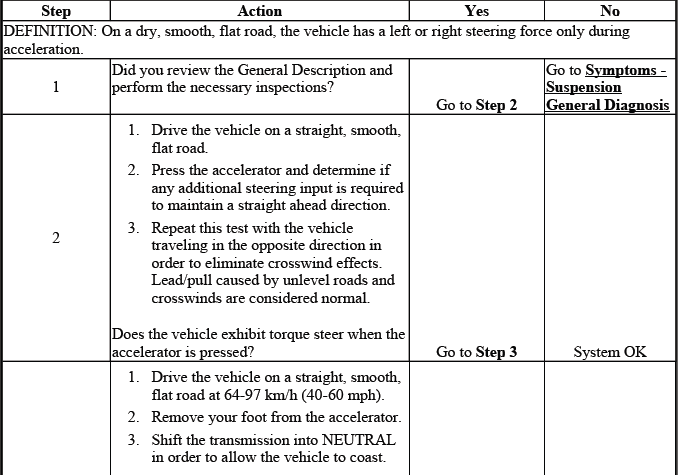
TORQUE STEER
Torque Steer
MEMORY STEER
Memory Steer

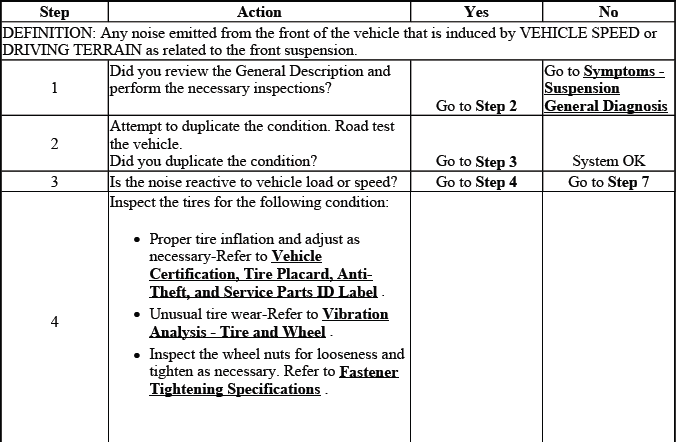
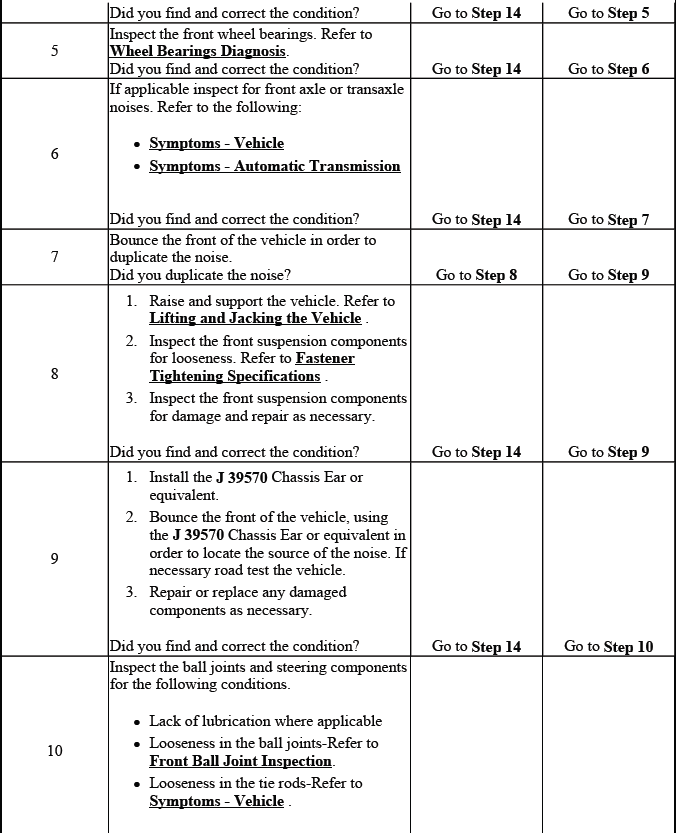
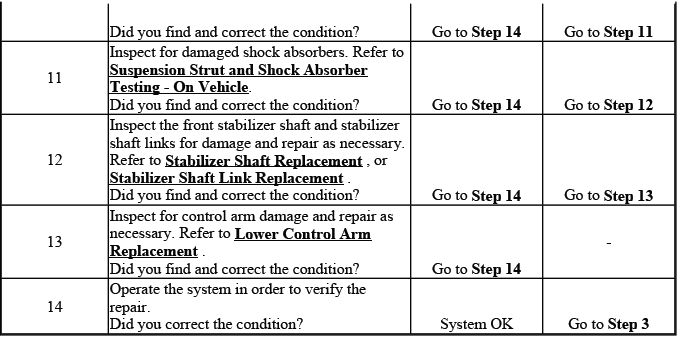
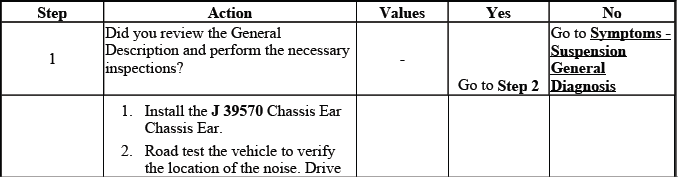
NOISE DIAGNOSIS - FRONT SUSPENSION
Noise Diagnosis - Front Suspension
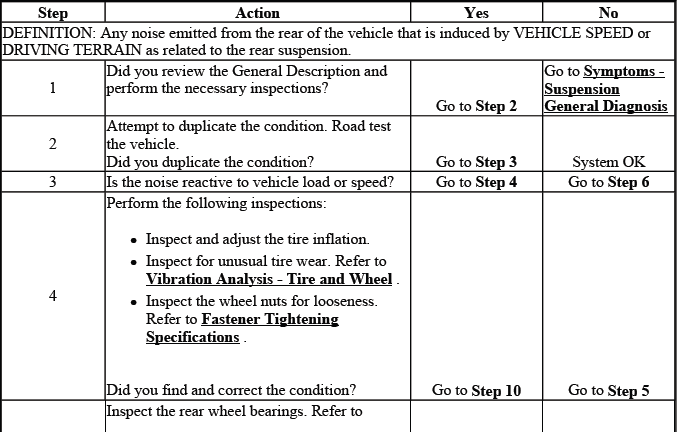
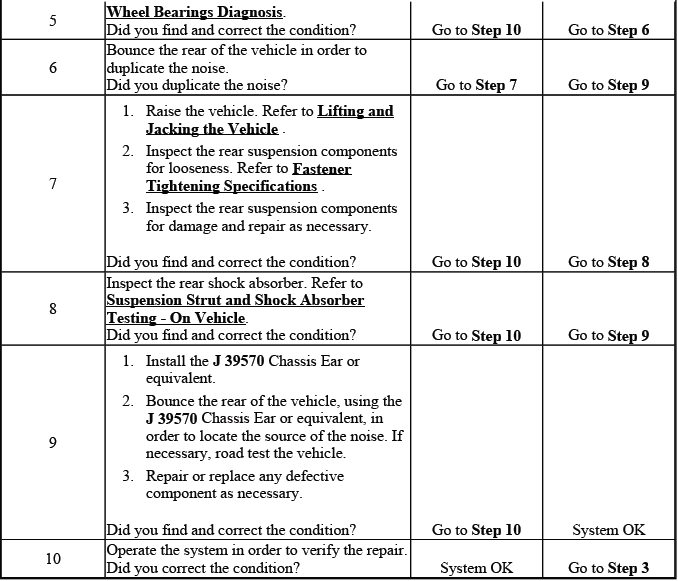
NOISE DIAGNOSIS - REAR SUSPENSION
Noise Diagnosis - Rear Suspension
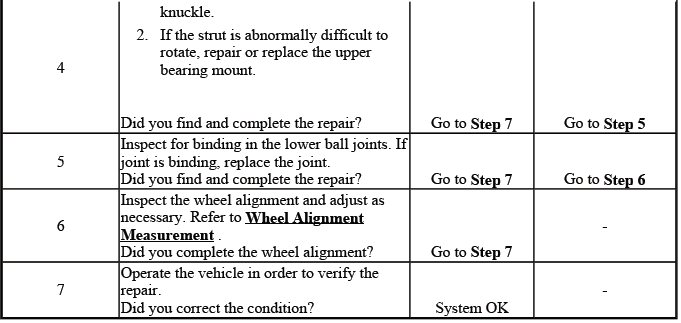
FRONT BALL JOINT INSPECTION
Special Tools
- J 8001 Dial Indicator Set
1. Raise and suitably support the vehicle. Refer to Lifting and Jacking the Vehicle.
IMPORTANT:
- The vehicle must rest on a level surface.
- The vehicle must be stable. Do not rock the vehicle on the floor stands.
2. Clean and inspect the ball joint seal for cuts or tears. If the ball joint seal is damaged, replace the ball joint. Refer to Lower Control Arm Ball Joint Replacement.
3. Support the lower control arm with a floor stand as far outboard as possible and raise the suspension to just below ride height.
4. Install J 8001 Dial Indicator Set or a suitable dial indicator in a way to measure vehicle lash in the ball joint.
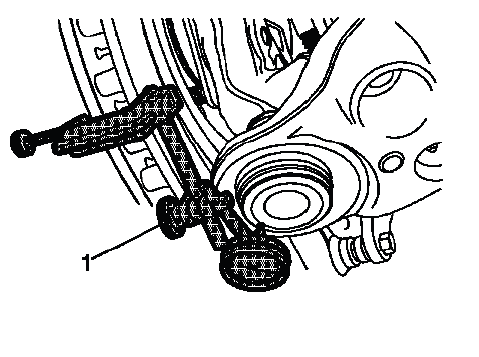
Fig. 1: Measuring Vertical Lash In Ball Joint
5. Gently lift or pry the suspension to induce ball joint movement.
IMPORTANT: Do not pry between the lower control arm and the wheel drive shaft boot.
6. If the dial indicator reading is more than 0.5 mm (0.020 in), replace the ball joint. Refer to Lower Control Arm Ball Joint Replacement.
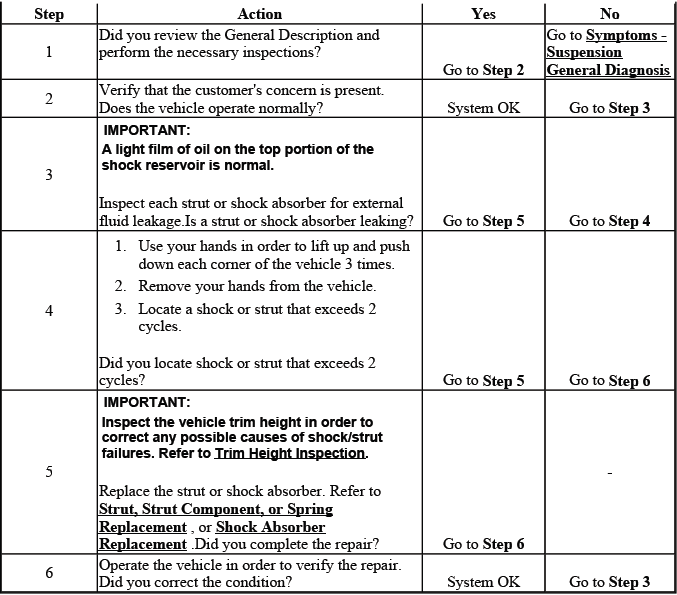
SUSPENSION STRUT AND SHOCK ABSORBER TESTING - ON VEHICLE
Suspension Strut and Shock Absorber Testing - On Vehicle
WHEEL BEARINGS DIAGNOSIS
Wheel Bearings Diagnosis

TRIM HEIGHT INSPECTION
Trim Height Measurement
Trim height is a predetermined measurement relating to vehicle ride height. Incorrect trim heights can cause the vehicle to bottom out over bumps, damage to the suspension components and symptoms similar to wheel alignment problems. Check the trim heights when diagnosing suspension concerns and before checking the wheel alignment.
Perform the following before measuring the trim heights:
- Set the tire pressure to the specifications shown on the certification label. Refer to Vehicle Certification, Tire Placard, Anti-Theft, and Service Parts ID Label.
- Check the fuel level. Add additional weight if necessary to simulate a
full tank.
One U.S. gallon of gasoline weighs approximately 6.5 lbs. One liter of gasoline weights approximately 0.70 kg.
- Make sure the passenger and rear compartments are empty, except for the spare tire.
- Make sure the vehicle is on a flat and level surface, such as an alignment rack.
- For vehicles equipped with automatic level control, ensure the system is functioning properly.
- Check that all the vehicle doors are securely closed.
- Check that the vehicle hood and rear deck lids are securely closed.
- Check for installed after market accessories or modifications that could
affect trim height measurement:
- Larger of smaller than production wheels and tires
- Lifting or lowering kits
- Wheel opening flares or ground affects
Measuring the Z Height
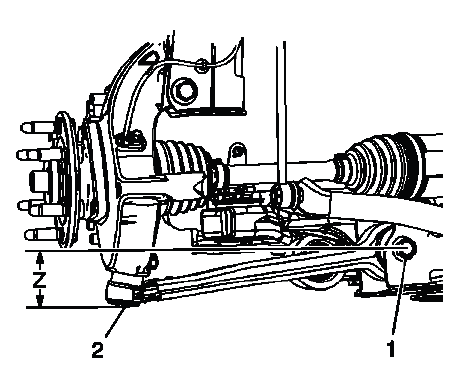
Fig. 2: Measuring Z Height Dimension
IMPORTANT:
- In order to obtain the proper measurement, Z will equal inner minus the outer.
- The left and right Z height difference should be no more than 12 mm (0.47 in).
Use the following procedure to measure the Z height:
1. Lift the front bumper of the vehicle up about 38 mm (1.5 in).
2. Gently remove your hands and let the vehicle settle.
3. Repeat this operation 2 more times for a total of 3 times.
4. Repeat this jouncing operation 2 more times for a total of 3 times.
5. Measure from the center of the lower ball joint (outer) 2 to the center of the lower control arm bolt (inner) 1.
6. Push the front bumper of the vehicle down about 38 mm (1.5 in).
7. Gently remove your hands and let the vehicle settle.
8. Repeat this operation 2 more times for a total of 3 times.
9. Re-measure the Z height as in step 5.
10. The true Z height is the average of the measurements taken in steps 5 and 8. Refer to Trim Height Specifications.
If any of these measurements are out of specifications, inspect for the following conditions:
- Worn or damage suspension components
- Collision damage
Measuring the D Height
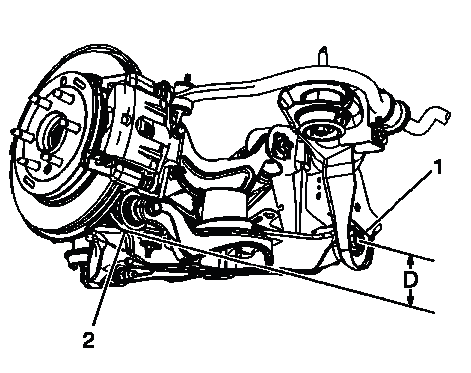
Fig. 3: Measuring D Height Dimension
IMPORTANT:
- In order to obtain the proper measurement, D will equal inner minus the outer.
- The left and right D height difference should be no more than 12 mm (0.47 in).
Use the following procedure to measure the D height:
1. Lift the rear bumper of the vehicle up about 38 mm (1.5 in).
2. Gently remove your hands and let the vehicle settle.
3. Repeat this operation 2 more times for a total of 3 times.
4. Use the outer flat spot 2 on the knuckle as the reference point for the D height measurement.
5. Measure from the outer on the knuckle to the center of the lower control arm bolt (1).
6. The difference between these 2 measurements is the D height.
7. Lift the rear bumper of the vehicle up about 38 mm (1.5 in).
8. Gently remove your hands and let the vehicle settle.
9. Repeat this operation 2 more times for a total of 3 times.
10. Re-measure the D height as in step 4.
11. The true D height is the average of the measurements taken in steps 4 and 8. Refer to Trim Height Specifications.
If any of these measurements are out of specifications, inspect for the following conditions:
- Worn or damage suspension components
- Collision damage
SPECIAL TOOLS AND EQUIPMENT
SPECIAL TOOLS
J 8001
Dial Indicator
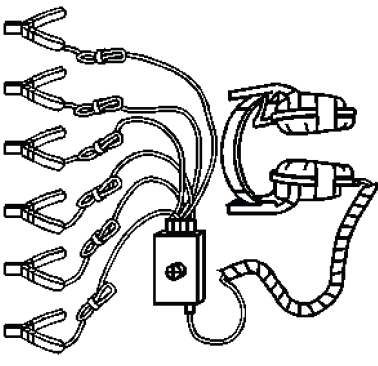
J 39570
Chassis Ear