Buick Enclave: Cylinder Head Overhaul
* PLEASE READ THIS FIRST *
NOTE: Examples used in this article are general in nature and do not necessarily relate to a specific engine or system. Illustrations and procedures have been chosen to guide mechanic through engine overhaul process. Descriptions of processes of cleaning, inspection, assembly and machine shop practice are included.
Always refer to appropriate engine overhaul article, if available, in the ENGINES section for complete overhaul procedures and specifications for the vehicle being repaired.
CYLINDER HEAD DISASSEMBLY
NOTE: Examples used in this article are general in nature and do not necessarily relate to a specific engine or system. Illustrations and procedures have been chosen to guide mechanic through engine overhaul process. Descriptions of processes of cleaning, inspection, assembly and machine shop practice are included.
Always refer to appropriate engine overhaul article, if available, in the ENGINES section for complete overhaul procedures and specifications for the vehicle being repaired.
Mark valves for location. Using valve spring compressor, compress valve springs. Remove valve locks.
Carefully release spring compressor. Remove retainer or rotator, valve spring, spring seat and valve. See Fig. 2.
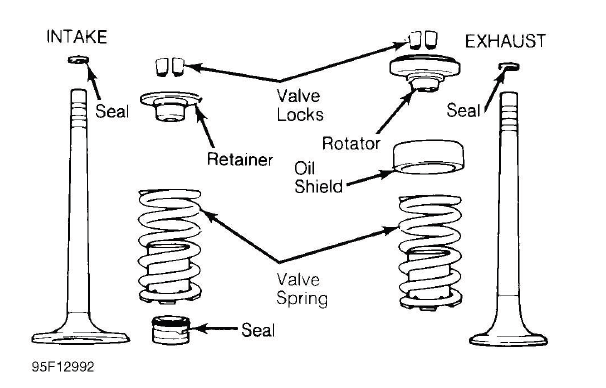
Fig. 2: Exploded View of Valve Assemblies
CYLINDER HEAD CLEANING & INSPECTION
NOTE: Examples used in this article are general in nature and do not necessarily relate to a specific engine or system. Illustrations and procedures have been chosen to guide mechanic through engine overhaul process. Descriptions of processes of cleaning, inspection, assembly and machine shop practice are included.
Always refer to appropriate engine overhaul article, if available, in the ENGINES section for complete overhaul procedures and specifications for the vehicle being repaired.
Clean cylinder head and valve components using approved cleaning methods. Inspect cylinder head for cracks, damage or warped gasket surface. Place straightedge across gasket surface. Determine clearance at center of straightedge. Measure across both diagonals, longitudinal center line and across cylinder head at several points. See Fig. 3.
On cast iron cylinder heads, if warpage exceeds.003" (.08 mm) in a 6" span, or.006" (.15 mm) over total length, cylinder head must be resurfaced. On most aluminum cylinder heads, if warpage exceeds.002" (.05 mm) in any area, cylinder head must be resurfaced. Warpage specification may vary by manufacturer. If warpage exceeds specification on some cylinder heads, cylinder head must be replaced.
Cylinder head thickness should be measured to determine amount of material which can be removed before replacement is required. Cylinder head thickness must not be less than the manufacturer's specification.
If cylinder head required resurfacing, it may not align properly with intake manifold. On "V" type engines, misalignment is corrected by machining intake manifold surface that contacts cylinder head. Cylinder head may be machined on surface that contacts intake manifold. Using oil stone, remove burrs or scratches from all sealing surfaces.

Fig. 3: Checking Cylinder Head for Warpage
VALVE SPRINGS
NOTE: Examples used in this article are general in nature and do not necessarily relate to a specific engine or system. Illustrations and procedures have been chosen to guide mechanic through engine overhaul process. Descriptions of processes of cleaning, inspection, assembly and machine shop practice are included.
Always refer to appropriate engine overhaul article, if available, in the ENGINES section for complete overhaul procedures and specifications for the vehicle being repaired.
Inspect valve springs for corroded or pitted valve spring surfaces which may lead to breakage. Polished spring ends caused by a rotating spring indicate that spring surge has occurred. Replace springs showing evidence of these conditions.
Inspect valve springs for squareness using a 90-degree straightedge. See Fig. 4. Replace valve spring if out-of-square exceeds manufacturer's specification.
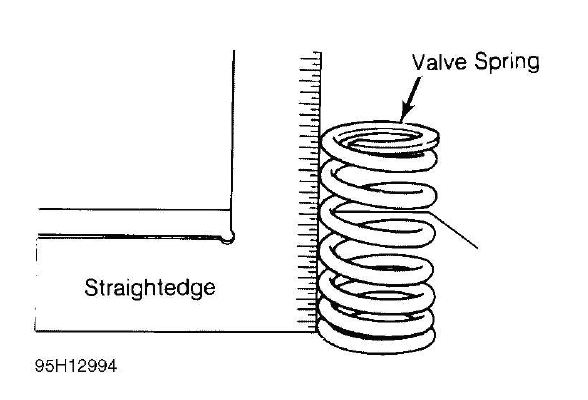
Fig. 4: Checking Valve Spring Squareness
Using vernier caliper, measure free length of all valve springs. Replace springs if not within specification.
Using valve spring tester, test valve spring pressure at installed and compressed heights. See Fig. 5.
Usually compressed height is installed height minus valve lift. Replace valve spring if not within specification.
It is recommended to replace all valve springs when overhauling cylinder head. Valve springs may need to be installed with color coded end or small coils at specified area according to manufacturer.
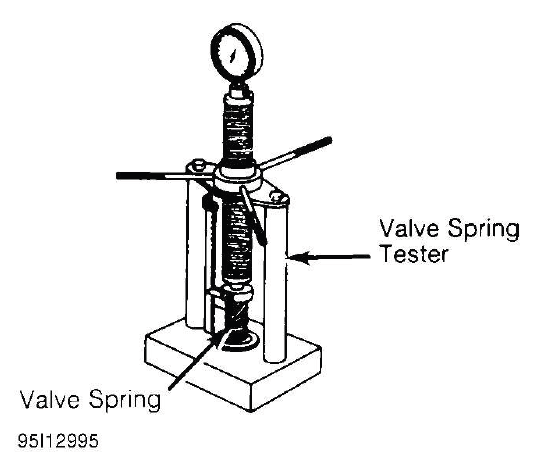
Fig. 5: Checking Valve Spring Pressure
VALVE GUIDE
NOTE: Examples used in this article are general in nature and do not necessarily relate to a specific engine or system. Illustrations and procedures have been chosen to guide mechanic through engine overhaul process. Descriptions of processes of cleaning, inspection, assembly and machine shop practice are included.
Always refer to appropriate engine overhaul article, if available, in the ENGINES section for complete overhaul procedures and specifications for the vehicle being repaired.
Measuring Valve Guide Clearance
Check valve stem-to-guide clearance. Ensure valve stem diameter is within specification. Install valve in valve guide. Install dial indicator assembly on cylinder head with tip resting against valve stem just above valve guide. See Fig. 6.
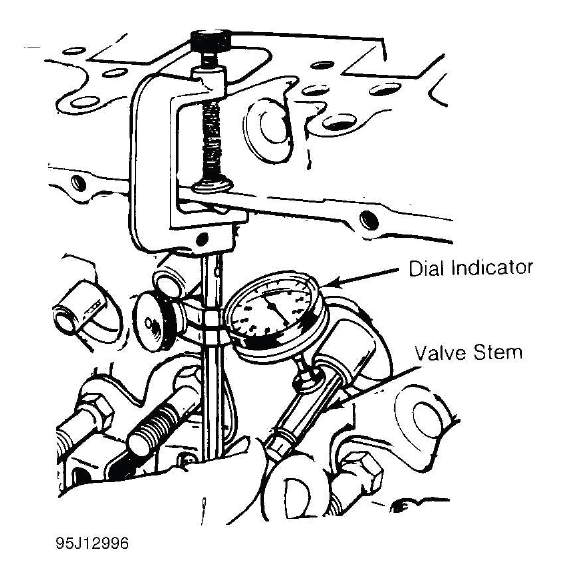
Fig. 6: Measuring Valve Stem-to-Guide Clearance
Lower valve approximately 1/16" below valve seat. Push valve stem against valve guide as far as possible.
Adjust dial indicator to zero. Push valve stem in opposite direction and note reading. Clearance must be within specification.
If valve guide clearance exceeds specification, valves with oversize stems may be used and valve guides are reamed to larger size or valve guide must be replaced. On some applications, a false guide is installed, then reamed to proper specification. Valve guide reamer set is used to ream valve guide to obtain proper clearance for new valve.
Reaming Valve Guide
Select proper reamer for size of valve stem. Reamer must be of proper length to provide clean cut through entire length of valve guide. Install reamer in valve guide and rotate to cut valve guide. See Fig. 7.
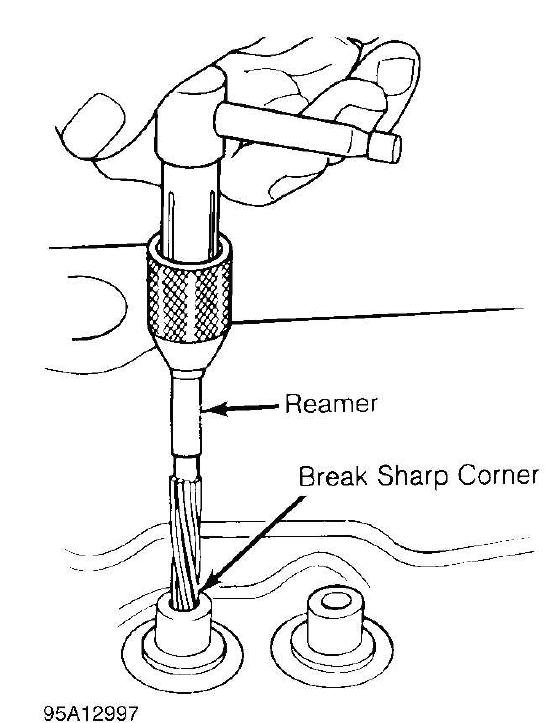
Fig. 7: Reaming Valve Guides
Replacing Valve Guide
Replace valve guide if clearance exceeds specification. Valve guides are either pressed, hammered or shrunk in place, depending upon cylinder head design and type of metal used.
Remove valve guide from cylinder head by pressing or tapping on a stepped drift. See Fig. 8. Once valve guide is installed, distance from cylinder head to top of valve guide must be checked. This distance must be within specification.
Aluminum heads are often heated before installing valve guide. Valve guide is sometimes cooled in dry ice prior to installation. Combination of a heated cylinder head and cooled valve guide ensures a tight guide fit upon assembly. The new guide must be reamed to specification.
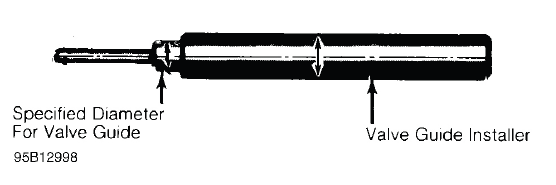
Fig. 8: Typical Valve Guide Remover & Installer
VALVES & VALVE SEATS
NOTE: Examples used in this article are general in nature and do not necessarily relate to a specific engine or system. Illustrations and procedures have been chosen to guide mechanic through engine overhaul process. Descriptions of processes of cleaning, inspection, assembly and machine shop practice are included.
Always refer to appropriate engine overhaul article, if available, in the ENGINES section for complete overhaul procedures and specifications for the vehicle being repaired.
Valve Grinding
Valve stem O.D. should be measured in several areas to indicate amount of wear. Replace valve if not within specification. Valve margin area should be measured to ensure that valve can be ground. See Fig. 9.
If valve margin is less than specification, the valves will be burned. Valve must be replaced. Due to minimum margin dimensions during manufacture, some new type valves cannot be reground. Some manufacturers use stellite coated valves that must NOT be machined. Valves can only be lapped into valve seat.
CAUTION: Some valves are sodium filled. Extreme care must be used when disposing of damaged or worn sodium-filled valves.
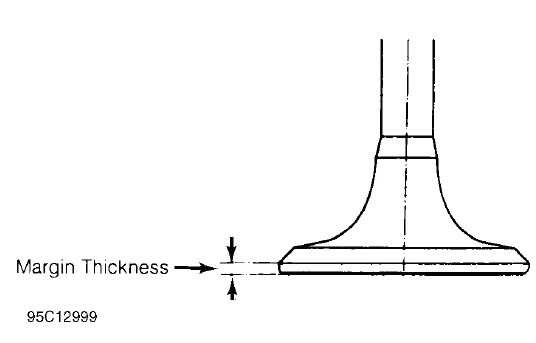
Fig. 9: Measuring Valve Head Margin
Resurface valve to proper angle specification using valve grinding machine. Follow manufacturer's instructions for valve grinding machine. Specifications may indicate a different valve face angle than seat angle. Measure valve margin after grinding. Replace valve if not within specification. Valve stem tip can be refinished using valve grinding machine.
Valve Lapping
During valve lapping of recently designed valves, be sure to follow manufacturer's recommendations. Surface hardening and materials used with some valves do not permit lapping. Lapping process will remove excessive amounts of the hardened surface.
Valve lapping is done to ensure adequate sealing between valve face and seat. Use either a hand drill or lapping stick with suction cup attached.
Moisten and attach suction cup to valve. Lubricate valve stem and guide. Apply a thin coat of fine valve grinding compound between valve and seat. Rotate lapping tool between the palms or with hand drill.
Lift valve upward off the seat and change position often. This is done to prevent grooving of valve seat. Lap valve until a smooth polished seat is obtained. Thoroughly clean grinding compound from components. Valve-to-valve seat concentricity should be checked. See VALVE SEAT CONCENTRICITY.
CAUTION: Valve guides must be in good condition and free of carbon deposits prior to valve seat grinding. Some engines contain an induction hardened valve seat. Excessive material removal will damage valve seats.
Valve Seat Grinding
Select coarse stone of correct size and angle for seat to be ground. Ensure stone is true and has a smooth surface. Select correct size pilot for valve guide dimension. Install pilot in valve guide. Lightly lubricate pilot shaft. Install stone on pilot. Move stone off and on the seat approximately 2 times per second during grinding operation.
Select a fine stone to finish grinding operation. Various angle grinding stones are used to center and narrow the valve seat as required. See Fig. 10.
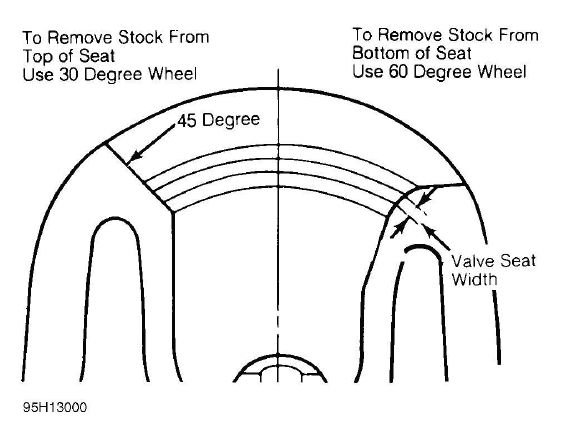
Fig. 10: Adjusting Valve Seat Width
Valve Seat Replacement
Replacement of valve seat inserts is done by cutting out the old insert and machining an oversize insert bore.
Replacement oversize insert is usually cooled and the cylinder head is sometimes warmed. Valve seat is pressed into the head. This operation requires specialized machine shop equipment.
Valve Seat Concentricity
Using dial gauge, install gauge pilot in valve guide. Position gauge arm on the valve seat. Adjust dial indicator to zero. Rotate arm 360 degrees and note reading. Runout should not exceed specification.
To check valve-to-valve seat concentricity, coat valve face lightly with Prussian Blue dye. Install valve and rotate it on valve seat. If pattern is even and entire seat is coated at valve contact point, valve is concentric with the valve seat.
CYLINDER HEAD REASSEMBLY
NOTE: Examples used in this article are general in nature and do not necessarily relate to a specific engine or system. Illustrations and procedures have been chosen to guide mechanic through engine overhaul process. Descriptions of processes of cleaning, inspection, assembly and machine shop practice are included.
Always refer to appropriate engine overhaul article, if available, in the ENGINES section for complete overhaul procedures and specifications for the vehicle being repaired.
Valve Stem Installed Height
Valve stem installed height must be checked when new valves are installed or when valves or valve seats have been ground. Install valve in valve guide. Measure distance from tip of valve stem to spring seat. See Fig. 11.
Distance must be within specification to allow sufficient clearance for valve operation.
Remove valve and grind valve stem tip if height exceeds specification. Valve tips are surface hardened. DO NOT remove more than.010" (.25 mm) from tip. Chamfer sharp edge of reground valve tip. Recheck valve stem installed height.
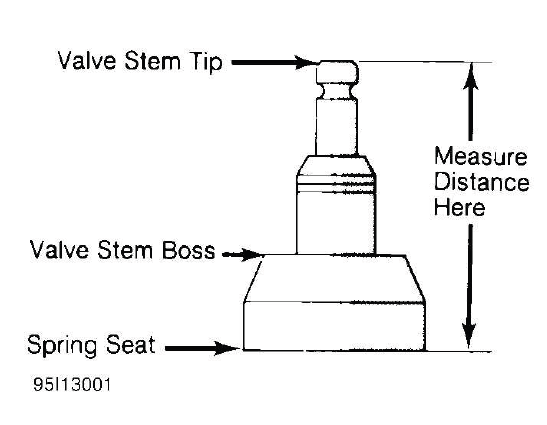
Fig. 11: Measuring Valve Stem Installed Height
VALVE STEM OIL SEALS
NOTE: Examples used in this article are general in nature and do not necessarily relate to a specific engine or system. Illustrations and procedures have been chosen to guide mechanic through engine overhaul process. Descriptions of processes of cleaning, inspection, assembly and machine shop practice are included.
Always refer to appropriate engine overhaul article, if available, in the ENGINES section for complete overhaul procedures and specifications for the vehicle being repaired.
Valve stem oil seals must be installed on valve stem. See Fig. 2. Seals are needed due to pressure differential at the ends of valve guides. Atmospheric pressure above intake guide, combined with manifold vacuum below guide, causes oil to be drawn into the cylinder.
Exhaust guides also have pressure differential created by exhaust gas flowing past the guide, creating a low pressure area. This low pressure area draws oil into the exhaust system.
Some manufacturers require that special color code or specified height valve stem oil seal be installed in designated area.
Replacement (On-Vehicle)
Mark rocker arm or overhead cam components for location. Remove rocker arm components or overhead cam components. Components must be installed in original location. Remove spark plugs. Valve stem oil seals may be replaced by holding valves against seats using air pressure.
Air pressure must be installed in cylinder using an adapter for spark plug hole. An adapter can be constructed by welding air hose connection to spark plug body with porcelain removed.
Rotate engine until piston is at top of stroke. Install adapter in spark plug hole. Apply a minimum of 140 psi (9.8 kg/cm2 ) line pressure to adapter. Air pressure should hold valve closed. If air pressure does not hold valve closed, check for damaged or bent valve. Cylinder head must be removed for service.
Using valve spring compressor, compress valve springs. Remove valve locks. Carefully release spring compressor. Remove retainer or rotator and valve spring. Remove valve stem oil seal.
If oversize valves have been installed, oversize oil seals must be used. Coat valve stem with engine oil. Install protective sleeve over end of valve stem. Install new oil seal over valve stem and seat on valve guide. Remove protective sleeve. Install spring seat, valve spring and retainer or rotator. Compress spring and install valve locks. Remove spring compressor. Ensure valve locks are fully seated.
Install rocker arms or overhead cam components. Tighten all bolts to specification. Adjust valves if required.
Remove adapter. Install spark plugs, valve cover and gasket.
VALVE SPRING INSTALLED HEIGHT
NOTE: Examples used in this article are general in nature and do not necessarily relate to a specific engine or system. Illustrations and procedures have been chosen to guide mechanic through engine overhaul process. Descriptions of processes of cleaning, inspection, assembly and machine shop practice are included.
Always refer to appropriate engine overhaul article, if available, in the ENGINES section for complete overhaul procedures and specifications for the vehicle being repaired.
Valve spring installed height should be checked during reassembly. Measure height from lower edge of valve spring to the upper edge. DO NOT include valve spring seat or retainer. Distance must be within specification.
If valves and/or seats have been ground, a valve spring shim may be required to correct spring height. See Fig. 12.
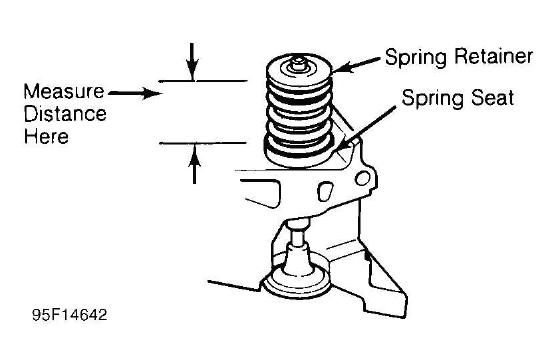
Fig. 12: Measuring Valve Spring Installed Height
ROCKER ARMS & ASSEMBLIES
NOTE: Examples used in this article are general in nature and do not necessarily relate to a specific engine or system. Illustrations and procedures have been chosen to guide mechanic through engine overhaul process. Descriptions of processes of cleaning, inspection, assembly and machine shop practice are included.
Always refer to appropriate engine overhaul article, if available, in the ENGINES section for complete overhaul procedures and specifications for the vehicle being repaired.
Rocker Studs
Rocker studs are either threaded or pressed in place. Threaded studs are removed by locking 2 nuts on the stud.
Unscrew the stud by turning the jam nut. Coat new stud threads with Loctite and install. Tighten to specification.
Pressed-in stud can be removed using a stud puller. Ream stud bore to proper specification and press in a new oversize stud. Pressed-in studs are often replaced by cutting threads in the stud bore to accept a threaded stud.
Rocker Arms & Shafts
Mark rocker arms for location. Remove rocker arm retaining bolts. Remove rocker arms. Inspect rocker arms, shafts, bushings and pivot balls (if equipped) for excessive wear. Inspect rocker arms for wear in valve stem contact area. Measure rocker arm bushing I.D. Replace bushings if excessively worn.
The rocker arm valve stem contact point may be reground, using special fixture for valve grinding machine.
Remove minimum amount of material as possible. Ensure all oil passages are clear. Install rocker arm components in original location. Ensure rocker arm is properly seated in push rod. Tighten bolts to specification. Adjust valves if required. See VALVE ADJUSTMENT.
PUSH RODS
NOTE: Examples used in this article are general in nature and do not necessarily relate to a specific engine or system. Illustrations and procedures have been chosen to guide mechanic through engine overhaul process. Descriptions of processes of cleaning, inspection, assembly and machine shop practice are included.
Always refer to appropriate engine overhaul article, if available, in the ENGINES section for complete overhaul procedures and specifications for the vehicle being repaired.
Remove rocker arms. Mark push rods for location. Remove push rods. Push rods can be steel or aluminum, solid or hollow. Hollow push rods must be internally cleaned to ensure oil passage to rocker arms is cleaned.
Check push rods for damage, such as loose ends on steel tipped aluminum types.
Check push rod for straightness. Roll push rod on a flat surface. Using feeler gauge, check clearance at center.
Replace push rod if bent. The push rod can also be supported at each end and rotated. A dial indicator is used to detect a bent area in the push rod.
Lubricate ends of push rod and install push rod in original location. Ensure push rod is properly seated in lifter.
Install rocker arm. Tighten bolts to specification. Adjust valves if required. See VALVE ADJUSTMENT.
LIFTERS
NOTE: Examples used in this article are general in nature and do not necessarily relate to a specific engine or system. Illustrations and procedures have been chosen to guide mechanic through engine overhaul process. Descriptions of processes of cleaning, inspection, assembly and machine shop practice are included.
Always refer to appropriate engine overhaul article, if available, in the ENGINES section for complete overhaul procedures and specifications for the vehicle being repaired.
Hydraulic Lifters
Before replacing a hydraulic lifter for noisy operation, ensure noise is not caused by worn rocker arms or valve tips. Also ensure sufficient oil pressure exists. Hydraulic lifters must be installed in original location. Remove rocker arm assembly and push rod. Mark components for location. Some applications require intake manifold, cylinder head or lifter cover removal. Remove lifter retainer plate (if used). To remove lifters, use a hydraulic lifter remover or magnet. Different type lifters are used. See Fig. 13.
On sticking lifters, disassemble and clean lifter. DO NOT mix lifter components or positions. Parts are selectfitted and are not interchangeable. Inspect all components for wear. Note amount of wear in lifter body-tocamshaft contact area. Surface must have smooth and convex contact face. If wear is apparent, carefully inspect cam lobe.
Inspect push rod contact area and lifter body for scoring or signs of wear. If body is scored, inspect lifter bore for damage and lack of lubrication. On roller type lifters, inspect roller for flaking, pitting, loss of needle bearings and roughness during rotation.
Measure lifter body O.D. in several areas. Measure lifter bore I.D. Ensure components or oil clearance is within specification. Some models offer oversize lifters. Replace lifter if damaged.
If lifter check valve is not operating, obstructions may be preventing it from closing or valve spring may be broken. Clean or replace components as necessary.
Check plunger operation. Plunger should drop to bottom of the body by its own weight when assembled dry. If plunger is not free, soak lifter in solvent to dissolve deposits.
Lifter leak-down test can be performed on lifter. Lifter must be filled with special test oil. New lifters contain special test oil. Using lifter leak-down tester, perform leak-down test following manufacturer's instructions. If leak-down time is not within specifications, replace lifter assembly.
Lifters should be soaked in clean engine oil several hours prior to installation. Coat lifter base, roller (if equipped) and lifter body with ample amount of Molykote or camshaft lubricant. See Fig. 13. Install lifter in original location. Install remaining components. Valve lash adjustment is not required on most hydraulic lifters.
Preload of hydraulic lifter is automatic. Some models may require adjustment.
NOTE: Some manufacturers require that a crankcase conditioner be added to engine oil and engine operated for specified amount of time to aid in lifter break-in procedure if new lifters or camshaft are installed.
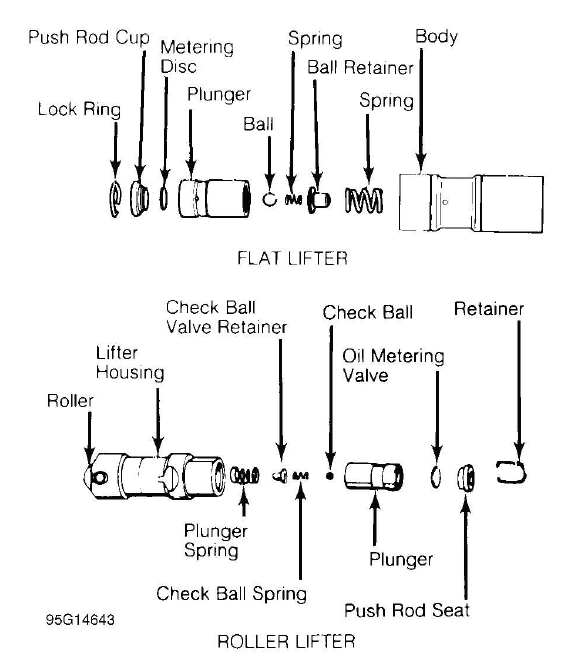
Fig. 13: Typical Hydraulic Valve Lifter Assemblies
Mechanical Lifters
Lifter assemblies must be installed in original locations. Remove rocker arm assembly and push rod. Mark components for location. Some applications require intake manifold or lifter cover removal. Remove lifter retainer plate (if used). To remove lifters, use lifter remover or magnet.
Inspect push rod contact area and lifter body for scoring or signs of wear. If body is scored, inspect lifter bore for damage and lack of lubrication. Note amount of wear in lifter body-to-camshaft contact area. Surface must have smooth and convex contact face. If wear is apparent, carefully inspect cam lobe.
Coat lifter base, roller (if equipped) and lifter body with ample amount of Molykote or camshaft lubricant.
Install lifter in original location. Install remaining components. Tighten bolts to specification. Adjust valves. See VALVE ADJUSTMENT.

