Buick Enclave: Repair Instructions
STEERING LINKAGE INNER TIE ROD INSPECTION
Special Tools
- GE-8001 Dial Indicator Set
For equivalent regional tools, refer to Special Tools.
1. Turn the ignition key to the ON position with the engine OFF.
NOTE: This inspection procedure does not supersede local government required inspections that have more stringent requirements.
2. With the aid of an assistant, turn the steering wheel to the full stop position and hold the steering wheel in that position until the test is complete. Part of the steering linkage inner tie rod (2) being tested should be inside the steering gear housing. The inner tie rod housing (1) being tested should be inside the steering gear housing and seated against the steering stop.
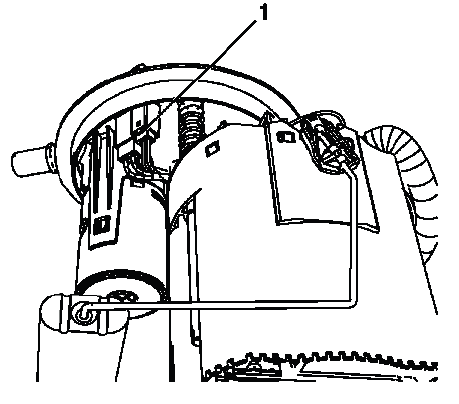
Fig. 4: Measuring Lash Between Inner Tie Rod & Steering Gear Housing
3. Raise and support the vehicle. Refer to Lifting and Jacking the Vehicle.
4. If there is not a good location for the GE-8001 dial indicator pointer at the steering gear housing, install a large worm gear hose clamp (3) to the steering gear housing over the larger steering gear boot clamp and align the clamp so that the screw can be a location for the GE-8001 dial indicator pointer.
5. Install the GE-8001 dial indicator between the inner tie rod and the steering gear housing or the worm gear clamp in such a way as to measure the lash between the inner tie rod and the steering gear housing.
The lash between the inner tie rod and the steering gear housing is equal to the lash between the inner tie rod and the inner tie rod housing because the inner tie rod housing is inside the steering gear housing during this procedure.
6. Grasping the tire at the 3 o'clock (2) and 9 o'clock (1) positions, gently push in on one side of the tire in order to remove any lash.
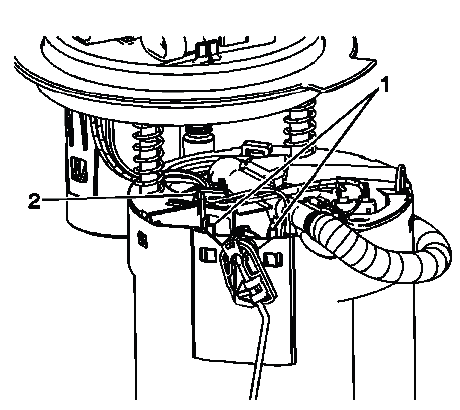
Fig. 5: Identifying Tire Grasping Positions
NOTE: Only move the tire enough to feel any lash between the inner tie rod and the inner tie rod housing without moving the steering gear rack.
7. Zero the GE-8001 dial indicator.
8. On the same side of the tire previously pushed in, gently pull out and measure the lash.
9. Record the measurement shown on the GE-8001 dial indicator.
10. If the measured value exceeds 0.5 mm (0.02 in), replace the inner tie rod. Refer to Steering Linkage Inner Tie Rod Replacement.
11. Repeat the procedure for the other side.
STEERING LINKAGE OUTER TIE ROD INSPECTION
Special Tools
- GE-8001 Dial Indicator Set
For equivalent regional tools, refer to Special Tools.
1. Inspect the outer tie rod seal. If the outer tie rod seal is torn, replace the outer tie rod. Refer to Steering Linkage Outer Tie Rod Replacement.
NOTE: This inspection procedure does not supersede local government required inspections that have more stringent requirements.
2. Raise the side of the vehicle being inspected with a floor jack while maintaining contact between the opposite wheel and the shop floor. Support the lower control arm with a floor jack stand as far outboard as possible and remove the floor jack. Refer to Lifting and Jacking the Vehicle.
3. Install the GE-8001 dial indicator between the outer tie rod and the steering knuckle as shown in the graphic. Note that the tire and wheel assembly is shown removed only for clarification of the GE-8001 dial indicator position.
Fig. 6: Measuring Outer Tie Rod Lash
4. Grasping the tire at the 3 o'clock (2) and 9 o'clock (1) positions, gently push in on one side of the tire to remove any lash.
Fig. 7: Identifying Tire Grasping Positions
5. Zero the GE-8001 dial indicator.
6. On the same side of the tire previously pushed inwards, gently pull outwards and measure the lash.
7. Record the measurement shown on the GE-8001 dial indicator.
8. If the measured value exceeds 0.5 mm (0.02 in), replace the outer tie rod. Refer to Steering Linkage Outer Tie Rod Replacement.
9. Repeat the procedure for the other side.
POWER STEERING SYSTEM BLEEDING
Special Tools
- CH-43485 Power Steering Bleeder Adapter
- GE-23738-A Vacuum Pump
For equivalent regional tools, refer to Special Tools.
NOTE:
- If you service the power steering system, you will not be able to obtain an accurate fluid level reading unless you bleed the air from the power steering system.
- Hoses touching the frame, body or engine may cause system noise.
Ensure the hoses do not touch any other part of the vehicle.
- Loose connections may not leak, but could allow air into the steering system. Ensure all hose connections are tight.
- Maintain the power steering fluid level throughout the bleeding procedure.
- Use clean, new power steering fluid only. Refer to Fluid and Lubricant Recommendations.
- Introducing too much air into the power steering system will increase the amount of time required to bleed the system.
- DO NOT start the engine until instructed to do so.
- DO NOT use a hoist. Keep the rear tires on the ground.
1. Apply the park brake.
2. Using a floor jack and jack stands, raise the front of the vehicle until the center of the front wheels are approximately 61 cm (24 in) off the ground. Refer to Lifting and Jacking the Vehicle.
3. Fill the power steering fluid reservoir with fluid to the bottom of the filler neck. Leave the cap off.
4. Place towels around the power steering fluid reservoir neck in order to catch any fluid flowing out of the reservoir.
5. With the key in the ON position and with the ENGINE OFF, turn the steering wheel from stop to stop until the fluid level stabilizes and there are fewer bubbles in the reservoir.
NOTE: The fluid level will rise and fall as you turn the steering wheel and you bleed air from the system. This step may take several minutes.
6. Ensure the fluid level is at the bottom of the filler neck.
7. Connect the CH-43485 adapter to the GE-23738-A pump clear hose.
8. Hold the CH-43485 adapter on the top of the reservoir filler neck.
9. Apply a vacuum of 68 kPa (20 in Hg, 10 psi).
10. Set the GE-23738-A pump down. The vacuum will hold the CH-43485 adapter in place.
11. Maintain a vacuum of 68 kPa (20 in Hg, 10 psi) while turning the steering wheel from stop to stop. Hold the steering wheel at each steering stop until there are fewer bubbles in the GE-23738-A pump clear hose.
NOTE: The vacuum gauge needle will fluctuate while the steering wheel is moving. This step may take several minutes.
12. With the steering wheel in the straight ahead position, maintain a vacuum of 68 kPa (20 in Hg, 10 psi) for 5 minutes.
13. Inspect the condition of the fluid in the GE-23738-A pump clear hose. If any bubbles are in the fluid, repeat steps 11 and 12.
14. Lower the vehicle.
15. Relieve the vacuum in the GE-23738-A pump.
16. Remove the CH-43485 adapter from the reservoir filler neck.
17. Ensure the power steering fluid level is at the MAX mark on the capstick fluid level indicator.
18. With the reservoir cap off, start the engine. Slowly rotate the steering wheel from stop to stop 10 times.
Hold the steering wheel at each stop for 2 seconds.
19. Verify the steering system does not shudder while turning the steering wheel. If the steering system exhibits a shudder condition, repeat steps 1 through 18.
20. Turn the engine OFF.
21. Ensure the power steering fluid level is at the MAX mark on the capstick fluid level indicator. Install the cap to the reservoir. Refer to Checking and Adding Power Steering Fluid.
22. Test drive the vehicle.
CHECKING AND ADDING POWER STEERING FLUID
CAUTION: When adding fluid or making a complete fluid change, always use the proper power steering fluid. Failure to use the proper fluid will cause hose and seal damage and fluid leaks.
1. Clean the area surrounding the reservoir cap.
2. Remove the reservoir cap.
3. Inspect the power steering pump fluid level at regular intervals. Use the appropriate procedure below.
Add fluid when required. Refer to Fluid and Lubricant Recommendations.
Fluid Is Hot
- Run the engine until the fluid reaches about 80ºC (170ºF).
- Turn the engine OFF.
- Remove the reservoir cap.
- Inspect the fluid level on the capstick.
- Ensure that the fluid level is at the HOT/FULL/MAX mark on the capstick.
4. If the fluid level is low, add power steering fluid to the proper level.
5. Install the reservoir cap.
6. When checking the fluid level after servicing the steering system, bleed the air from the system. Refer to Power Steering System Bleeding.
POWER STEERING SYSTEM FLUSHING
1. Ensure the engine is OFF.
2. Apply the park brake.
3. Using a floor jack and jack stands, raise the front of the vehicle until the center of the front wheels are approximately 61 cm (24 in) off the ground. Refer to Lifting and Jacking the Vehicle.
4. Place a large container under the vehicle in order to collect the draining fluid.
NOTE: Do not reuse any drained power steering fluid regardless of appearance or condition.
5. Loosen the hose clamp (1) and disconnect the power steering fluid reservoir inlet hose from the power steering fluid reservoir.
Fig. 8: Identifying Power Steering Reservoir Inlet Hose & Clamp
6. Plug the power steering fluid reservoir inlet port.
7. With the key ON and the engine OFF, turn the steering wheel fully to the left and to the right while an assistant maintains the minimum fluid level in the reservoir using NEW approved power steering fluid.
Refer to Fluid and Lubricant Recommendations.
NOTE: This step may require 4 L (4 qt) of power steering fluid until the draining fluid appears clear.
Continue until the fluid from the power steering fluid reservoir inlet hose runs clear.
8. Remove the plug from the power steering fluid reservoir inlet port.
9. Connect the power steering fluid reservoir inlet hose to the reservoir. Secure the hose with the clamp.
10. Fill and bleed the power steering system. Refer to Power Steering System Bleeding.
NOTE: Do NOT start the engine without the power steering fluid at a minimum system level.
11. Inspect the power steering fluid for the following indications of contamination:
- Milky fluid - water
- Brown fluid - burnt
- Plastic debris or dirt chunks
12. If the fluid is contaminated, repeat steps 5 through 11.
13. Ensure there are no power steering fluid leaks.
14. Lower the vehicle.
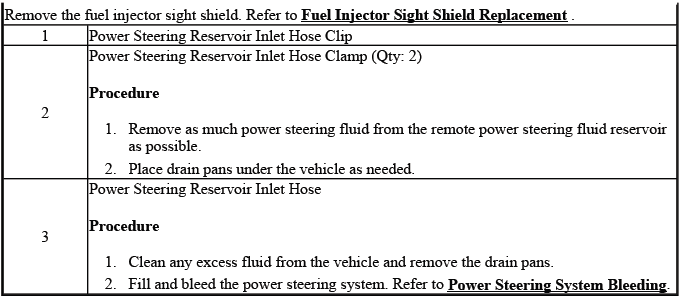
POWER STEERING FLUID RESERVOIR REPLACEMENT
Removal Procedure
1. Remove the fuel injector sight shield. Refer to Fuel Injector Sight Shield Replacement.
2. Remove as much power steering fluid from the remote power steering fluid reservoir as possible.
3. Place drain pans under the vehicle as needed.
4. Compress the power steering reservoir inlet hose clamp (1) and disconnect the hose from the remote power steering fluid reservoir.
Fig. 9: Identifying Power Steering Reservoir Inlet Hose & Clamp
5. Compress the power steering fluid reservoir outlet hose clamp (1) and disconnect the hose from the remote power steering fluid reservoir.
Fig. 10: View Of Power Steering Fluid Reservoir Outlet Hose & Clamp
6. Remove the remote power steering fluid reservoir bolts (1).
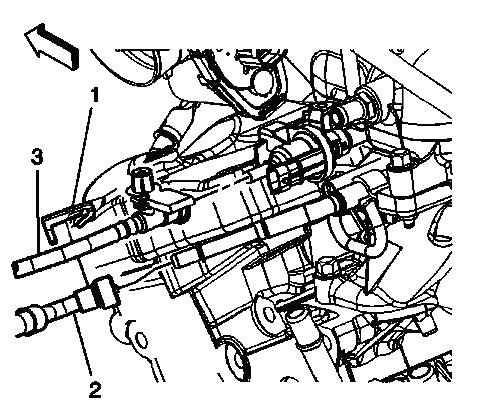
Fig. 11: Locating Power Steering Fluid Reservoir & Bolts
7. Remove the remote power steering fluid reservoir (2).
Installation Procedure
1. Install the remote power steering fluid reservoir (2).
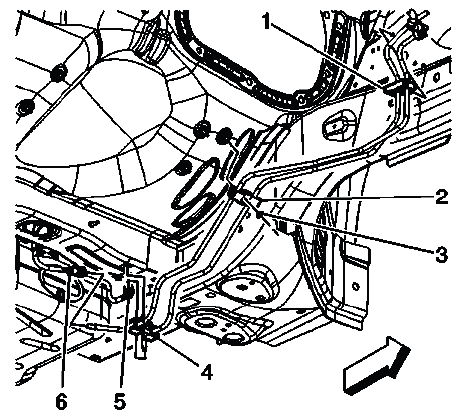
Fig. 12: Locating Power Steering Fluid Reservoir & Bolts
CAUTION: Refer to Fastener Caution.
2. Install the remote power steering fluid reservoir bolts (1) and tighten to 9 (80 lb in).
3. Connect the power steering fluid reservoir outlet hose and clamp (1).
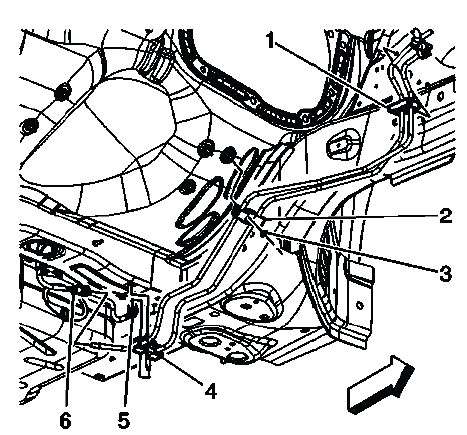
Fig. 13: View Of Power Steering Fluid Reservoir Outlet Hose & Clamp
4. Connect the power steering reservoir inlet hose and clamp (1).
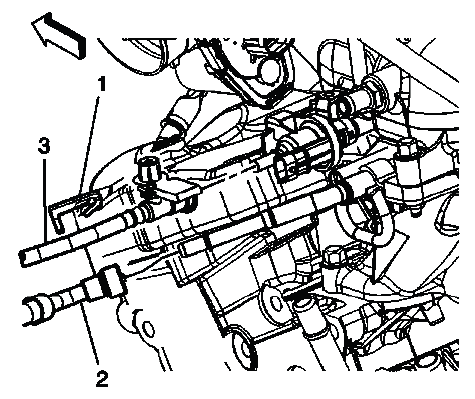
Fig. 14: Identifying Power Steering Reservoir Inlet Hose & Clamp
5. Clean all excess fluid from the vehicle and remove the drain pans.
6. Fill and bleed the power steering system. Refer to Power Steering System Bleeding.
7. Install the fuel injector sight shield. Refer to Fuel Injector Sight Shield Replacement.
POWER STEERING FLUID RESERVOIR BRACKET REPLACEMENT
Removal Procedure
1. Remove the fuel injector sight shield. Refer to Fuel Injector Sight Shield Replacement.
2. Remove the right side engine mount strut bracket. Refer to Engine Mount Strut Bracket Replacement - Right Side.
3. Remove as much power steering fluid from the remote power steering fluid reservoir as possible.
4. Place drain pans under the vehicle as needed.
5. Disconnect the power steering reservoir inlet hose (1).
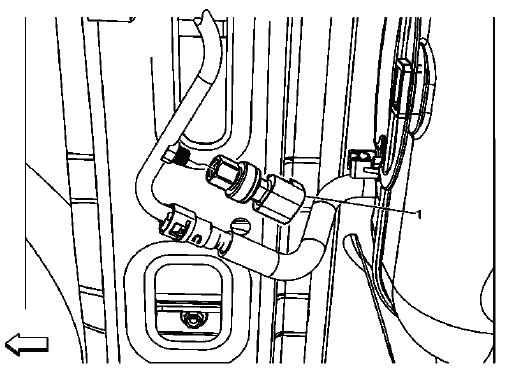
Fig. 15: Identifying Power Steering Reservoir Inlet Hose & Clamp
6. Disconnect the power steering fluid reservoir outlet hose (1).
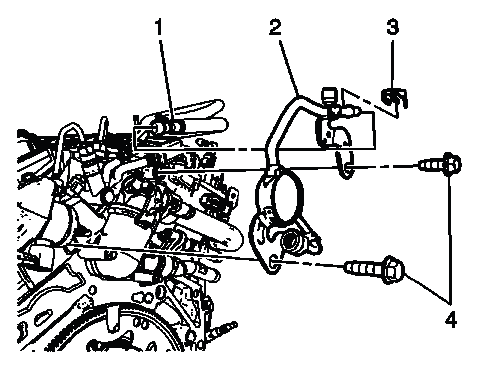
Fig. 16: View Of Power Steering Fluid Reservoir Outlet Hose & Clamp
7. Remove the remote power steering fluid reservoir bracket bolts (1).
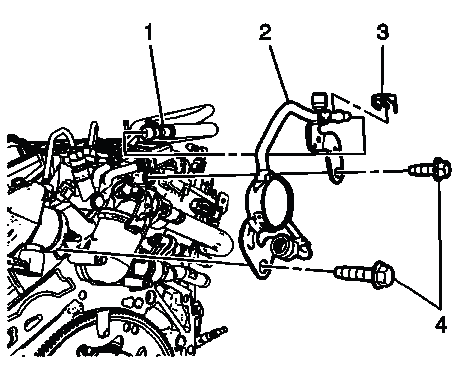
Fig. 17: Identifying Power Steering Fluid Reservoir Bracket & Bolts
8. Remove the remote power steering fluid reservoir bracket (2).
9. Transfer any parts as needed.
Installation Procedure
1. Install the remote power steering fluid reservoir bracket (2).
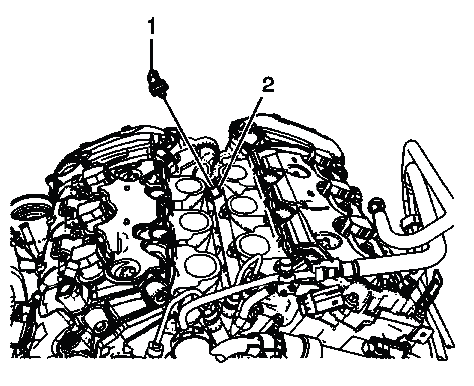
Fig. 18: Identifying Power Steering Fluid Reservoir Bracket & Bolts
CAUTION: Refer to Fastener Caution.
2. Install the remote power steering fluid reservoir bracket bolts (1) and tighten to 9 (80 lb in).
3. Connect the power steering fluid reservoir outlet hose (1).
Fig. 19: View Of Power Steering Fluid Reservoir Outlet Hose & Clamp
4. Connect the power steering reservoir inlet hose (1).
Fig. 20: Identifying Power Steering Reservoir Inlet Hose & Clamp
5. Clean all excess fluid from the vehicle and remove the drain pans.
6. Install the right side engine mount strut bracket. Refer to Engine Mount Strut Bracket Replacement - Right Side.
7. Fill and bleed the power steering system. Refer to Power Steering System Bleeding.
8. Install the fuel injector sight shield. Refer to Fuel Injector Sight Shield Replacement.
POWER STEERING PUMP PULLEY REPLACEMENT
Fig. 21: View Of Power Steering Pump Pulley
Power Steering Pump Pulley Replacement

POWER STEERING PUMP REPLACEMENT
Removal Procedure
1. Remove the fuel injector sight shield. Refer to Fuel Injector Sight Shield Replacement.
2. Remove as much power steering fluid from the remote power steering fluid reservoir as possible.
3. Place drain pans under the vehicle as needed.
4. Remove the drive belt. Refer to Drive Belt Replacement.
5. Remove the steering gear heat shield. Refer to Steering Gear Heat Shield Replacement.
6. Remove the right side catalytic convertor. Refer to Catalytic Converter Replacement - Right Side.
7. Disconnect the power steering fluid reservoir outlet hose (1) from the power steering pump.
Fig. 22: Identifying Power Steering Fluid Reservoir Outlet Hose
8. Disconnect the power steering gear inlet hose (1) from the power steering pump.
Fig. 23: Identifying Power Steering Gear Inlet Hose And Fitting
9. Remove the power steering pump bolts (2).
Fig. 24: View Of Power Steering Pump & Bolts
10. Remove the power steering pump (1) from the vehicle.
11. Transfer any parts as needed.
Installation Procedure
1. Install the power steering pump (1) to the vehicle.
Fig. 25: View Of Power Steering Pump & Bolts
2. Install the power steering pump bolts (2) and tighten to 50 N.m (37 lb ft).
CAUTION: Refer to Fastener Caution.
3. Connect the power steering gear inlet hose fitting (1) to the power steering pump and tighten to 34 N.m (25 lb ft).
Fig. 26: Identifying Power Steering Gear Inlet Hose And Fitting
4. Connect the power steering fluid reservoir outlet hose (1) to the power steering pump.
Fig. 27: Identifying Power Steering Fluid Reservoir Outlet Hose
5. Clean any excess fluid from the vehicle and remove the drain pans.
6. Install the right side catalytic convertor. Refer to Catalytic Converter Replacement - Right Side.
7. Install the steering gear heat shield. Refer to Steering Gear Heat Shield Replacement.
8. Install the drive belt. Refer to Drive Belt Replacement.
9. Fill and bleed the power steering system. Refer to Power Steering System Bleeding.
10. Install the fuel injector sight shield. Refer to Fuel Injector Sight Shield Replacement.
STEERING LINKAGE OUTER TIE ROD REPLACEMENT
Special Tools
- J-24319-B Steering Linkage and Tie Rod Puller
- SA91100C Tie Rod Separator
For equivalent regional tools, refer to Special Tools.
Removal Procedure
1. Remove the front tire and wheel assembly. Refer to Tire and Wheel Removal and Installation.
2. Remove the steering linkage outer tie rod nut (1).
Fig. 28: Identifying Steering Linkage Outer Tie Rod Nut
3. Loosen the steering linkage inner tie rod nut (1).

Fig. 29: View Of Steering Linkage Inner Tie Rod Nut
4. Use the J-24319-B puller for Buick, GMC and Chevrolet and the SA91100C separator for Saturn in order to disconnect the steering linkage outer tie rod from the steering knuckle.
Fig. 30: Removing Outer Tie Rod Assembly From Steering Knuckle
CAUTION: Do not attempt to free the ball stud by using a pickle fork or wedge type tool, because seal or bushing damage could result. Use the proper tool to separate all ball joints.
5. Remove the steering linkage outer tie rod (2) from the steering linkage inner tie rod (1). Count the total number of complete rotations necessary in order to remove the steering linkage outer tie rod from the steering linkage inner tie rod.
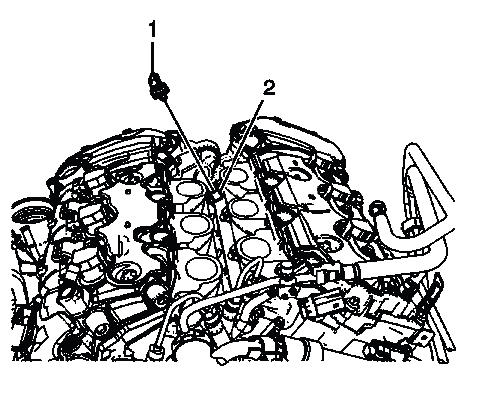
Fig. 31: Identifying Steering Linkage Inner & Outer Tie Rod
Installation Procedure
1. Install the steering linkage outer tie rod (3) to the steering linkage inner tie rod (1) with the same number of complete rotations counted during the removal. Do not tighten the steering linkage inner tie rod nut (2), yet.
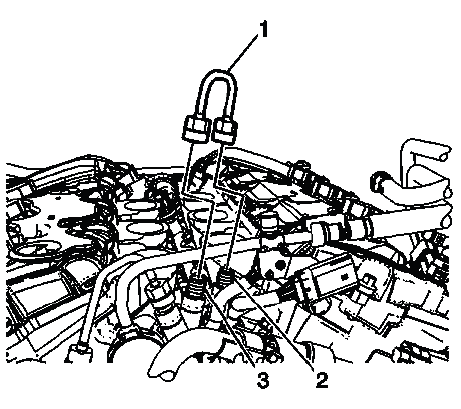
Fig. 32: Identifying Outer Tie Rod Assembly & Inner Tie Rod Assembly
2. Connect the steering linkage outer tie rod (2) to the steering knuckle (1).
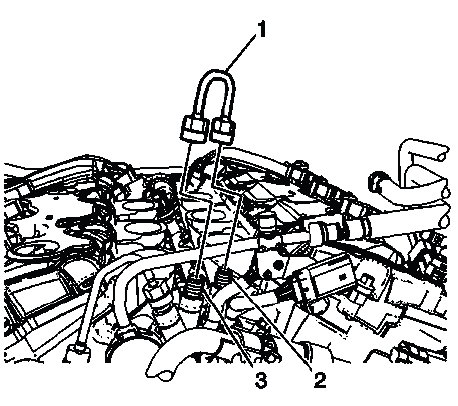
Fig. 33: View Of Outer Tie Rod & Steering Knuckle
3. Ensure the threads on the steering linkage outer tie rod nut (1) and on the outer tie rod stud are clean an free from corrosion. If the threads on a part are corroded, replace the corroded part.
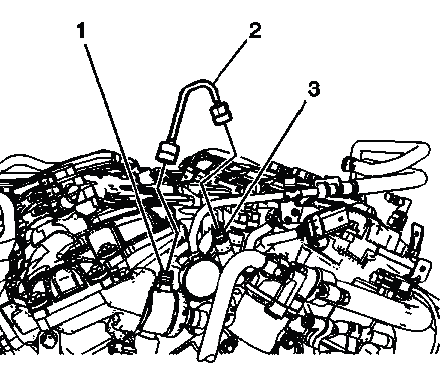
Fig. 34: Identifying Steering Linkage Outer Tie Rod Nut
4. Install the steering linkage outer tie rod nut to the outer tie rod stud. Ensure the nut develops 2 N.m (18 lb in) of torque or drag, on the stud prior to the nut seating. If the nut does NOT meet this specification, replace the nut.
CAUTION: Refer to Fastener Caution.
5. Tighten the steering linkage outer tie rod nut to 30 N.m (22 lb ft).
6. Tighten the steering linkage outer tie rod nut an additional 120º.
7. Ensure that 2.5-4.5 steering linkage outer tie rod threads are visible beyond the steering linkage outer tie rod nut nylon.
8. Install the front tire and wheel assembly. Refer to Tire and Wheel Removal and Installation.
9. Measure and adjust the front toe. Refer to Wheel Alignment - Steering Wheel Angle and/or Front Toe Adjustment.
10. Tighten the steering linkage inner tie rod nut (1) to 75 N.m (55 lb ft).
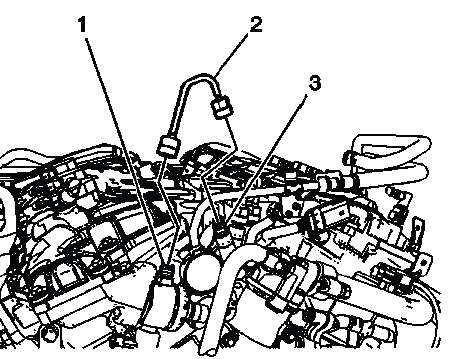
Fig. 35: View Of Steering Linkage Inner Tie Rod Nut
POWER STEERING COOLER PIPE/HOSE REPLACEMENT
Removal Procedure
1. Remove the right front frontwards wheelhouse liner. Refer to Front Wheelhouse Front Liner Replacement (Acadia, Enclave, Traverse).
2. Place drain pans under the vehicle as needed.
3. Loosen the power steering cooler pipe clamp (2) and disconnect the power steering cooler pipe (3) from the power steering fluid cooler (1).
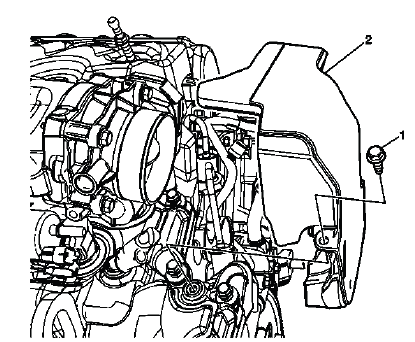
Fig. 36: Identifying Power Steering Fluid Cooler, Power Steering Cooler Pipe
& Clamp
4. Remove the power steering gear outlet hose bracket bolt (1).
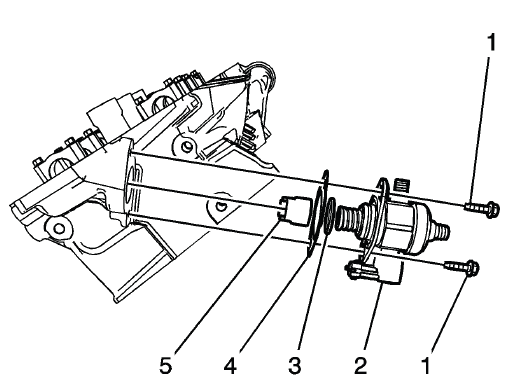
Fig. 37: View Of Power Steering Gear Outlet Hose Bracket Bolt
5. Remove and discard the power steering gear outlet hose clamp (2).
6. Disconnect the power steering cooler pipe from the power steering gear outlet hose (4, 3).
7. Remove any plastic retaining clips on the power steering cooler pipe and discard them.
8. Remove the power steering cooler pipe from the vehicle.
Installation Procedure
1. Install the power steering cooler pipe to the vehicle.
2. Install a new power steering cooler pipe clamp (2).
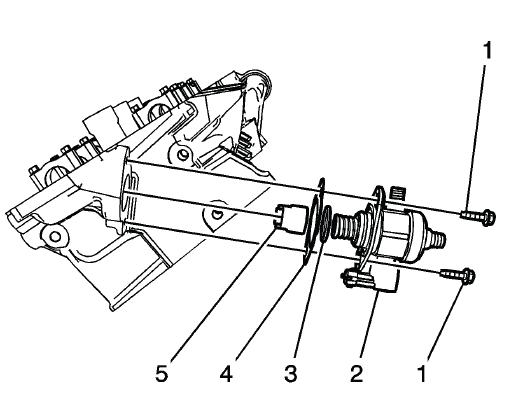
Fig. 38: View Of Power Steering Gear Outlet Hose Bracket Bolt
3. Connect the power steering cooler pipe to the power steering gear outlet hose (4, 3).
4. Install the power steering gear outlet hose bracket bolt (1) and tighten to 9 N.m (80 lb in).
CAUTION: Refer to Fastener Caution.
5. Connect the power steering cooler pipe (3) to the power steering fluid cooler (1) and tighten the power steering cooler pipe clamp (2).
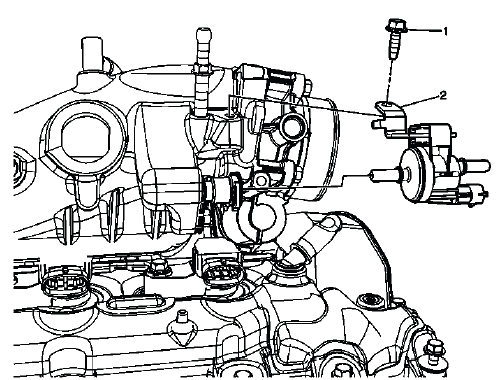
Fig. 39: Identifying Power Steering Fluid Cooler, Power Steering Cooler Pipe
& Clamp
6. Clean any excess fluid from the vehicle and remove the drain pans.
7. Install the right front frontwards wheelhouse liner. Refer to Front Wheelhouse Front Liner Replacement (Acadia, Enclave, Traverse).
8. Fill and bleed the power steering system. Refer to Power Steering System Bleeding.
POWER STEERING FLUID COOLER REPLACEMENT
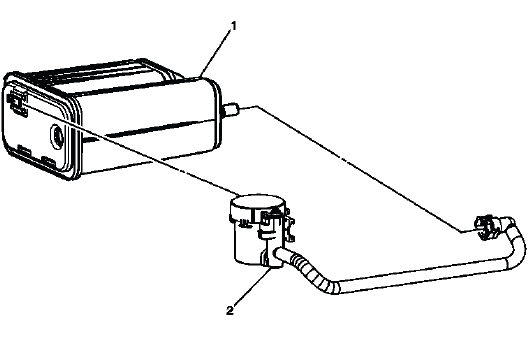
Fig. 40: View Of Power Steering Fluid Cooler
Power Steering Fluid Cooler Replacement
POWER STEERING FLUID RESERVOIR INLET HOSE REPLACEMENT

Fig. 41: View Of Power Steering Reservoir Inlet Hose
Power Steering Fluid Reservoir Inlet Hose Replacement

POWER STEERING FLUID RESERVOIR OUTLET HOSE REPLACEMENT
Removal Procedure
1. Remove the fuel injector sight shield. Refer to Fuel Injector Sight Shield Replacement.
2. Remove as much power steering fluid from the remote power steering fluid reservoir as possible.
3. Place drain pans under the vehicle as needed.
4. Disconnect the power steering fluid reservoir outlet hose (1) from the remote power steering fluid reservoir.
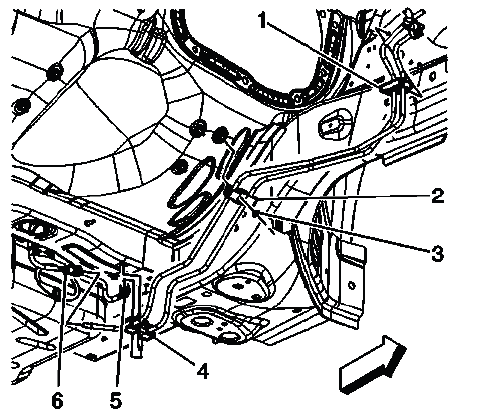
Fig. 42: View Of Power Steering Fluid Reservoir Outlet Hose & Clamp
5. Disconnect the power steering fluid reservoir outlet hose (1) from the power steering pump.
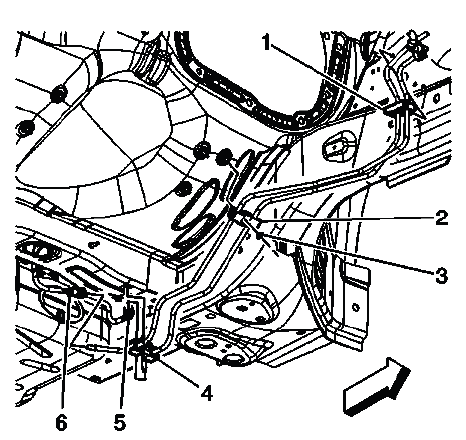
Fig. 43: Identifying Power Steering Fluid Reservoir Outlet Hose
6. Remove the power steering fluid reservoir outlet hose from the vehicle.
NOTE: Disconnect any clips as needed before attempting removal.
Installation Procedure
1. Install the power steering fluid reservoir outlet hose to the vehicle.
NOTE: Clip the power steering fluid reservoir hose in place in its original routing.
2. Connect the power steering fluid reservoir outlet hose (1) to the power steering pump.
Fig. 44: Identifying Power Steering Fluid Reservoir Outlet Hose
3. Connect the power steering fluid reservoir outlet hose (1) to the remote power steering fluid reservoir.
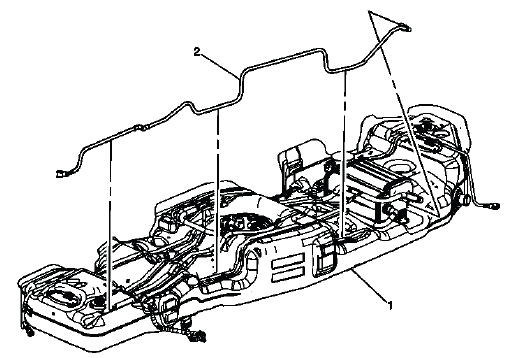
Fig. 45: View Of Power Steering Fluid Reservoir Outlet Hose & Clamp
4. Clean all excess fluid from the vehicle and remove the drain pans.
5. Fill and bleed the power steering system. Refer to Power Steering System Bleeding.
6. Install the fuel injector sight shield. Refer to Fuel Injector Sight Shield Replacement.
POWER STEERING GEAR INLET PIPE/HOSE REPLACEMENT
Removal Procedure
1. Remove the right side catalytic convertor. Refer to Catalytic Converter Replacement - Right Side 2. Remove as much power steering fluid from the remote power steering fluid reservoir as possible.
3. Place drain pans under the vehicle as needed.
4. Disconnect the power steering fluid reservoir outlet hose from the power steering pump. Refer to Power Steering Fluid Reservoir Outlet Hose Replacement 5. Unclip the power steering fluid reservoir outlet hose from the power steering gear inlet hose bracket.
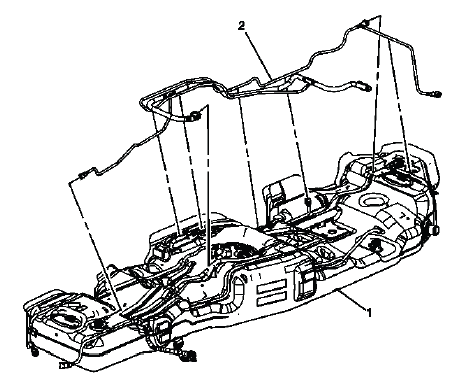
Fig. 46: Identifying Power Steering Gear Inlet Hose Bracket Nut & Bolt
6. Remove the power steering gear inlet hose bracket bolt (1).
7. Remove the power steering gear inlet hose bracket nut (2).
8. Disconnect the power steering gear inlet hose (1) from the power steering pump.
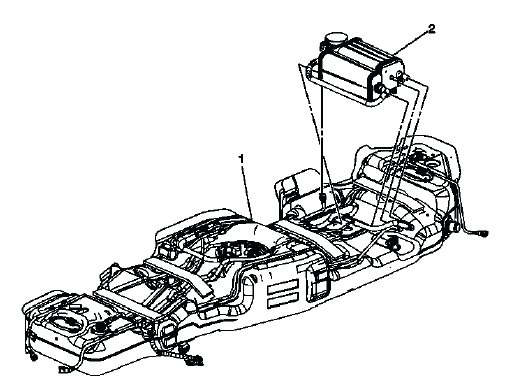
Fig. 47: Identifying Power Steering Gear Inlet Hose And Fitting
9. Remove the power steering gear inlet hose retaining plate bolt (1).
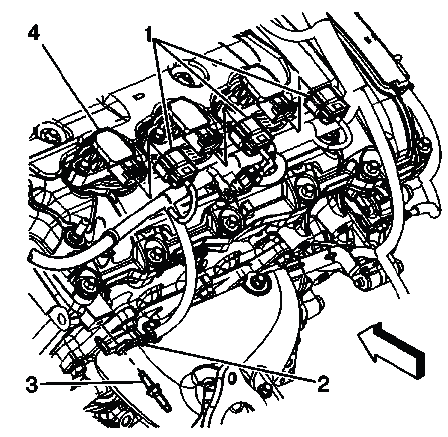
Fig. 48: Identifying Power Steering Gear Inlet Hose Retaining Plate Bolt
10. Remove the power steering gear inlet and outlet pipe clip bolt (2).
11. Remove the power steering gear inlet hose from underneath the vehicle.
Installation Procedure
1. Install the power steering gear inlet hose to the vehicle from underneath the vehicle and place the power steering gear inlet hose end into the steering gear.
NOTE: Hand tighten the bolts and nut in the following steps until all parts are in place. Once all bolts, the nut and the part are in place they can be torqued to the specifications.
2. Install the power steering gear inlet hose retaining plate bolt (1) and tighten to 12 N.m (106 lb in).
Fig. 49: Identifying Power Steering Gear Inlet Hose Retaining Plate Bolt
CAUTION: Refer to Fastener Caution.
3. Install the power steering gear inlet and outlet pipe clip bolt (2) and tighten to 9 N.m (80 lb in).
4. Connect the power steering gear inlet hose (1) to the power steering pump and tighten to 34 N.m (25 lb ft).
Fig. 50: Identifying Power Steering Gear Inlet Hose And Fitting
5. Install the power steering gear inlet hose bracket and bolt (1) and tighten to 9 N.m (80 lb in).
Fig. 51: Identifying Power Steering Gear Inlet Hose Bracket Nut & Bolt
6. Install the power steering gear inlet hose bracket and nut (2) and tighten to 9 N.m (80 lb in).
7. Connect the power steering fluid reservoir outlet hose to the power steering pump. Refer to Power Steering Fluid Reservoir Outlet Hose Replacement 8. Clip the power steering fluid reservoir outlet hose to the power steering gear inlet hose bracket.
9. Clean any excess fluid from the vehicle and remove the drain pans.
10. Install the right side catalytic convertor. Refer to Catalytic Converter Replacement - Right Side 11. Fill and bleed the power steering system. Refer to Power Steering System Bleeding.
POWER STEERING GEAR OUTLET PIPE/HOSE REPLACEMENT
Removal Procedure
1. Remove as much power steering fluid from the remote power steering fluid reservoir as possible.
2. Hoist and raise the vehicle. Refer to Lifting and Jacking the Vehicle.
3. Place drain pans under the vehicle as needed.
4. Remove the power steering gear inlet hose retaining plate bolt (1) and the power steering gear inlet and outlet pipe clip bolt (2).
Fig. 52: Identifying Power Steering Gear Inlet Hose Retaining Plate Bolt
5. Pull the power steering gear outlet hose out of the steering gear.
6. Remove the power steering gear outlet hose bracket bolt (1).
Fig. 53: View Of Power Steering Gear Outlet Hose Bracket Bolt
7. Remove and discard the power steering gear outlet hose crimp clamp (2).
8. Disconnect the rubber segment from the metal segment of the power steering gear outlet hose (3, 4).
9. Remove any plastic retaining clips on the power steering gear outlet hose and discard them.
10. Remove the power steering gear outlet hose from the vehicle.
Installation Procedure
1. Position the power steering gear outlet hose to the vehicle.
2. Position a new power steering gear outlet hose clamp (2).
Fig. 54: View Of Power Steering Gear Outlet Hose Bracket Bolt
3. Connect the rubber segment to the metal segment of the power steering gear outlet hose (3, 4).
4. Crimp the new power steering gear outlet hose crimp clamp.
5. Install the power steering gear outlet hose bracket bolt (1) and tighten to 9 N.m (80 lb in).
CAUTION: Refer to Fastener Caution.
6. Insert the steering gear outlet hose in to the steering gear.
Fig. 55: Identifying Power Steering Gear Inlet Hose Retaining Plate Bolt
7. Install the power steering gear inlet hose retaining plate bolt (1) and tighten to 12 N.m (106 lb in).
8. Install the power steering gear inlet and outlet pipe clip bolt (2) and tighten to 9 N.m (80 lb in).
9. Clean any excess fluid from the vehicle and remove the drain pans.
10. Fill and bleed the power steering system. Refer to Power Steering System Bleeding.
STEERING GEAR HEAT SHIELD REPLACEMENT
Fig. 56: View Of Steering Gear Heat Shield
Steering Gear Heat Shield Replacement
STEERING GEAR REPLACEMENT
Removal Procedure
1. Lock the steering column in the straight-ahead position.
CAUTION: With wheels of the vehicle facing straight ahead, secure the steering wheel utilizing steering column anti-rotation pin, steering column lock or a strap to prevent rotation. Locking of the steering column will prevent damage and a possible malfunction of the SIR system.
The steering wheel must be secured in position before disconnecting the following components:
- The steering column
- The intermediate shaft(s)
- The steering gear
After disconnecting these components, do not rotate the steering wheel or move the front tires and wheels. Failure to follow this procedure may cause the SIR coil assembly to become un-centered and cause possible damage to the SIR coil. If you think the SIR coil has become un-centered, refer to your specific SIR coil's centering procedure to re-center SIR Coil.
2. Place drain pans under the vehicle.
3. Remove as much power steering fluid from the power steering fluid reservoir as possible.
4. Disconnect the steering linkage outer tie rods from the steering knuckles. Refer to Steering Linkage Outer Tie Rod Replacement.
5. Disconnect the stabilizer shaft links at the stabilizer shaft. Refer to Stabilizer Shaft Link Replacement.
6. Disconnect the intermediate steering shaft from the steering gear. Refer to Intermediate Steering Shaft Replacement.
7. Remove the rear propeller shaft, if equipped. Refer to Propeller Shaft Replacement.
8. Remove the underbody rear side rails. Refer to Underbody Rear Side Rail Replacement.
9. Remove the frame brace. Refer to Frame Brace Replacement.
10. Remove the right side catalytic convertor. Refer to Catalytic Converter Replacement - Right Side.
11. Remove the steering gear heat shields. Refer to Steering Gear Heat Shield Replacement.
12. Position adjustable jack stands underneath the left and right sides of the vehicle at the rear of the front frame.
13. Remove the left and right front frame reinforcement mounting bolts (1).
Fig. 57: Front Frame Reinforcement Mounting Bolts
14. Loosen the front frame reinforcement mounting bolts (1).
Fig. 58: Identifying Front Frame Mounting Bolts
15. Loosen the front frame mounting bolts (2).
NOTE: When the front frame mounting bolts are removed always discard and replace them with new bolts.
16. Loosen the front frame rear mounting bolts (1).
Fig. 59: Locating Rear Frame Mounting Bolts
NOTE: When the front frame rear mounting bolts are removed always discard and replace them with new bolts.
17. Lower the front frame (1) from the frame rail (2) until enough clearance is gained to remove the steering gear.

Fig. 60: Identifying Frame & Frame Rail
18. Remove the power steering gear inlet hose retaining plate bolt (1).
Fig. 61: Identifying Power Steering Gear Inlet Hose Retaining Plate Bolt
19. Disconnect the power steering gear inlet and outlet hoses from the steering gear.
20. Remove the power steering gear inlet and outlet pipe clip bolt (2).
21. Separate the power steering gear inlet and outlet hoses from the power steering gear inlet and outlet pipe clip.
22. Remove the left side steering gear nuts (1) and bolts (2).
Fig. 62: View Of Left Side Steering Gear Nuts & Bolts
23. Remove the right side steering gear bolts (1).
Fig. 63: Identifying Right Side Steering Gear Bolts
24. Remove the steering gear from the vehicle toward the left side of the vehicle.
Installation Procedure
1. Position the steering gear in the vehicle from the left side of the vehicle.
2. Install the left side steering gear nuts (1) and bolts (2) and tighten to 180 (133 lb ft).
Fig. 64: View Of Left Side Steering Gear Nuts & Bolts
CAUTION: Refer to Fastener Caution.
NOTE: Start all bolts by hand before finalizing any torques.
3. Install the right side steering gear bolts (1) and tighten to 100 (74 lb ft).
Fig. 65: Identifying Right Side Steering Gear Bolts
4. Install the power steering gear inlet and outlet hoses to the steering gear.
5. Install the power steering gear inlet hose retaining plate bolt (1) and tighten to 12 (106 lb in).
Fig. 66: Identifying Power Steering Gear Inlet Hose Retaining Plate Bolt
6. Install the power steering gear inlet and outlet hoses to the power steering gear inlet and outlet pipe clip.
7. Install the power steering gear inlet and outlet pipe clip bolt (2) and tighten to 9 (80 lb in).
8. Raise the front frame to the vehicle body leaving a gap of approximately 12 mm (0.5 in).
9. Install the left and right front frame reinforcement mounting bolts (1) and tighten to 50 (37 lb ft).
Fig. 67: Front Frame Reinforcement Mounting Bolts
10. Install the front frame rear mounting bolts (1) and tighten to 110 (81 lb ft).
Fig. 68: Locating Rear Frame Mounting Bolts
11. Tighten the front frame rear mounting bolts an additional 90º.
12. Install the front frame mounting bolts (2) and tighten to 110 (81 lb ft).
Fig. 69: Identifying Front Frame Mounting Bolts
13. Tighten the front frame mounting bolts an additional 90º.
14. Install the front frame reinforcement mounting bolts (1) and tighten to 50 (37 lb ft).
15. Remove the adjustable jack stands from underneath the vehicle.
16. Clean any excess fluid from the vehicle and remove the drain pans.
17. Install the underbody rear side rails. Refer to Underbody Rear Side Rail Replacement.
18. Install the rear propeller shaft, if equipped. Refer to Propeller Shaft Replacement.
19. Install the steering gear heat shields. Refer to Steering Gear Heat Shield Replacement.
20. Install the right side catalytic convertor. Refer to Catalytic Converter Replacement - Right Side.
21. Install the frame brace. Refer to Frame Brace Replacement.
22. Connect the intermediate steering shaft to the steering gear. Refer to Intermediate Steering Shaft Replacement.
23. Connect the stabilizer shaft links at the stabilizer shaft. Refer to Stabilizer Shaft Link Replacement.
24. Connect the steering linkage outer tie rods to the steering knuckles. Refer to Steering Linkage Outer Tie Rod Replacement.
25. Bleed the power steering system. Refer to Power Steering System Bleeding.
26. Measure and adjust the front toe. Refer to Wheel Alignment - Steering Wheel Angle and/or Front Toe Adjustment.
STEERING LINKAGE INNER TIE ROD REPLACEMENT
Special Tools
- CH-6321 Inner Tie Rod Wrench
- CH-22610 Keystone Clamp Pliers
For equivalent regional tools, refer to Special Tools.
Disassembly Procedure
1. Remove the steering gear from the vehicle. Refer to Steering Gear Replacement.
2. Remove the outer tie rod from the inner tie rod.
Fig. 70: Identifying Steering Linkage Inner & Outer Tie Rod
NOTE: Count the number of complete rotations necessary in order to remove the steering linkage outer tie rod (2) from the steering linkage inner tie rod (1).
3. Remove the inner tie rod nut from the inner tie rod.
4. Remove the outboard boot clamp.
5. Remove the inboard boot clamp.
Discard the inboard boot clamp.
6. Remove the steering gear boot.
7. Inspect the inner tie rod for evidence of corrosion or contamination. If no corrosion or contamination is evident on the inner tie rod, continue with the repair.
NOTE: If corrosion or contamination is evident on the inner tie rod, replace the steering gear.
8. Place the steering gear in a vise.
9. Slide the shock dampener (4) from the inner tie rod housing (6) to the rack (5).
Fig. 71: Identifying Inner Tie Rod Components
CAUTION: Do not change the steering gear preload adjustment before moving the inner tie rod from the steering gear. Changing the steering gear preload adjustment before moving the inner tie rod could result in damage to the pinion and the steering gear.
10. Place a soft jaw pipe wrench or soft jaw pliers on the rack next to the inner tie rod housing.
CAUTION: The pipe wrench must be placed at the valve end of the steering gear and positioned up against the inner tie rod housing. Placing the pipe wrench in any other location will cause damage to the steering gear.
11. Place a wrench on the flats of the inner tie rod housing.
12. Rotate the inner tie rod housing counterclockwise, while holding the rack stationary, until the inner tie rod separates from the rack.
13. If the steering gear has a female rack (1) and a male inner tie rod (3), remove the old thread locking adhesive from the threads (2) on the inner tie rod and from the threads on the rack.
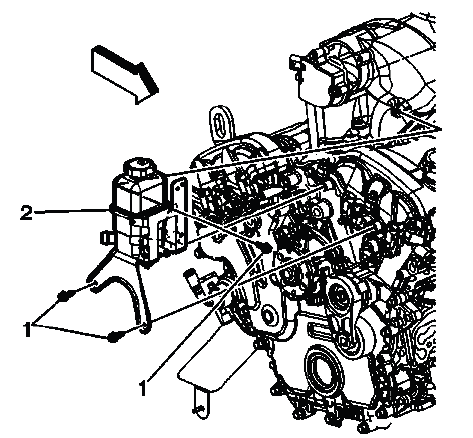
Fig. 72: Identifying Tie Rod Male & Female Ends
NOTE: If the steering gear has a male rack (5) and a female inner tie rod (4), thread locking adhesive will not be present.
Assembly Procedure
1. If the steering gear has a female rack (1) and a male inner tie rod (3), apply LOCTITE 262 or the equivalent thread locking adhesive, to the threads on the inner tie rod.
Fig. 73: Identifying Tie Rod Male & Female Ends
NOTE:
- If the steering gear has a male rack (5) and a female inner tie rod (4), do not apply thread locking adhesive.
- The male inner tie rod threads (2) must be clean prior to applying the thread locking adhesive.
- Inspect the thread locking adhesive container for the expiration date.
- Use only enough thread locking adhesive in order to evenly coat the threads.
2. Install the inner tie rod to the rack (3).
Fig. 74: Connecting Inner Tie Rod To Rack
3. Place a soft jaw pipe wrench or soft jaw pliers on the rack next to the inner tie rod housing (2).
4. Place a torque wrench and the CH-6321 wrench on the flats of the inner tie rod housing. Tighten the inner tie rod to 100 N.m (74 lb ft).
CAUTION: Refer to Fastener Caution.
5. Place the inner tie rod (2) on a vise.
Fig. 75: Staking Both Sides Of Female Inner Tie Rod Assembly Housing To The
Male Rack
6. If the steering gear has a male rack and a female inner tie rod, stake both sides of the inner tie rod housing to the rack.
NOTE: If the steering gear has a female rack (1) and a male inner tie rod, do not stake.
7. Insert a 0.25 mm gauge (1) between the rack (2) and the inner tie rod housing in order to inspect the 2 stakes. The feeler gauge must not pass between the rack and the inner tie rod housing stake.
Fig. 76: Inserting Gage Between Rack & Inner Tie Rod Housing
8. Slide the shock dampener (2) over the inner tie rod housing (3) until the front lip of the shock dampener bottoms against the inner tie rod housing.
Fig. 77: Identifying Shock Dampener & Inner Tie Rod Housing
9. Position the NEW inboard boot clamp (1) on the steering gear boot.
Fig. 78: Larger Steering Gear Boot Clamp
10. Position the steering gear boot with the NEW inboard boot clamp on the steering gear housing.
11. Use the CH-22610 pliers in order to install the NEW inboard boot clamp.
12. Install the outboard boot clamp.
13. Install the inner tie rod nut (2) to the inner tie rod (1).
Fig. 79: Identifying Outer Tie Rod Assembly & Inner Tie Rod Assembly
14. Install the outer tie rod to the inner tie rod.
NOTE:
- Install the outer tie rod (3) with the same number of complete rotations as you counted during the removal.
- Do not tighten the outer tie rod to the inner tie rod nut yet.
- Tighten the inner tie rod nut to the outer tie rod while adjusting the front toe.
15. Install the steering gear to the vehicle. Refer to Steering Gear Replacement.
16. Measure and adjust the front toe. Refer to Wheel Alignment - Steering Wheel Angle and/or Front Toe Adjustment.
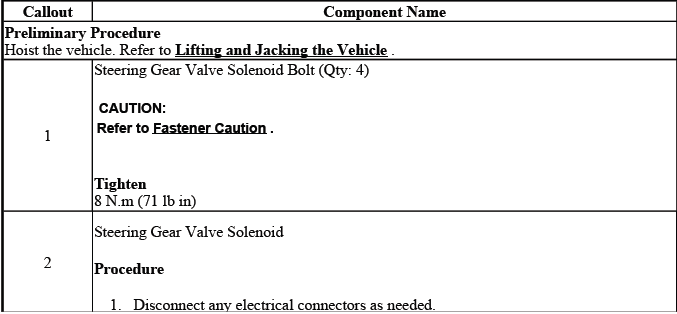
STEERING GEAR VALVE SOLENOID REPLACEMENT
Fig. 80: Identifying Steering Gear Valve Solenoid
Steering Gear Valve Solenoid Replacement