Buick Enclave: Automatic Transmission Fluid. Engine Air Cleaner/Filter. Cooling System
It is not necessary to check the transmission fluid level. Change the fluid at the intervals listed in Maintenance Schedule , and be sure
to use the transmission fluid listed in Recommended Fluids and Lubricants . Notice: Use of the incorrect automatic transmission fluid may damage the vehicle,
and the damages may not be covered by the vehicle warranty. Always use the automatic
transmission fluid listed in Recommended Fluids and Lubricants . The transmission fluid will not reach the end of the dipstick unless the transmission
is at operating temperature. If you need to check the transmission fluid level,
please take the vehicle to your dealer. When to Inspect the Engine Air Cleaner/Filter Inspect the air cleaner/filter at the scheduled maintenance intervals and replace
it at the first oil change after each 80 000 km (50,000 mile) interval. See Maintenance
Schedule for more information. If you are driving in dusty/dirty conditions, inspect the filter at each engine
oil change. See Engine Compartment Overview for the location of the engine air cleaner/filter. How to Inspect the Engine Air Cleaner/Filter To inspect the air cleaner/filter, remove the filter from the vehicle and lightly
shake the filter (away from vehicle) to release loose dust and dirt. If the filter
remains covered with dirt, a new filter is required. To inspect or replace the engine air cleaner/filter: 1. Remove the engine cover. See Engine Cover A. Ventilation Tube 2. Disconnect the cover fitting from the ventilation tube (A). A. Clamp 4. Loosen the outlet duct clamp (A). See Engine Cover . Notice: If the air cleaner/filter is off, dirt can easily get into the engine,
which could damage it. Always have the air cleaner/filter in place when you are driving. The cooling system allows the engine to maintain the correct working temperature. A. Engine Coolant Recovery Tank Do not run the engine if there is a leak. If you run the engine, it could lose
all coolant. That could cause an engine fire, and you could be burned. Get any leak
fixed before you drive the vehicle Notice: Using coolant other than DEX-COOL® can cause premature engine, heater
core, or radiator corrosion. In addition, the engine coolant could require changing
sooner, at 50 000 km (30,000 mi) or 24 months, whichever occurs first. Any repairs
would not be covered by the vehicle warranty. Always use DEX-COOL (silicate-free) coolant in the vehicle.Automatic Transmission Fluid
Engine Air Cleaner/Filter
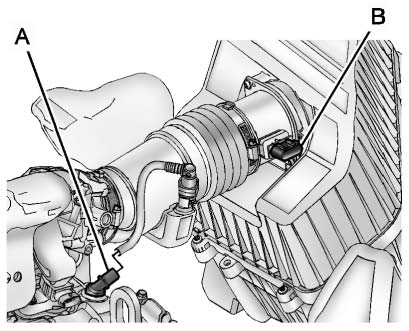
B. Sensor
3. Disconnect the wiring harness connector from the sensor (B).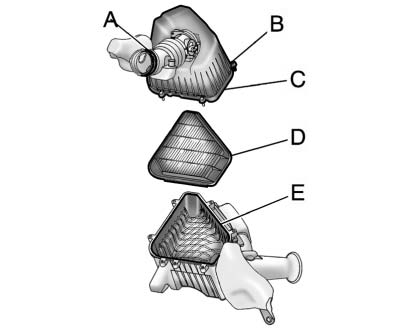
B. Screws
C. Housing Cover
D. Filter
E. Base
5. Loosen the six housing cover (C) screws (B).
6. Remove the housing cover (C) with outlet duct.
7. Remove the filter (D) and any loose debris that may be found in the base (E).
8. Inspect or replace the filter (D).
9. Reverse Steps 2 through 6 to reinstall the housing cover and reconnect the electrical
connector to the sensor.
10. Reinstall the engine cover. WARNING
Operating the engine with the air cleaner/filter off can cause you or others
to be burned. The air cleaner not only cleans the air; it helps to stop flames if
the engine backfires. Use caution when working on the engine and do not drive with
the air cleaner/filter off.Cooling System
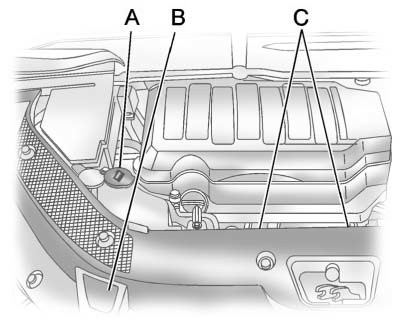
B. Radiator Pressure Cap
C. Engine Cooling Fans (Out of View)WARNING
An electric engine cooling fan under the hood can start up even when the engine
is not running and can cause injury. Keep hands, clothing, and tools away from any
underhood electric fan.WARNING
Heater and radiator hoses, and other engine parts, can be very hot. Do not touch
them. If you do, you can be burned.

