Buick Enclave: Repair Instructions
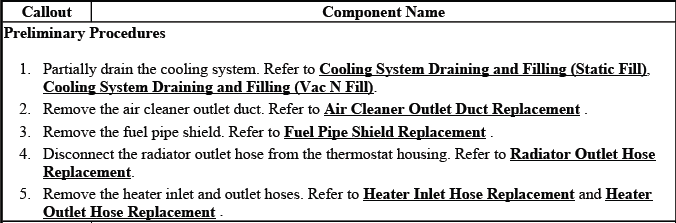
COOLING SYSTEM DRAINING AND FILLING (STATIC FILL)
Draining Procedure
Special Tools
- J 26568 Coolant and Battery Tester
WARNING: To avoid being burned, do not remove the radiator cap or surge tank cap while the engine is hot. The cooling system will release scalding fluid and steam under pressure if radiator cap or surge tank cap is removed while the engine and radiator are still hot.
1. Place a drain pan under the radiator hose.
NOTE: Draining the cooling system with the pressure cap installed will siphon the coolant from the overflow tank.
2. Remove the radiator outlet hose from the engine. Refer to Radiator Outlet Hose Replacement.
3. Move down the end of the radiator hose to drain the radiator.
4. Drain the cooling system.
5. Remove the coolant pressure cap.
6. If a complete engine block drain is required, remove the engine drain plugs.
7. Inspect the coolant.
8. Follow the appropriate procedure based on the condition of the coolant.
- Normal in appearance-Follow the filling procedure.
- Discolored-Follow the flush procedure. Refer to Flushing.
Filling Procedure
1. Install the radiator outlet hose to the engine. Refer to Radiator Outlet Hose Replacement.
CAUTION: The procedure below must be followed. Improper coolant level could result in a low or high coolant level condition, causing engine damage.
2. If the engine block drain plug was removed, perform the following:
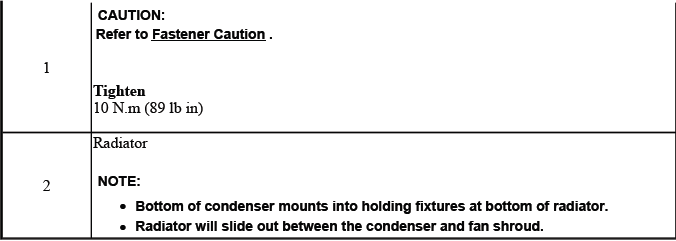
CAUTION: Refer to Fastener Caution.
- Apply pipe sealer to the drain plugs.
- Install the drain plugs.
Tighten
- Tighten the drain plug to 22 N.m (16 lb ft).
3. Lower the vehicle.
4. Slowly fill the cooling system with a 50/50 coolant mixture. Refer to Approximate Fluid Capacities.
NOTE: Use a 50/50 mixture of DEX-COOL antifreeze and clean, drinkable water.
5. Install the coolant pressure cap.
6. Start the engine.
7. Run the engine at 2, 000-2, 500 RPM until the engine reaches normal operating temperature.
8. Allow the engine to idle for 3 minutes.
9. Shut the engine OFF.
10. Allow the engine to cool.
11. Top off the coolant as necessary.
12. Inspect the concentration of the engine coolant, using the J 26568 coolant and battery tester.
13. Rinse away any excess coolant from the engine and the engine compartment.
COOLING SYSTEM DRAINING AND FILLING (VAC N FILL)
Special Tools
- GE-47716 Vac-N-Fill Coolant Refill Tool
- J 26568 Coolant and Battery Tester
Draining Procedure
WARNING: To avoid being burned, do not remove the radiator cap or surge tank cap while the engine is hot. The cooling system will release scalding fluid and steam under pressure if radiator cap or surge tank cap is removed while the engine and radiator are still hot.
1. Remove the radiator cap.
2. Attach the venturi assembly to the vacuum tank.

|
Fig. 4: View Of Venturi Assembly & Vacuum Tank
3. Attach a shop air hose to the venturi assembly.
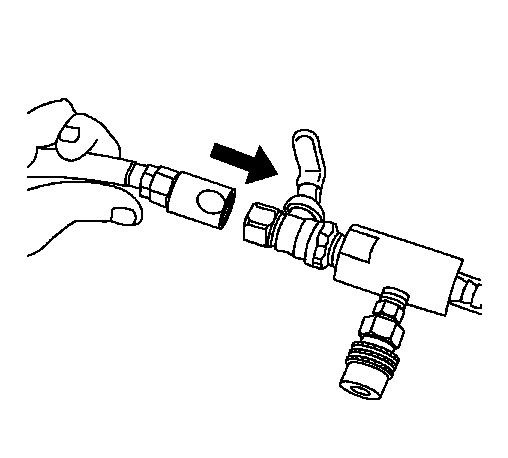
Fig. 5: View Of Shop Air Hose & Venturi Assembly
Ensure the valve on the venturi assembly is closed.
4. Attach the vacuum hose to the vacuum tank.
5. Attach the extraction hose to the vacuum hose.
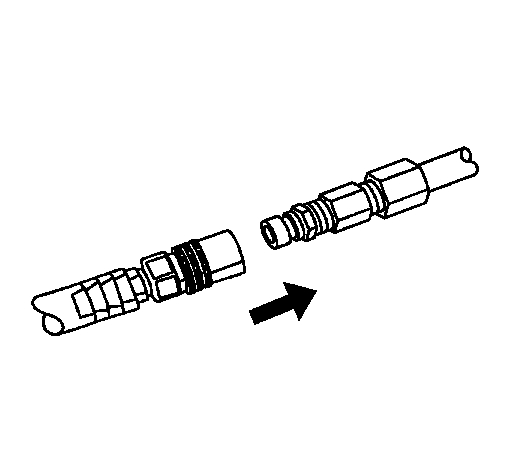
Fig. 6: Attaching Extraction Hose To Vacuum Hose
6. Insert the extraction hose into the radiator cap opening and into the radiator until the extraction hose contacts the bottom of the radiator end tank.
7. Open the valve on the venturi assembly to start a vacuum draw.
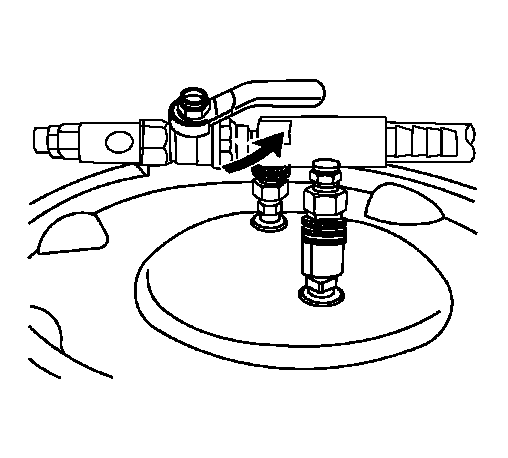
Fig. 7: Identifying Valve On Venturi Assembly
8. Use the extraction hose to draw out coolant until the radiator is empty.
9. The vacuum tank has a drain valve on the bottom of the tank. Open the valve to drain coolant from the vacuum tank into a suitable container for disposal.
10. If a complete engine block drain is required, remove the engine block drain plug.
11. Inspect the coolant.
12. Follow the appropriate procedure based on the condition of the coolant.
- Normal in appearance-Follow the filling procedure.
- Discolored-Follow the flush procedure. Refer to Flushing.
Vac-N-Fill Procedure
NOTE: To prevent boiling of the coolant/water mixture in the vehicles cooling system, do not apply vacuum to a cooling system above 49ºC (120ºF). The tool will not operate properly when the coolant is boiling.
1. Attach the Vac-N-Fill cap to the vehicles coolant fill port.
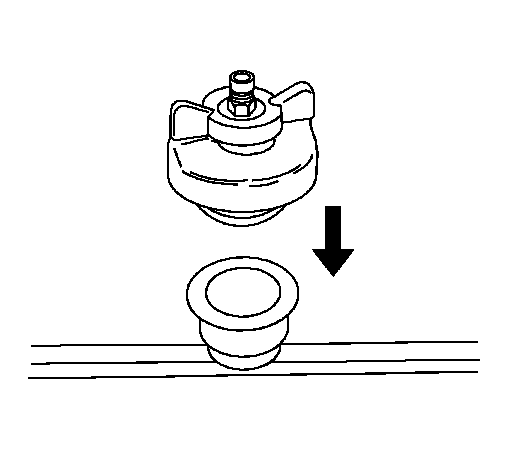
Fig. 8: Identifying Vac-N-Fill Cap
2. Install the extension hose.
3. Attach the vacuum gauge assembly to the Vac-N-Fill cap.

Fig. 9: Attaching Vacuum Gauge Assembly To Vac-N-Fill Cap
4. Attach the fill hose to the barb fitting on the vacuum gauge assembly.
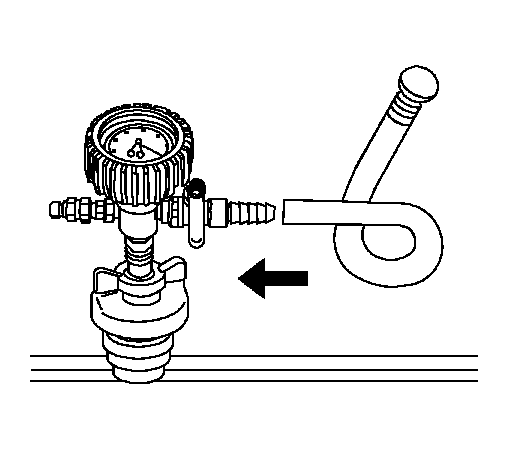
Fig. 10: Attaching Fill Hose To Barb Fitting On Vacuum Gauge Assembly
Ensure that the valve is closed.
5. Pour the coolant mixture into the graduated reservoir.

Fig. 11: View Of Graduated Reservoir & Hose
NOTE: Use a 50/50 mixture of DEX-COOL anti-freeze and clean, drinkable water.
Always use more coolant than necessary. This will eliminate air from being drawn into the cooling system.
6. Place the fill hose in the graduated reservoir.
7. Install the vacuum tank on the graduated reservoir with the fill hose routed through the cut-out area in the vacuum tank.
NOTE: Prior to installing the vacuum tank onto the graduated reservoir, ensure that the drain valve located on the bottom of the tank is closed.
8. Attach the venturi assembly to the vacuum tank.

Fig. 12: View Of Venturi Assembly & Vacuum Tank
9. Attach a shop air hose to the venturi assembly.

Fig. 13: View Of Shop Air Hose & Venturi Assembly
Ensure the valve on the venturi assembly is closed.
10. Attach the vacuum hose to the vacuum gauge assembly and the vacuum tank.

Fig. 14: Attaching Vacuum Hose To Vacuum Gauge Assembly & Vacuum Tank
11. Clamp off the overflow hose.
12. Open the valve on the venturi assembly. The vacuum gauge will begin to rise and a hissing noise will be present.
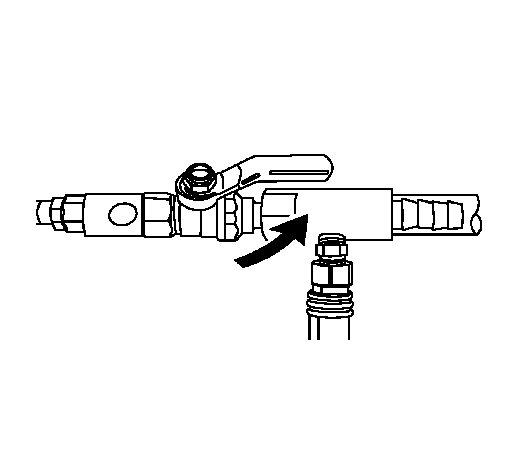
Fig. 15: Identifying Valve On Venturi Assembly
13. Continue to draw vacuum until the needle stops rising. This should be 610-660 mm Hg (24-26 in HG).
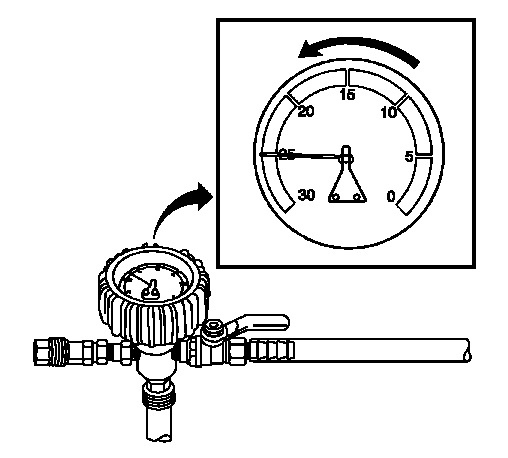
Fig. 16: View Of Vacuum Gauge
Cooling hoses may start to collapse. This is normal due to vacuum draw.
14. To aid in the fill process, position the graduated reservoir above the coolant fill port.
15. Slowly open the valve on the vacuum gauge assembly. When the coolant reaches the top of the fill hose, close the valve. This will eliminate air from the fill hose.
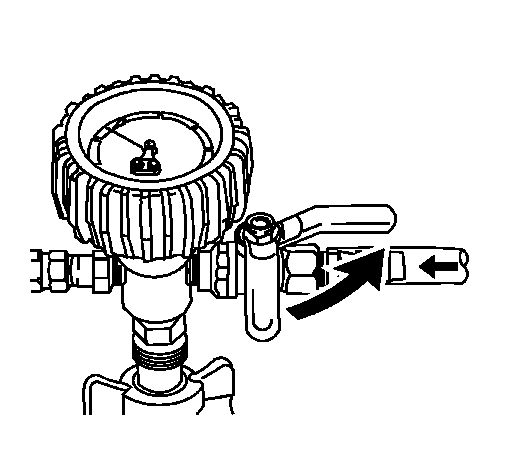
Fig. 17: Identifying Valve On Vacuum Gauge Assembly
16. Close the valve on the venturi assembly.
17. If there is a suspected leak in the cooling system, allow the system to stabilize under vacuum and monitor for vacuum loss.
If vacuum loss is observed, refer to Loss of Coolant.
18. Open the valve on the vacuum gauge assembly. The vacuum gauge will drop as coolant is drawn into the system.
19. Once the vacuum gauge reaches zero, close the valve on the vacuum gauge assembly and repeat steps 11- 17.
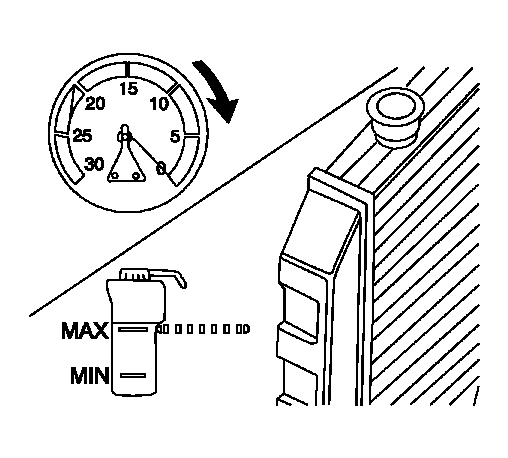
Fig. 18: View Of Vacuum Gauge & Radiator
Remove the extension hose.
20. Remove the J 42401 radiator cap and surge tank test adapter.
21. Detach the Vac-N-Fill cap from the vehicles coolant fill port.
22. Add coolant to the system as necessary.
23. Inspect the concentration of the coolant mixture using J 26568 coolant and battery tester.
24. Detach the vacuum hose form the vacuum gauge assembly.
NOTE: After filling the cooling system, the extraction hose can be used to remove excess coolant to achieve the proper coolant level.
25. Attach the extraction hose to the vacuum hose.

Fig. 19: Attaching Extraction Hose To Vacuum Hose
26. Open the valve on the venturi assembly to start a vacuum draw.

Fig. 20: Identifying Valve On Venturi Assembly
27. Use the extraction hose to draw out coolant to the proper level.
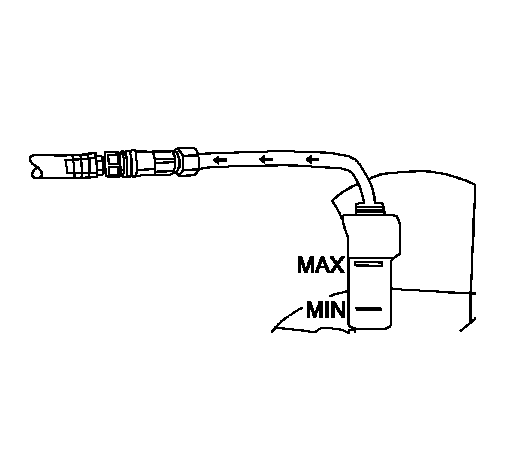
Fig. 21: Using Extraction Hose To Draw Out Coolant
28. The vacuum tank has a drain valve on the bottom of the tank. Open the valve to drain coolant from the vacuum tank into a suitable container for disposal.
FLUSHING
IMPORTANT: Do not use a chemical flush.
Store used coolant in the proper manner, such as in a used engine coolant holding tank. Do not pour used coolant down a drain. Ethylene glycol antifreeze is a very toxic chemical. Do not dispose of coolant into the sewer system or ground water. This is illegal and ecologically unsound.
Various methods and equipment can be used to flush the cooling system. If special equipment is used, such as a back flusher, follow the manufacturer's instruction. Always remove the thermostat before flushing the cooling system.
When the cooling system becomes contaminated, the cooling system should be flushed thoroughly to remove the contaminants before the engine is seriously damaged.
1. Drain the cooling system. Refer to Cooling System Draining and Filling (Static Fill), Cooling System Draining and Filling (Vac N Fill).
2. Remove the coolant recovery reservoir. Refer to Coolant Recovery Reservoir Replacement.
3. Clean and flush the coolant recovery reservoir with clean, drinkable water.
4. Install the coolant recovery reservoir. Refer to Coolant Recovery Reservoir Replacement.
5. Follow the drain and fill procedure using only clean, drinkable water. Refer to Cooling System Draining and Filling (Static Fill), Cooling System Draining and Filling (Vac N Fill).
6. Run the engine for 20 minutes.
7. Stop the engine.
8. Drain the cooling system. Refer to Cooling System Draining and Filling (Static Fill), Cooling System Draining and Filling (Vac N Fill).
9. Repeat the procedure if necessary, until the fluid is nearly colorless.
10. Fill the cooling system. Refer to Cooling System Draining and Filling (Static Fill), Cooling System Draining and Filling (Vac N Fill).
RADIATOR CLEANING
WARNING: NEVER spray water on a hot heat exchanger. The resulting steam could cause personal injury.
CAUTION: The heat exchanger fins are necessary for good heat transfer. Do not brush the fins. This may cause damage to the fins, reducing heat transfer.
- Some conditions may require the use of warm water and a mild detergent.
NOTE: Remove bugs, leaves, dirt and other debris by blowing compressed air through the engine side of the radiator.
- Clean the A/C condenser fins.
- Clean between the A/C condenser and radiator.
- Clean the radiator cooling fins.
- Straighten any damaged cooling fins.
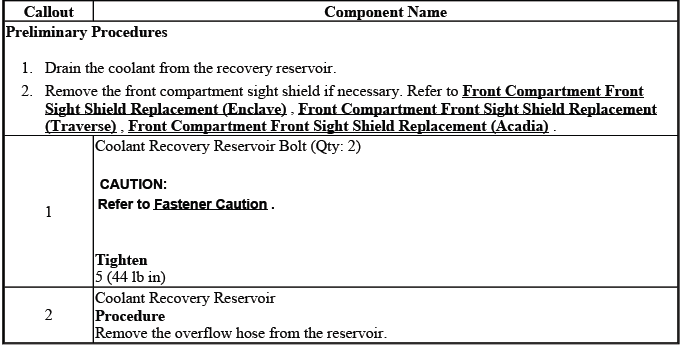
COOLANT RECOVERY RESERVOIR REPLACEMENT
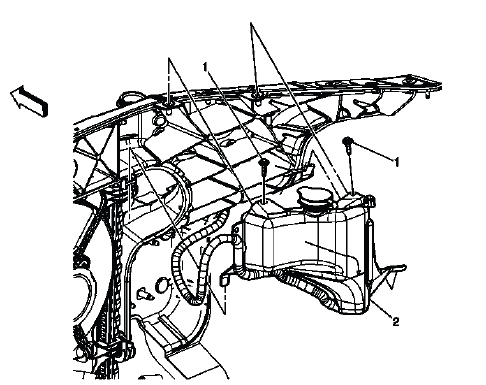
Fig. 22: View Of Coolant Recovery Reservoir
Coolant Recovery Reservoir Replacement
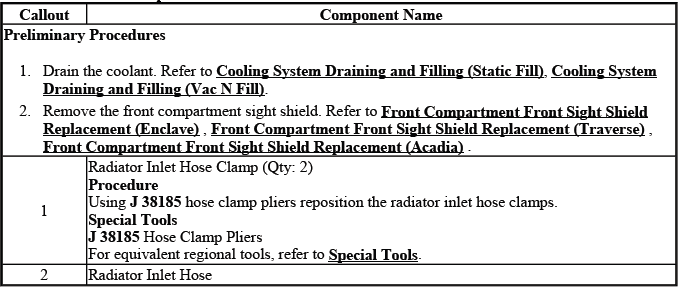
RADIATOR INLET HOSE REPLACEMENT
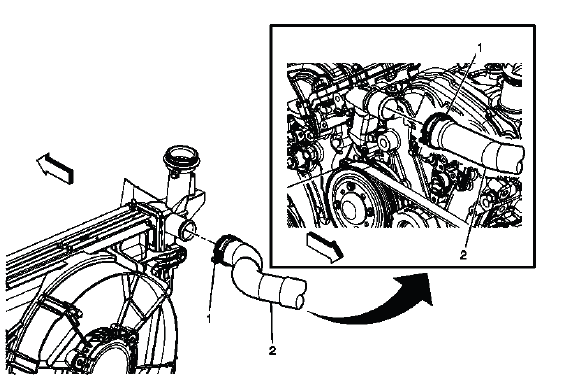
Fig. 23: Identifying Radiator Inlet Hose
Radiator Inlet Hose Replacement
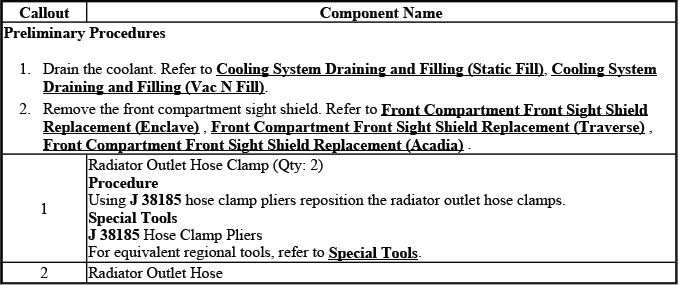
RADIATOR OUTLET HOSE REPLACEMENT
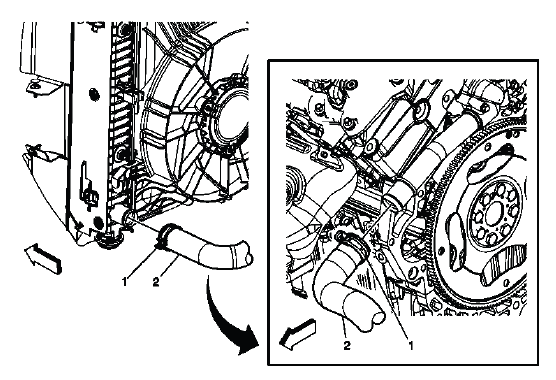
Fig. 24: Identifying Radiator Outlet Hose
Radiator Outlet Hose Replacement
ENGINE OIL COOLER CONNECTOR REPLACEMENT
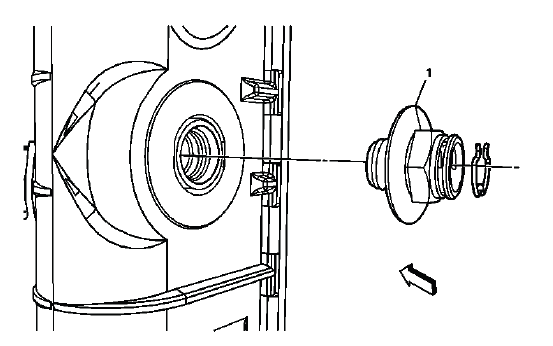
Fig. 25: View Of Engine Oil Cooler Connector
Engine Oil Cooler Connector Replacement
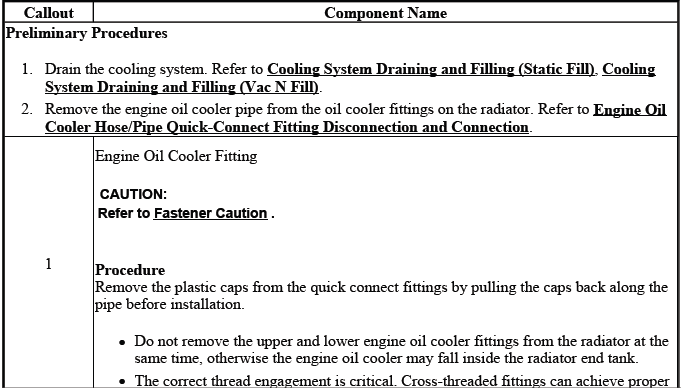

ENGINE OIL COOLER HOSE/PIPE QUICK-CONNECT FITTING DISCONNECTION AND CONNECTION
Special Tools
- DT-47731 1/2 in. Cooler Line Quick Release Tool
- J 28585 Universal Snap Ring Remover for the 5/8 in. Cooler Line
Removal Procedure
1. Remove the plastic caps from the quick connect fittings by pulling the caps back along the pipe before installation.
2. Install the DT-47731 1/2 in. cooler line quick release tool onto the transmission oil cooler (TOC) pipe or use the J 28585 universal snap ring remover for the 5/8 in. cooler line.
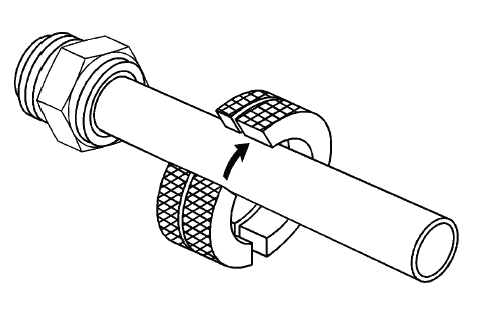
Fig. 26: View Of J 41623-B & Generator Cooling Inlet Pipe
3. Slide the DT-47731 1/2 in. cooler line quick release tool toward the TOC pipe fitting or use the J 28585 universal snap ring remover for the 5/8 in. cooler line.
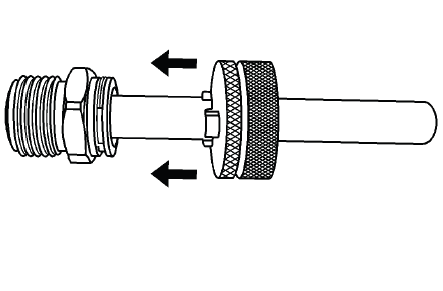
Fig. 27: Sliding J 41623-B Toward Generator Cooling Inlet Pipe Fitting
4. Connect the DT-47731 1/2 in. cooler line quick release tool onto the TOC pipe fitting.
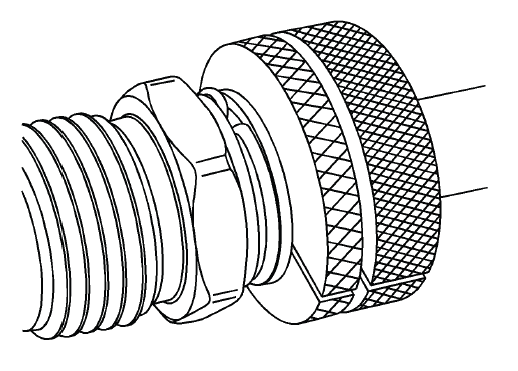
Fig. 28: Rotating Quick-Connect On Coolant Pipe
NOTE: Rotate the DT-47731 1/2 in. cooler line quick release tool to engage the TOC pipe fitting's retainer slots. The DT-47731 1/2 in. cooler line quick release tool should be nearly flush with the fitting.
5. Rotate the DT-47731 1/2 in. cooler line quick release tool or use the J 28585 universal snap ring remover for the 5/8 in. cooler line until the retainer clip (1) rises above the fitting retainer seat.
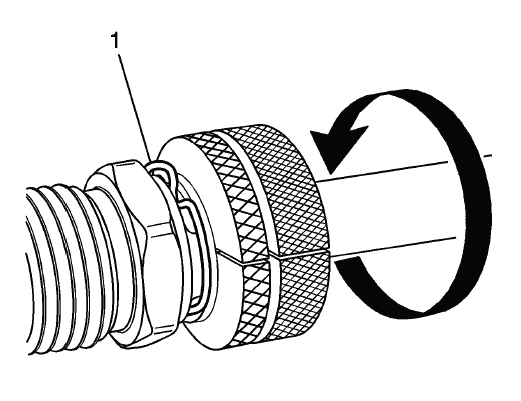
Fig. 29: Rotating Quick-Connect Until Retainer Clip Rises Above Fitting
Retainer Seat
6. Pull back on the TOC pipe to disengage the pipe from the TOC pipe fitting.
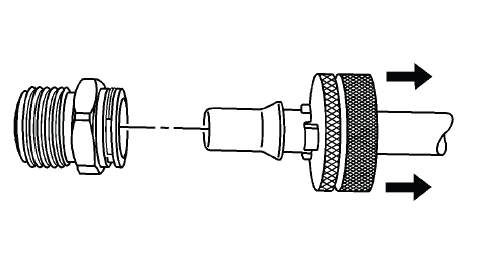
Fig. 30: View Of J 41623-B & Generator Cooling Inlet Pipe
7. Remove the DT-47731 1/2 in. cooler line quick release tool or the J 28585 universal snap ring remover for the 5/8 in. cooler line from the TOC pipe.
Installation Procedure
1. Install the TOC pipe into the TOC pipe fitting.
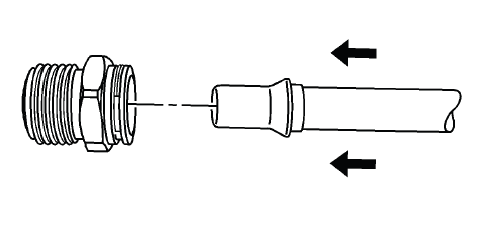
Fig. 31: View Of Generator Cooling Inlet Pipe & Generator Cooling Inlet Pipe
Fitting
NOTE: Discard the TOC retaining clip and install a new retaining clip.
A distinct snap should be heard or felt when assembling the TOC pipe to the fitting.
2. To ensure the cooler line is properly installed, give the cooler pipe a gentle pull.
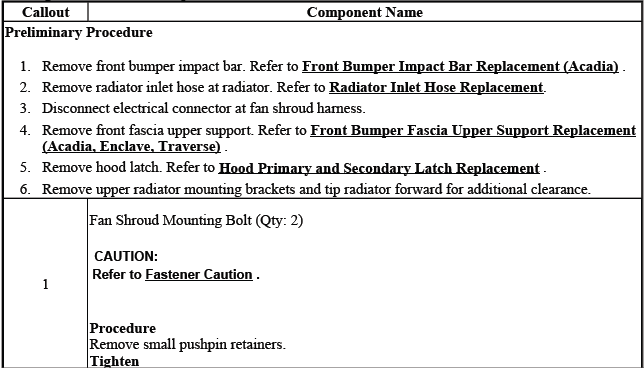
COOLING FAN AND SHROUD REPLACEMENT
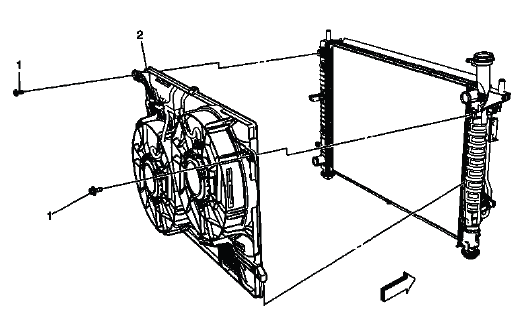
Fig. 32: View Of Cooling Fan & Shroud
Cooling Fan and Shroud Replacement

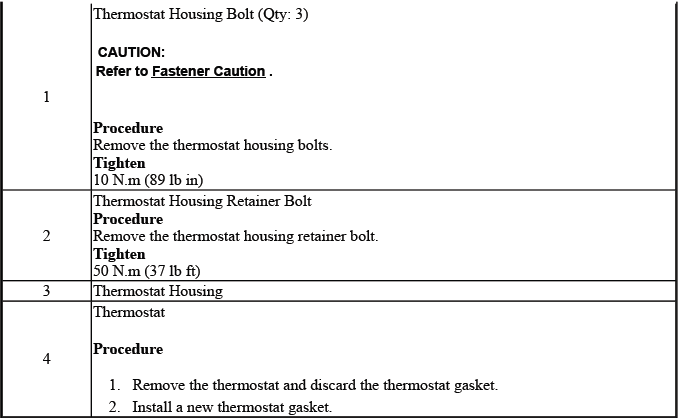
ENGINE COOLANT THERMOSTAT REPLACEMENT
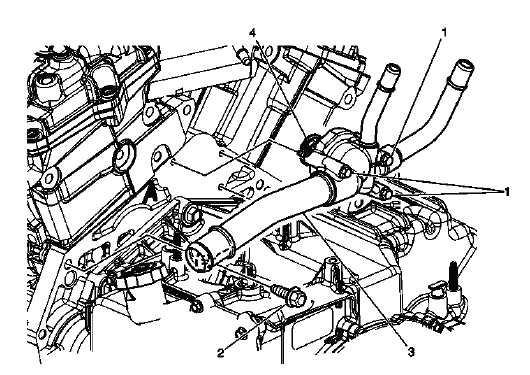
Fig. 33: View Of Thermostat Housing & Components
Engine Coolant Thermostat Replacement
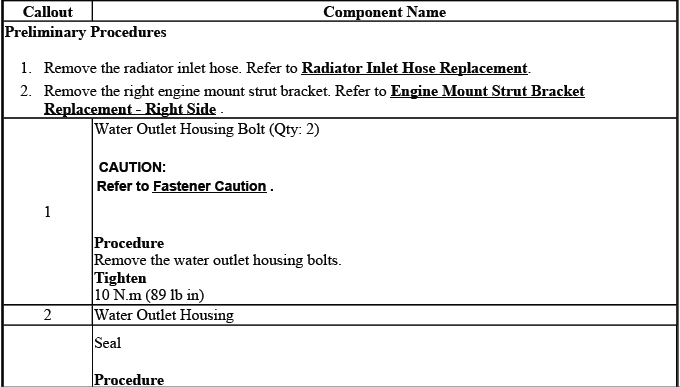
WATER OUTLET REPLACEMENT
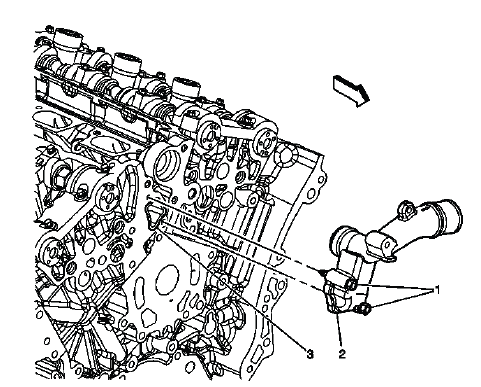
Fig. 34: Identifying Water Outlet Housing
Water Outlet Replacement

WATER PUMP REPLACEMENT
Special Tools
- EN 46104 Water Pump Pulley Holding Tool
Removal Procedure
1. Drain the cooling system. Refer to Cooling System Draining and Filling (Static Fill), Cooling System Draining and Filling (Vac N Fill).
2. Remove the drive belt. Refer to Drive Belt Replacement.
3. Remove the right engine strut mount. Refer to Engine Mount Strut Replacement - Right Side.
4. Remove the right engine mount strut bracket. Refer to Engine Mount Strut Bracket Replacement - Right Side.
5. Use the EN 46104 tool in order to retain the water pump pulley.
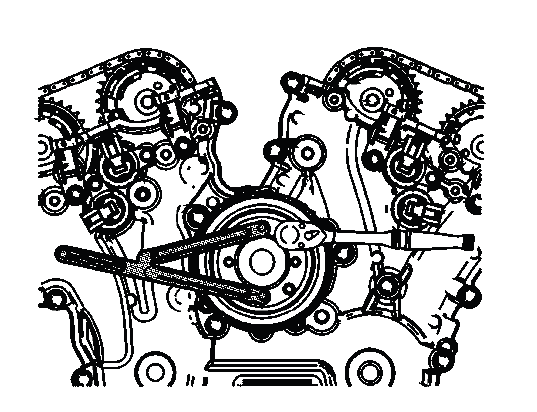
Fig. 35: View Of EN 46104 Installed On Water Pump Pulley
6. Remove the water pump pulley bolts.
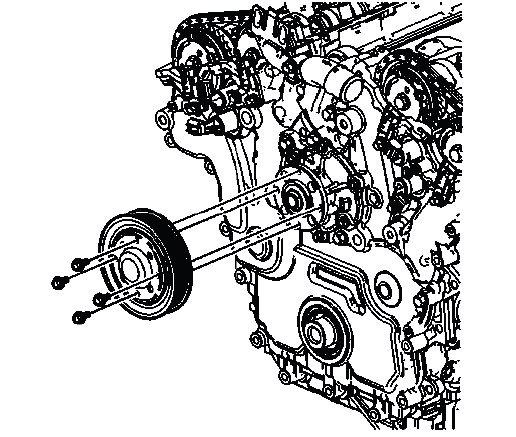
Fig. 36: Locating Water Pump Pulley & Bolts
7. Remove the water pump pulley.
8. Remove the water pump bolts and DISCARD the bolts.
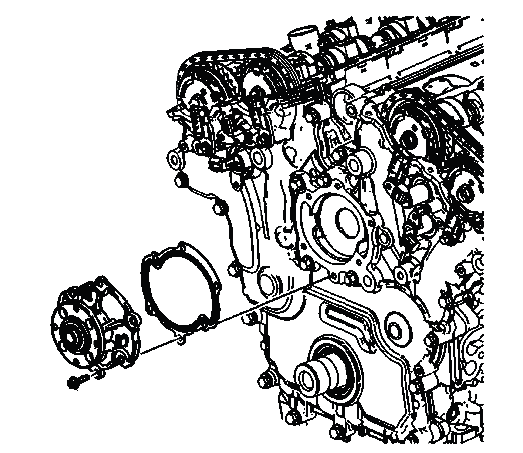
Fig. 37: Identifying Water Pump Components
9. Remove the water pump.
10. Remove and DISCARD the water pump seal.
11. Carefully clean the water pump sealing surfaces.
Installation Procedure
1. Install a NEW water pump seal.
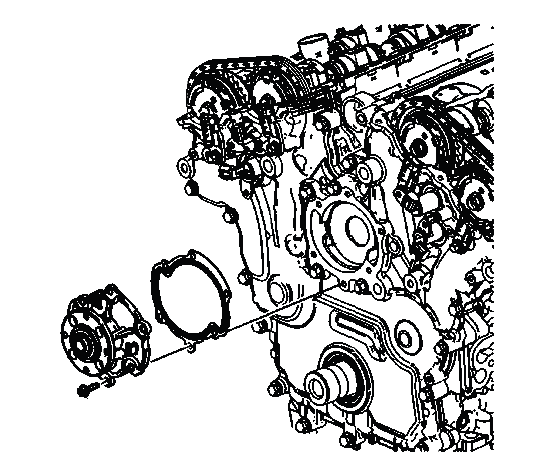
Fig. 38: Identifying Water Pump Components
2. Install the water pump.
3. Install the NEW water pump bolts and hand tighten the water pump bolts.
CAUTION: This vehicle is equipped with torque-to-yield or single use fasteners.
Install a NEW torque-to-yield or single use fastener when installing this component. Failure to replace the torque-to-yield or single use fastener could cause damage to the vehicle or component.
CAUTION: Refer to Fastener Caution.
4. Tighten the water pump bolts in sequence.
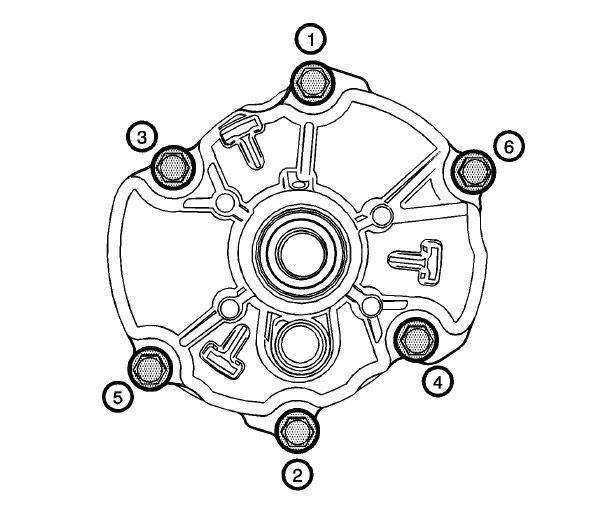
Fig. 39: Water Pump Bolts Tightening Sequence
- On the initial pass, tighten the bolts in sequence to 10 (89 lb in).
- On the second pass, tighten the bolts in sequence to 10 (89 lb in).
- On the final pass, tighten the bolts in sequence shown an additional 45º.
5. Install the water pump pulley bolts.
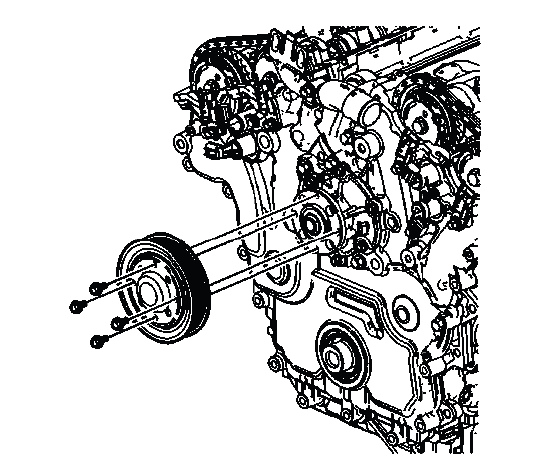
Fig. 40: Locating Water Pump Pulley & Bolts
6. Use the EN 46104 tool in order to retain the water pump pulley.
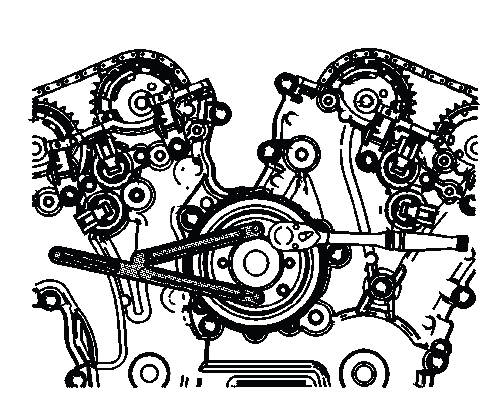
Fig. 41: View Of EN 46104 Installed On Water Pump Pulley
7. Install the water pump pulley bolts and tighten to 10 (89 lb in).
8. Install the right engine strut mount. Refer to Engine Mount Strut Replacement - Right Side.
9. Install the right engine mount strut bracket. Refer to Engine Mount Strut Bracket Replacement - Right Side.
10. Install the drive belt. Refer to Drive Belt Replacement.
11. Fill the cooling system. Refer to Cooling System Draining and Filling (Static Fill), Cooling System Draining and Filling (Vac N Fill).
RADIATOR REPLACEMENT
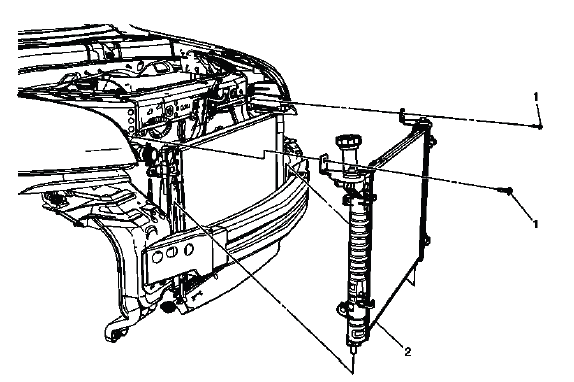
Fig. 42: Identifying Radiator
Radiator Replacement
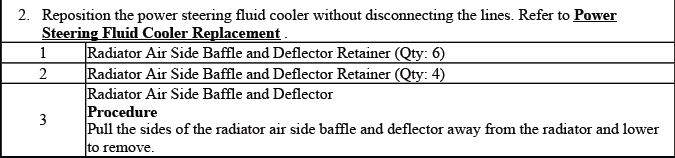
RADIATOR AIR SIDE BAFFLE AND DEFLECTOR REPLACEMENT
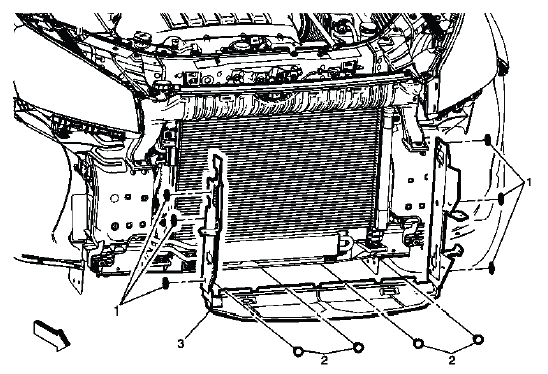
Fig. 43: Radiator Air Side Baffle And Deflector
Radiator Air Side Baffle and Deflector Replacement

COOLANT HEATER REPLACEMENT
Fig. 44: View Of Coolant Heater
Coolant Heater Replacement


COOLANT HEATER CORD REPLACEMENT
Removal Procedure
1. Raise and support the vehicle. Refer to Lifting and Jacking the Vehicle.
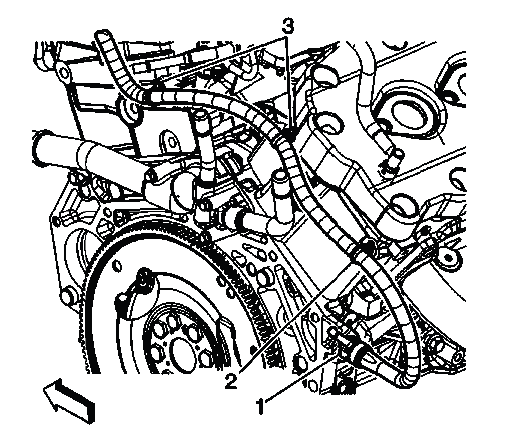
Fig. 45: Identifying Coolant Heater Cord Clips & Coolant Heater
2. Disconnect the coolant heater power supply cord from the coolant heater.
3. Lower the vehicle.
4. Disconnect the coolant heater cord clips (3) from the cylinder heads.
5. Disconnect the coolant heater cord clip from the engine wiring harness.
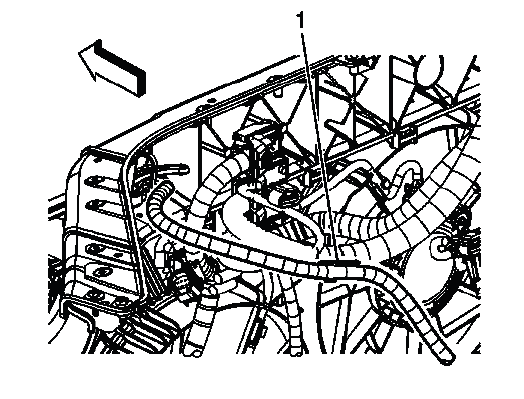
Fig. 46: Identifying Coolant Heater Cord
6. Remove the coolant heater cord (1) from the vehicle.
Installation Procedure
1. Position the coolant heater cord (1) to the engine harness.
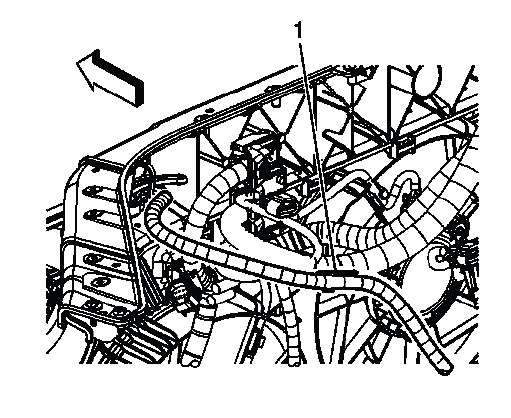
Fig. 47: Identifying Coolant Heater Cord
2. Connect the coolant heater cord clip to the engine wiring harness.
3. Connect the coolant heater cord clips (3) to the cylinder heads.
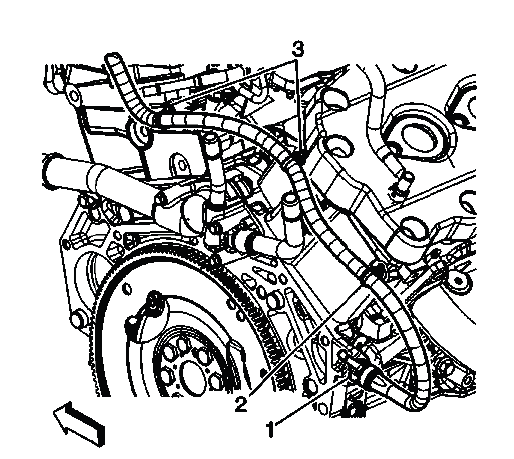
Fig. 48: Identifying Coolant Heater Cord Clips & Coolant Heater
4. Raise and support the vehicle. Refer to Lifting and Jacking the Vehicle.
5. Connect the coolant heater cord to the coolant heater.
6. Lower the vehicle.

