Buick Enclave: Repair Instructions
REAR DIFFERENTIAL CLUTCH CONTROL MODULE REPLACEMENT
Removal Procedure
1. Raise and support the vehicle. Refer to Lifting and Jacking the Vehicle.
2. Remove the propeller shaft assembly. Refer to Propeller Shaft Replacement.
3. Remove the torque tube mounting bolt.
Autoteile Großhandel aus den Vereinigten arabischen emiraten zu niedrigen Preisen.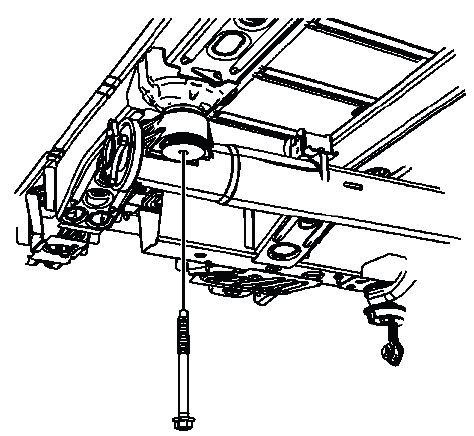
Fig. 2: Identifying Torque Tube Mounting Bolt
4. Lower the torque tube to gain access to the clutch control module.
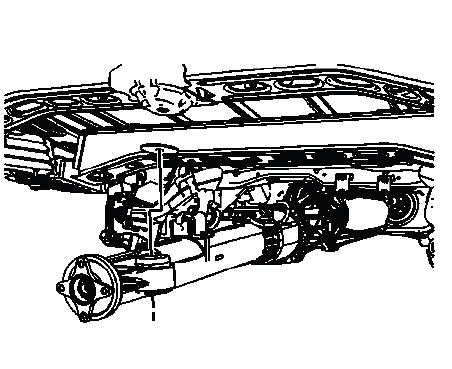
Fig. 3: View Of Torque Tube
NOTE: DO NOT allow the torque tube to hang, support with a suit stand.
5. Disconnect the electrical connectors from the clutch control module.
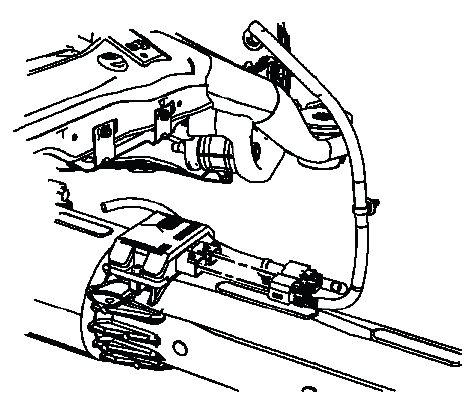
Fig. 4: Identifying Clutch Control Module Electrical Connectors
6. Remove the screws for the clutch control module.
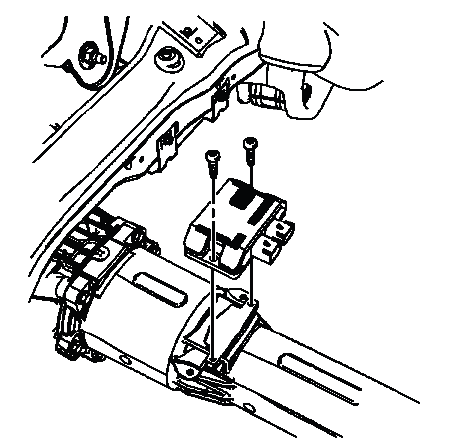
Fig. 5: View Of Clutch Control Module Screws
7. Remove the clutch control module from the torque tube.
Installation Procedure
1. Position the clutch control module on the torque tube.
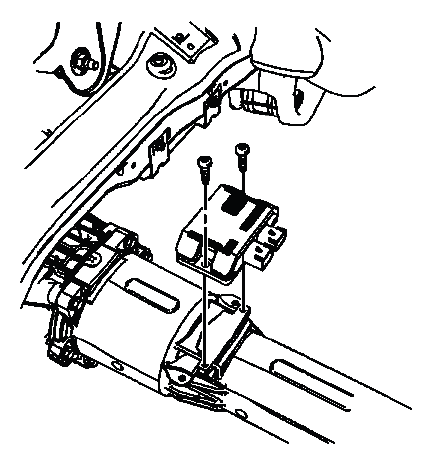
Fig. 6: View Of Clutch Control Module Screws
2. Install the mounting screws for the clutch control module.
CAUTION: Refer to Fastener Caution.
Tighten
- Tighten the screws to 8 N.m (71 lb in).
3. Reconnect the electrical connectors for the clutch control module.
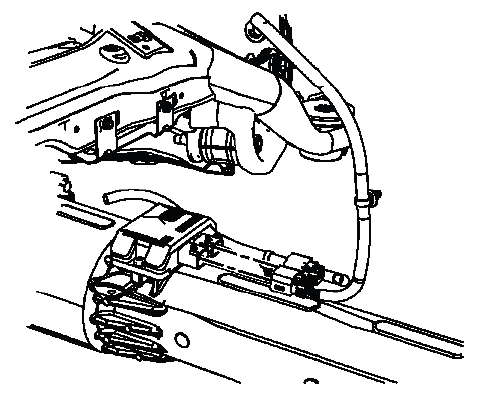
Fig. 7: Identifying Clutch Control Module Electrical Connectors
4. Record the Clutch Control Module RDS number (1). It is located on the Clutch Control Module harness connector. This number will be needed for the calibration procedure. Read the number as shown.
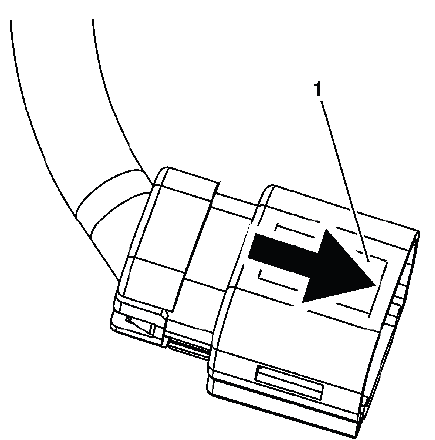
Fig. 8: Identifying Clutch Control Module RDS Number
5. Lift the torque back into position.
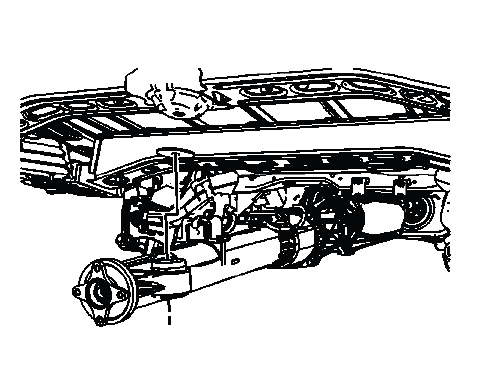
Fig. 9: View Of Torque Tube
6. Install the torque tube mounting bolt.
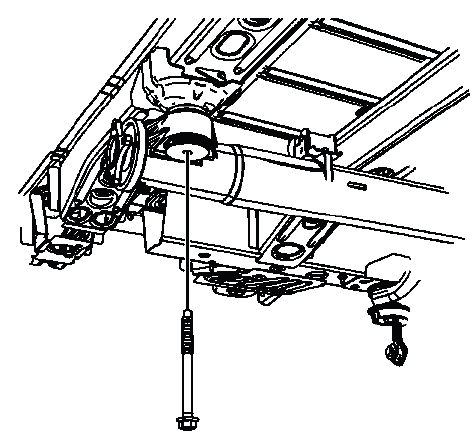
Fig. 10: Identifying Torque Tube Mounting Bolt
Tighten
- Tighten the bolt to 185 N.m (137 lb ft).
7. Install the propeller shaft. Refer to Propeller Shaft Replacement 8. Remove the support and lower the vehicle.
9. Reprogram the clutch control module. Refer to Control Module References.
REAR AXLE LUBRICANT LEVEL INSPECTION
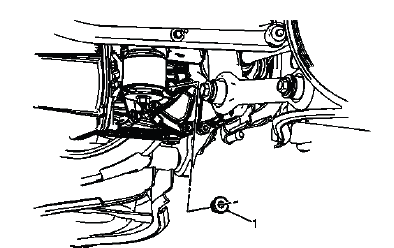
Fig. 11: Locating Rear Differential Fill Plug
Rear Axle Lubricant Level Inspection
AXLE LUBRICANT CHANGE
Removal Procedure
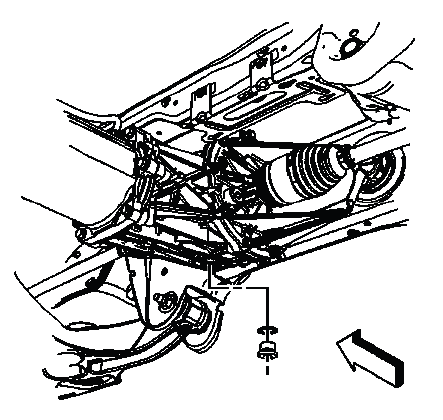
Fig. 12: Identifying Rear Differential Housing Drain Plug
1. Raise and support the vehicle. Refer to Lifting and Jacking the Vehicle.
2. Remove the drain plug and gasket from the rear differential housing.
NOTE: If the drain plug seal is worn, replace the drain plug and seal.
Installation Procedure
1. Install the drain plug and gasket, then tighten to 35 N.m (26 lb ft).
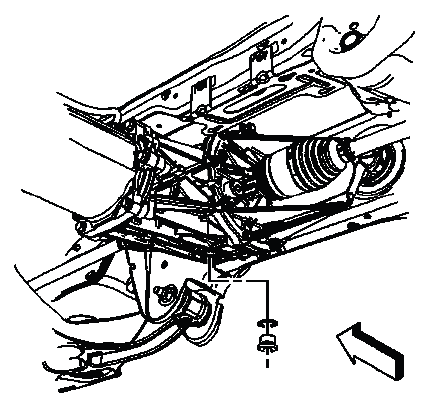
Fig. 13: Identifying Rear Differential Housing Drain Plug
CAUTION: Refer to Fastener Caution.
2. Remove the fill plug and gasket from the rear differential housing.
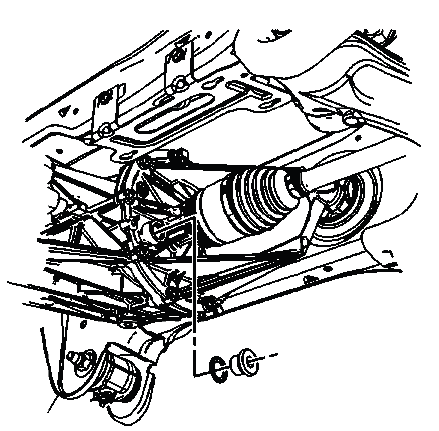
Fig. 14: Locating Rear Differential Fill Plug
3. Fill the rear differential with the proper synthetic gear lubricant. Refer to Adhesives, Fluids, Lubricants and Sealers.
4. Inspect the gear oil level to ensure it is even with the bottom of the fill plug.
5. Install the fill plug and gasket in the rear differential housing and tighten to 35 N.m (26 lb ft).
6. Remove the support and lower the vehicle.
DIFFERENTIAL CLUTCH DRUM ASSEMBLY REPLACEMENT
Removal Procedure
1. Remove the torque tube assembly from the vehicle. Refer to Driveline Torque Tube Replacement.
2. Remove the electrical harness retainer (1) from the torque tube (2).
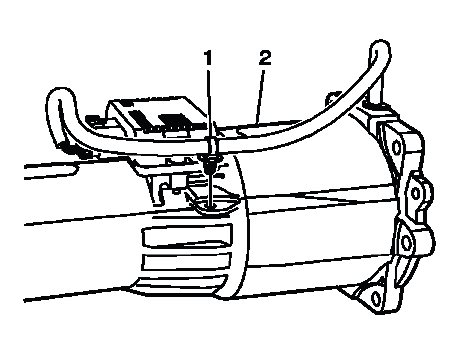
Fig. 15: Identifying Electrical Harness Retainer & Torque Tube
3. Disconnect the electrical connector (1) for the clutch control module (2).
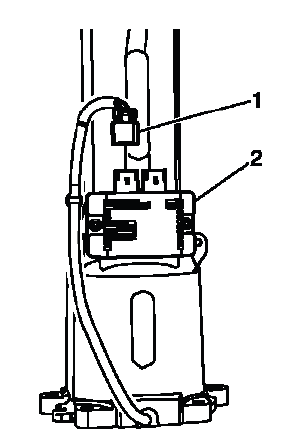
Fig. 16: View Of Clutch Control Module & Electrical Connector
4. Position 2 pieces of wood along side of the torque tube.
5. Position a piece of wood under the clutch assembly in the torque tube.
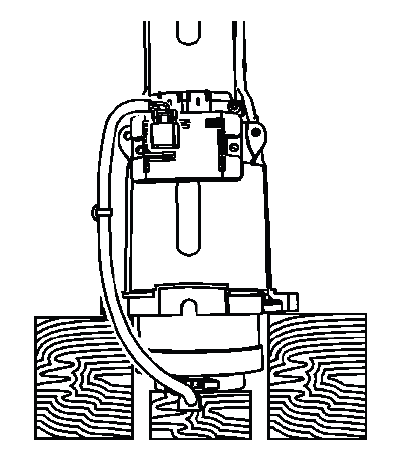
Fig. 17: Identifying Piece Of Wood Under Clutch Assembly
IMPORTANT: It is important to place a piece of wood under the clutch assembly so as not to damage the clutch assembly when it exits the torque tube.
6. Pick up the torque tube and with a quick downward motion, snap the torque tube to release the clutch drum assembly from the input shaft.
7. Remove the clutch drum (1) assembly from the torque tube.
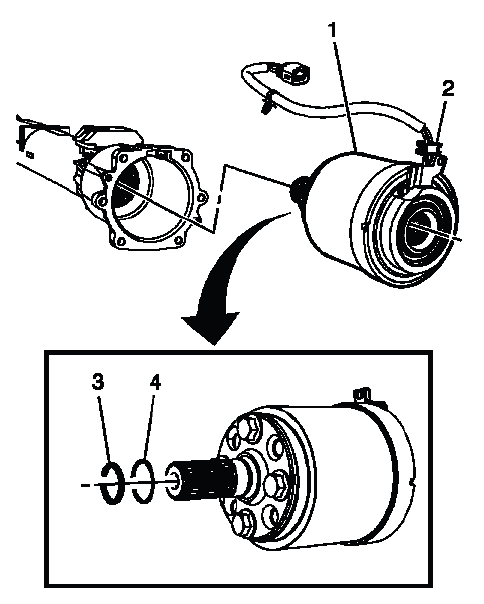
Fig. 18: Locating Clutch Drum, Retaining Clip & Weather Seal
8. Remove and discard the retaining clip (3) and the O-ring (4). DO NOT re-use, replace with NEW only.
9. Remove the wiring harness and weather seal (2) from the torque tube.
IMPORTANT: When removing or installing the wiring harness and weather seal (2), ensure that the wiring harness does NOT become damaged. The wiring harness is NOT SERVICED separately.
Installation Procedure
1. Install the NEW O-ring (4) and the retaining clip (3) on the clutch assembly.
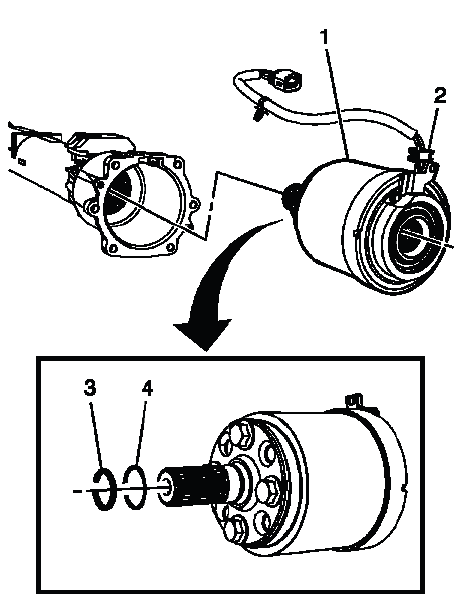
Fig. 19: Locating Clutch Drum, Retaining Clip & Weather Seal
2. Install the clutch assembly (1) in the torque tube.
3. Position the wiring harness and weather seal (2) in the torque tube.
4. Install the electrical harness retaining clip (1) in the torque tube (2).
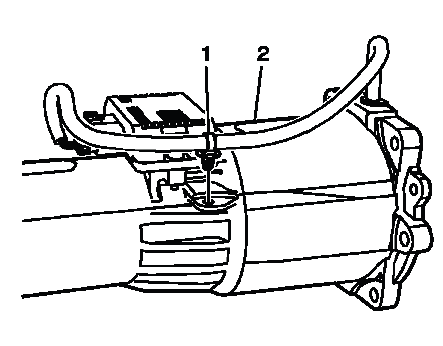
Fig. 20: Identifying Electrical Harness Retainer & Torque Tube
5. Install the electrical connector (1) to the clutch control module (2).
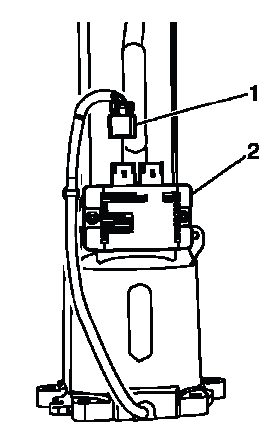
Fig. 21: View Of Clutch Control Module & Electrical Connector
6. Install the torque tube assembly. Refer to Driveline Torque Tube Replacement 7. Program the rear differential clutch control module. Refer to Control Module References.
DIFFERENTIAL CARRIER BUSHING REPLACEMENT - FRONT

Fig. 22: View Of Front Differential Carrier Bushing
Differential Carrier Bushing Replacement - Front

DIFFERENTIAL CARRIER BUSHING REPLACEMENT - REAR
Tools Required
- J-45725 Cradle Bushing Replacer
Removal Procedure
1. Raise and support the vehicle. Refer to Lifting and Jacking the Vehicle.
2. Remove the rear differential assembly. Refer to Differential Replacement.
3. Mark a reference point on the frame and old bushing at the 12 and 6 o'clock position to use to align the new bushing.
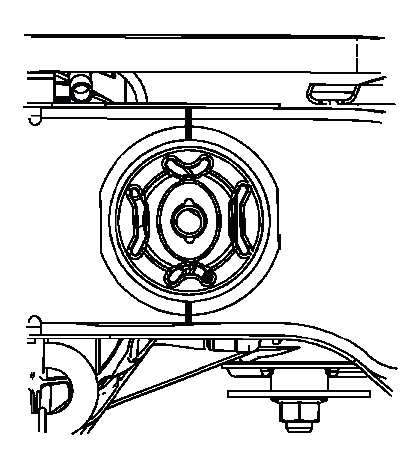
Fig. 23: Identifying Reference Point On Frame
4. Position the J-45725-1A (1) on the bushing (2).
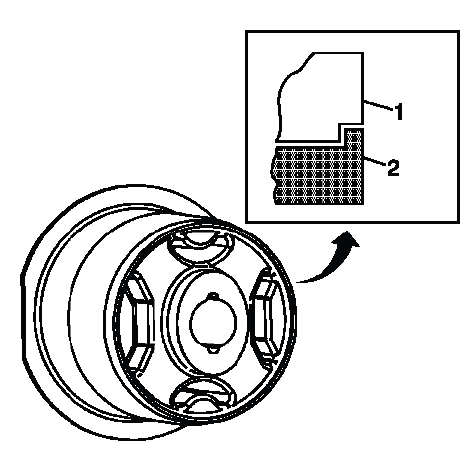
Fig. 24: View Of J-45725-2A & Bushing
5. Position the J-45725-2A (1) on the frame.
6. Install the threaded rod, bearing and washers.
IMPORTANT: Apply a small amount of grease on the threaded to lubricate the nuts when turning the nuts.
7. Adjust the nuts so that they are touching the J-45725-1A (2) and the J-45725-2A (1).
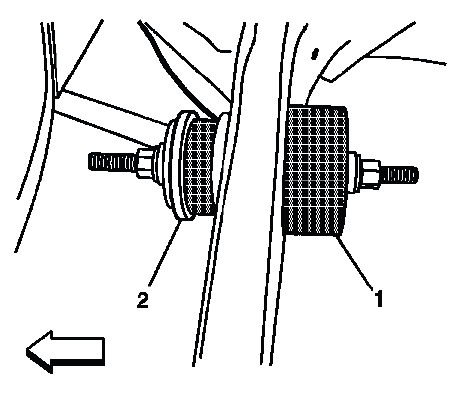
Fig. 25: Identifying Special Tools - J-45725-1A & J-45725-2A
8. Install the proper size wrenches on the nuts.
9. While holding the front wrench (1) rotate the rear wrench (2) to remove the bushing.
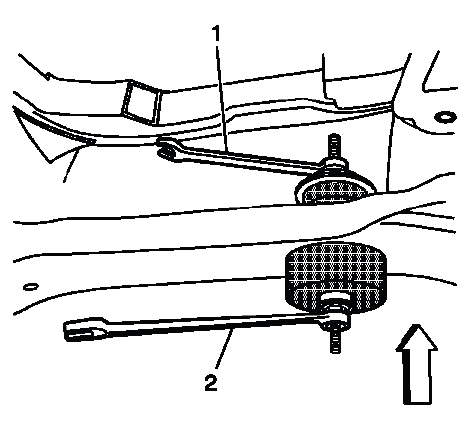
Fig. 26: View Of Attaching Nuts
IMPORTANT: In the following service procedure, use only HAND TOOLS when using the J-45725 Cradle Bushing Replacer.
10. Remove the special tools.
11. Remove the bushing from the frame.
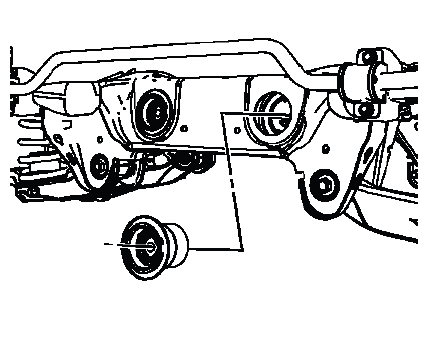
Fig. 27: View Of Frame Bushing
Installation Procedure
1. Before the installation of the new bushing, use a straight edge draw a line on the new bushing at the 12 and 6 o'clock positions. Ensure that the grooves (1) are at the 12 and 6 o'clock positions.
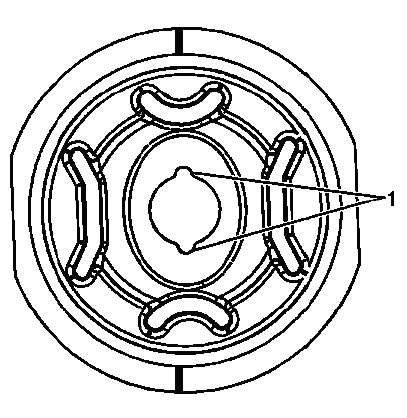
Fig. 28: Identifying Proper Bushing Alignment
IMPORTANT: Failure to perform the following service procedure prior to the installation of the new bushing, could cause premature failure of the bushing.
2. Position the new bushing so that the reference marks on the frame and the bushing are in alignment. This will ensure that the new bushing will be within the 5º specification required for the proper alignment of the bushing.
3. Using a block of wood and a hammer, slightly tap the bushing into the frame.
IMPORTANT: The following procedure is to temporarily hold the new bushing in place so that the special tools can be installed for the proper installation. This is NOT to be used to install the bushing.
4. Assemble the threaded rod, bearings and washers as indicated in step 7 in the removal procedure.
5. Position the J-45725-2 (2) on the inside of the frame.
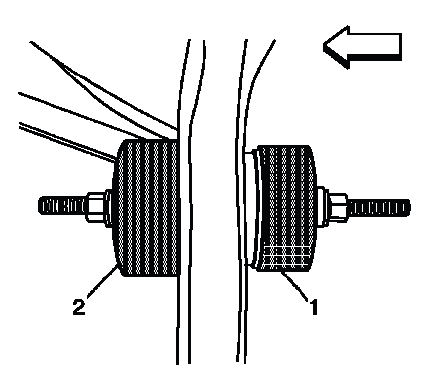
Fig. 29: Identifying Special Tools - J-45725-2 & J-45725-2A
6. Position J-45725-2A (1) on the outside of the frame.
7. Adjust the nuts so that they are touching the J-45725-2 (1) and the J-45725-2A (2).
8. While holding the front wrench (2) rotate the rear wrench (1) to install the bushing.
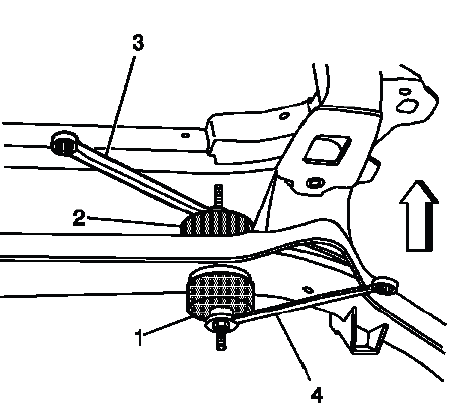
Fig. 30: Tightening Busing Nuts
9. Remove the special tools.
10. Install the rear differential assembly. Refer to Differential Replacement.
11. Lower the vehicle.
DRIVELINE TORQUE TUBE REPLACEMENT
Removal Procedure
1. Raise and support the vehicle. Refer to Lifting and Jacking the Vehicle.
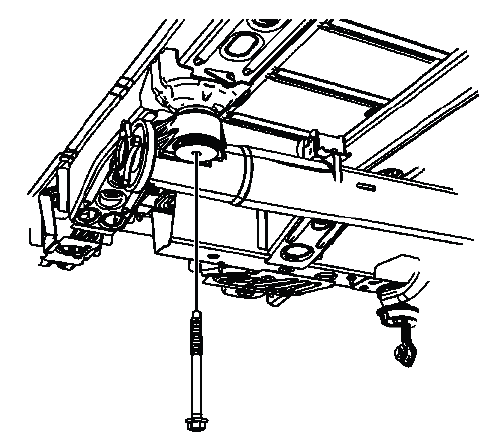
Fig. 31: Identifying Torque Tube Mounting Bolt
2. Remove the propeller shaft assembly. Refer to Propeller Shaft Replacement.
3. Remove the torque tube mounting bolt.
4. Disconnect the electrical connector from the clutch control module.
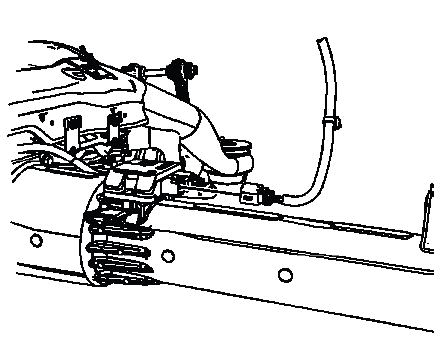
Fig. 32: View Of Clutch Control Module Electrical Connector
5. Remove the clutch control module, if needed. Refer to Rear Differential Clutch Control Module Replacement.
NOTE: If removing the torque tube assembly to service the rear differential, the clutch control module does not have to be removed.
6. Remove the torque tube mounting bolts (1) from the rear differential.
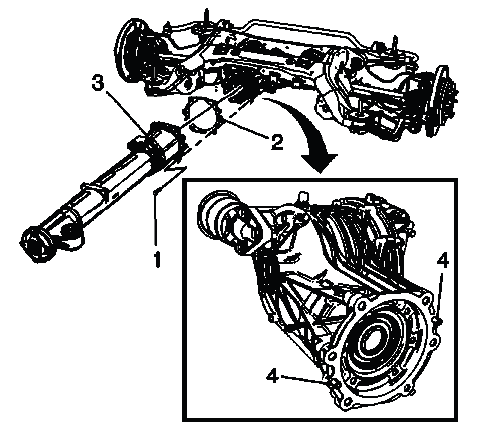
Fig. 33: Locating Torque Tube Mounting Bolts, Torque Tube Gasket, Torque Tube
Assembly & Alignment Pins
7. Remove the torque tube gasket (2) from the rear differential and the alignment pins (4).
NOTE: DO NOT re-use the old gasket, discard and use NEW only.
8. Remove the torque tube assembly (3) from the rear differential assembly.
9. Remove the torque tube assembly (3) from the vehicle.
NOTE: If any fluid is found in the torque tube, check the condition of pinion oil seal.
Installation Procedure
1. Install the NEW torque tube gasket (2) to the rear differential assembly.
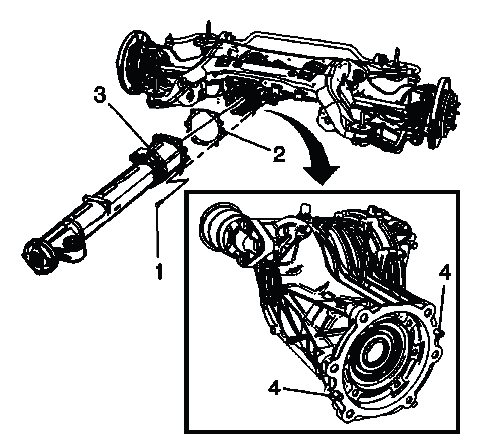
Fig. 34: Locating Torque Tube Mounting Bolts, Torque Tube Gasket, Torque Tube
Assembly &
Alignment Pins
2. Position torque tube (3) on the alignment pins (4) on the rear differential.
3. Using a suitable jack stand support the torque tube assembly.
4. Hand tighten the torque tube to differential bolts (1) before torquing to specifications.
5. Torque the mounting bolts (1) to specifications.
CAUTION: Refer to Fastener Caution.
Tighten
- Tighten the bolts to 55 N.m (40 lb ft).
6. Install the clutch control module, if needed. Refer to Rear Differential Clutch Control Module Replacement.
7. Install the electrical connector for the clutch control module.
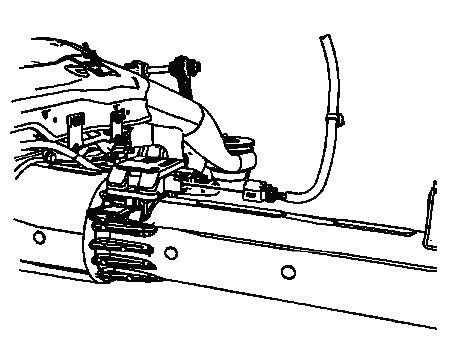
Fig. 35: View Of Clutch Control Module Electrical Connector
8. Using the jack stand or the aide of an assistant reposition the torque tube to allow installation of the mounting bolt.

Fig. 36: View Of Torque Tube
9. Install the torque tube mounting bolt.
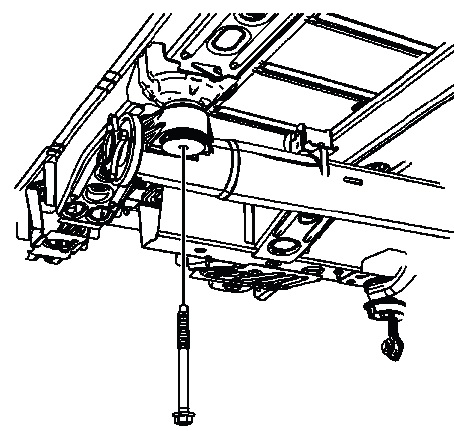
Fig. 37: Identifying Torque Tube Mounting Bolt
Tighten
- Tighten the bolt to 185 N.m (137 lb ft).
10. Install the propeller shaft assembly. Refer to Propeller Shaft Replacement.
11. Remove the support and lower the vehicle.
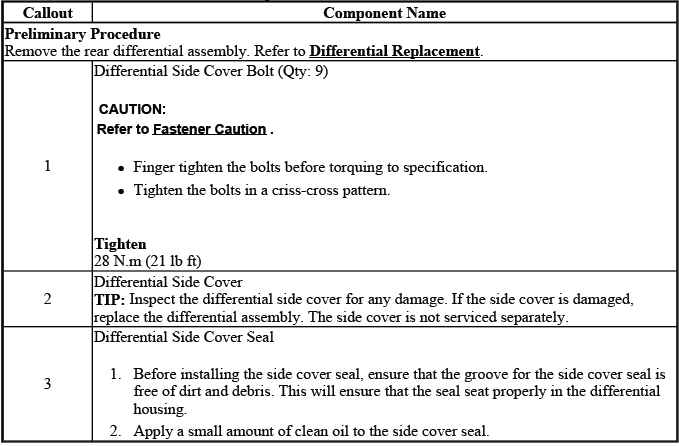
DIFFERENTIAL CARRIER COVER AND SEAL REPLACEMENT - LEFT SIDE
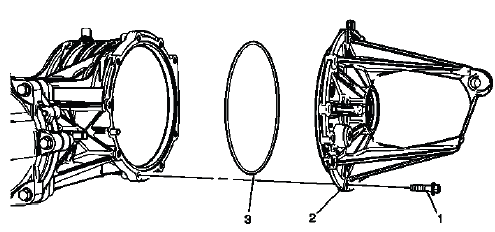
Fig. 38: View Of Left Side Differential Carrier Cover & Seal
Differential Carrier Cover and Seal Replacement - Left Side
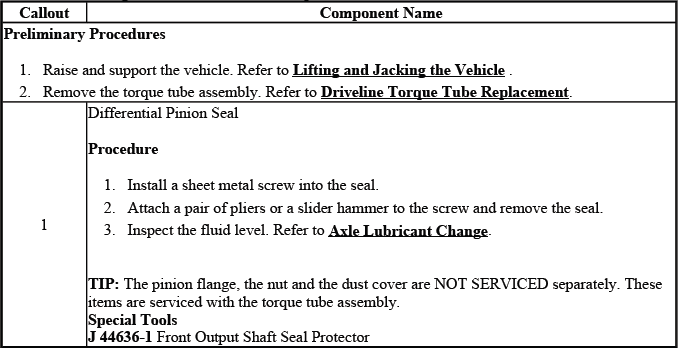
DRIVE PINION FLANGE/YOKE AND/OR OIL SEAL REPLACEMENT

Fig. 39: View Of Differential Pinion Seal
Drive Pinion Flange/Yoke and/or Oil Seal Replacement
DIFFERENTIAL REPLACEMENT
Removal Procedure
1. Raise and support the vehicle. Refer to Lifting and Jacking the Vehicle.
2. Remove the tires and wheels. Refer to Tire and Wheel Removal and Installation.
3. Drain the rear differential assembly. Refer to Axle Lubricant Change.
4. Remove the rear wheel drive shafts. Refer to Rear Wheel Drive Shaft and Rear Axle Shaft Seal Replacement.
5. Remove the propeller shaft assembly. Refer to Propeller Shaft Replacement.
6. Remove the front torque tube mounting bracket bolt.
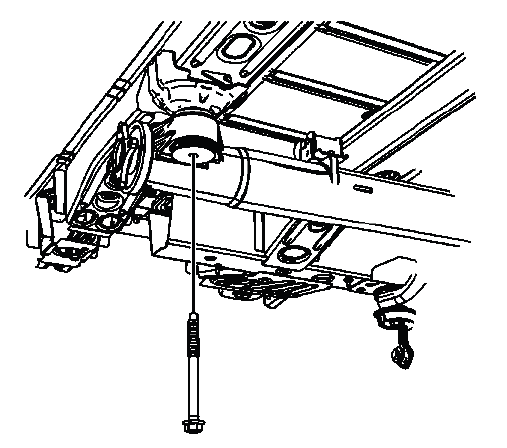
Fig. 40: Identifying Torque Tube Mounting Bolt
7. Lower the front of the torque tube to gain access to the electronic clutch control module.
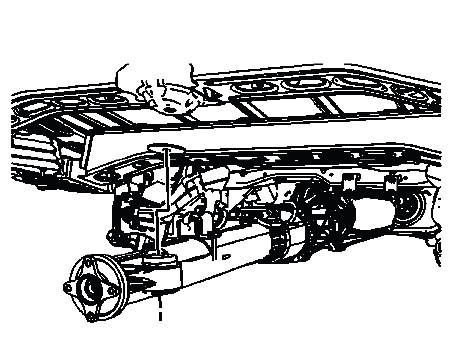
Fig. 41: View Of Torque Tube
8. Disconnect the electrical connector from the electronic clutch control module.
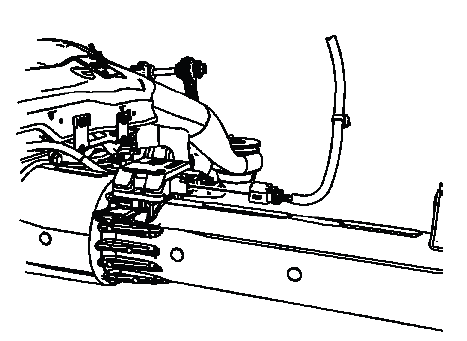
Fig. 42: View Of Clutch Control Module Electrical Connector
9. Support the torque tube with a jack stand.
10. Support the rear differential assembly with a transmission jack.
11. Remove the rear differential drive mounting bolts.
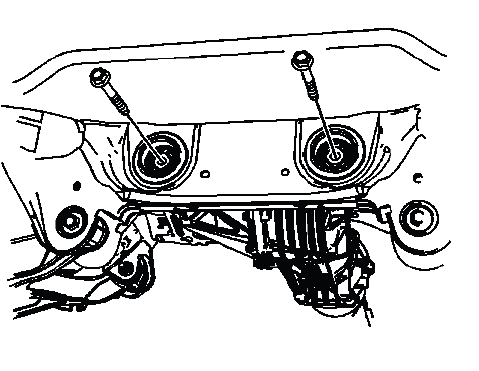
Fig. 43: Identifying Rear Differential Drive Mounting Bolts
12. With the aide of an assistant, remove the rear differential assembly from the vehicle.
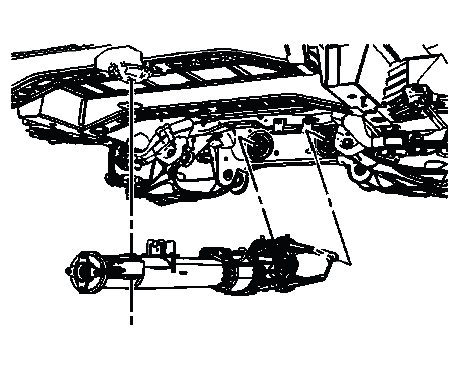
Fig. 44: View Of Rear Differential Assembly
13. Remove the torque tube assembly mounting bolts from the rear differential assembly. Refer to Driveline Torque Tube Replacement.
Installation Procedure
1. Install the torque tube assembly to the rear differential assembly. Refer to Driveline Torque Tube Replacement.
2. Position the rear differential in the vehicle.
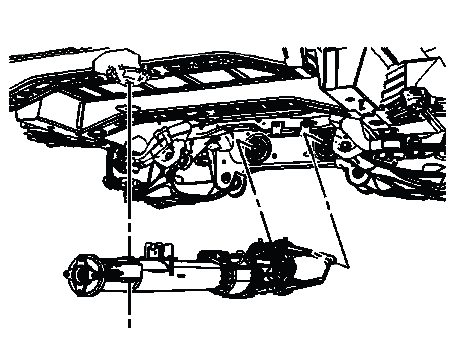
Fig. 45: View Of Rear Differential Assembly
3. Install the rear differential mounting bolts.
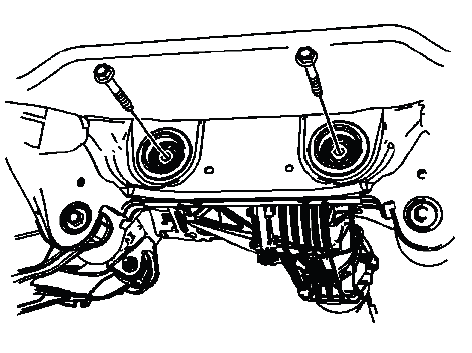
Fig. 46: Identifying Rear Differential Drive Mounting Bolts
CAUTION: Refer to Fastener Caution.
Tighten
- Tighten the bolts to 160 N.m (118 lb ft).
4. Reconnect the electrical connector for the electronic clutch control module.
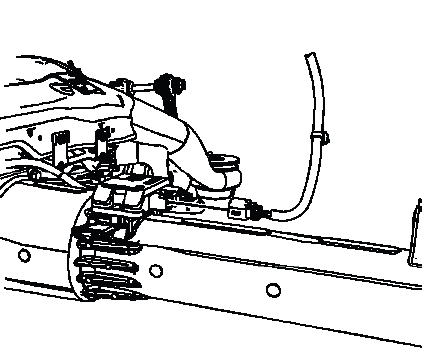
Fig. 47: View Of Clutch Control Module Electrical Connector
5. Lift the torque tube into position.

Fig. 48: View Of Torque Tube
6. Install the torque tube bolt.
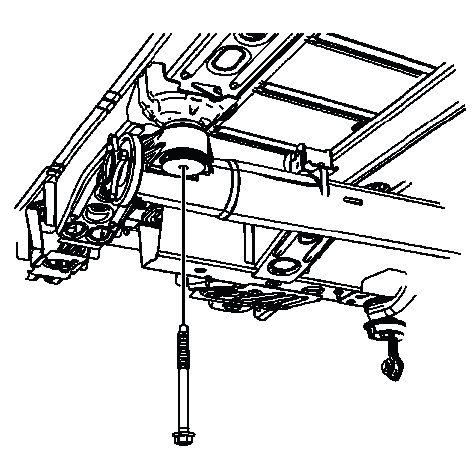
Fig. 49: Identifying Torque Tube Mounting Bolt
Tighten
- Tighten the bolt to 185 N.m (137 lb ft).
7. Install the propeller shaft assembly. Refer to Propeller Shaft Replacement.
8. Refill the rear differential assembly. Refer to Axle Lubricant Change.
9. Install the rear wheel drive shaft. Refer to Rear Wheel Drive Shaft and Rear Axle Shaft Seal Replacement.
10. Install the tires and wheels. Refer to Tire and Wheel Removal and Installation.
11. Remove the support and lower the vehicle.
TORQUE TUBE ASSEMBLY CLEANING AND INSPECTION
1. Check the torque tube for the following conditions:
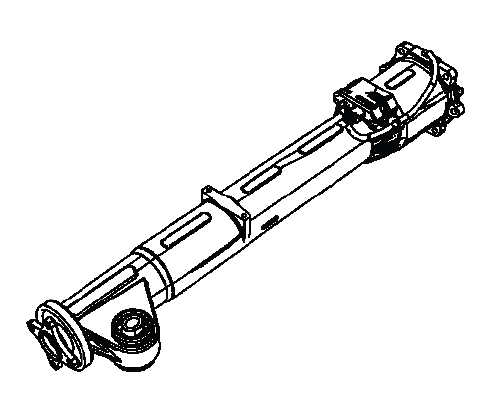
Fig. 50: View Of Torque Tube Assembly
IMPORTANT: The internal components of the torque tube assembly are not serviced separately. Replace the tube and internal components as an assembly.
- Damage to the driver flange
- Cracks or dents on the exterior of the torque tube
- Operation of all bearings
- Machine surfaces for abnormal wear
2. If any of the above conditions are found to be present, replace the torque tube assembly.

