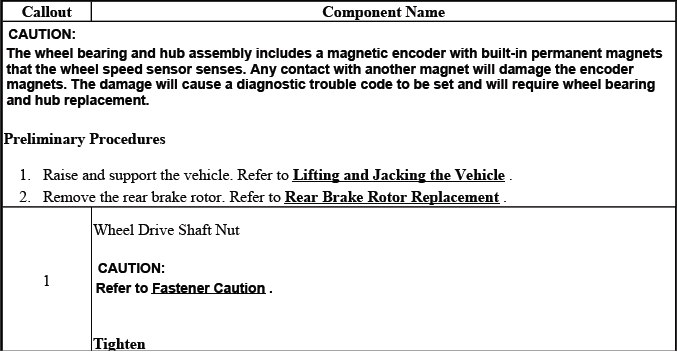
Buick Enclave: Rear Suspension
SPECIFICATIONS
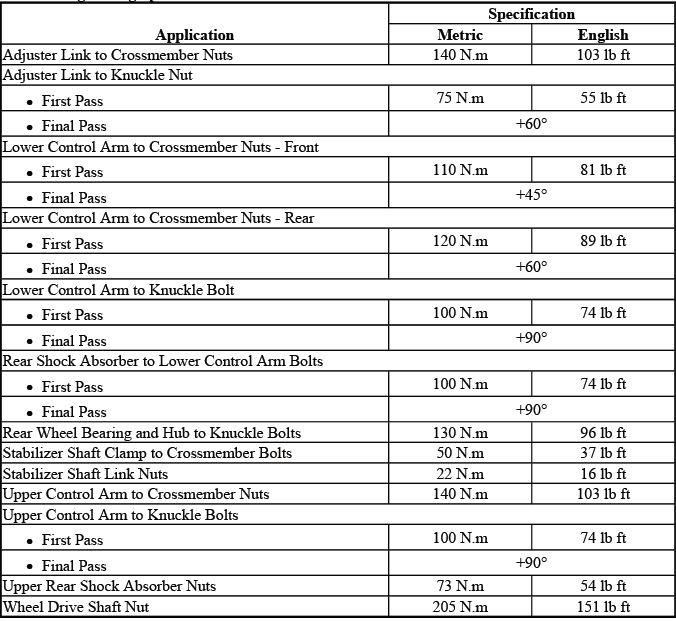
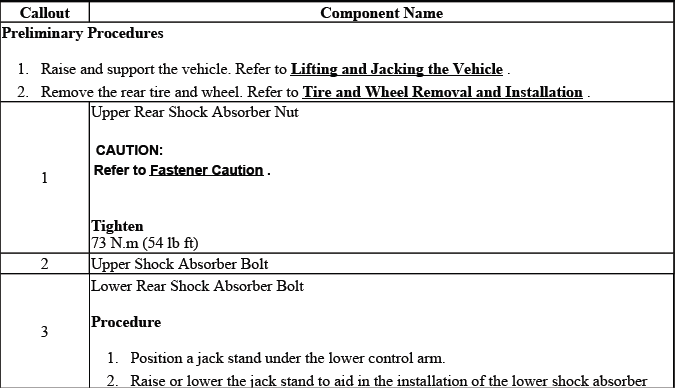
FASTENER TIGHTENING SPECIFICATIONS
Fastener Tightening Specifications
REPAIR INSTRUCTIONS
REAR WHEEL BEARING AND HUB REPLACEMENT (AWD)
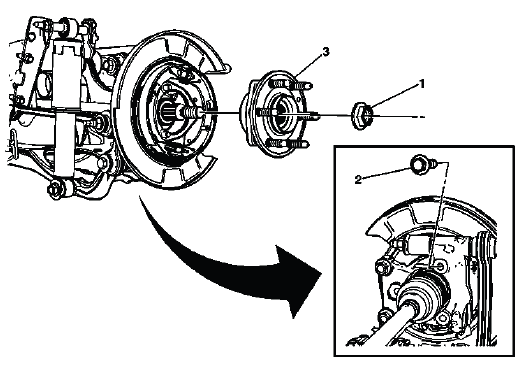
Fig. 1: Identifying Rear Wheel Bearing & Hub (AWD)
Rear Wheel Bearing and Hub Replacement (AWD)
REAR WHEEL BEARING AND HUB REPLACEMENT (FWD)
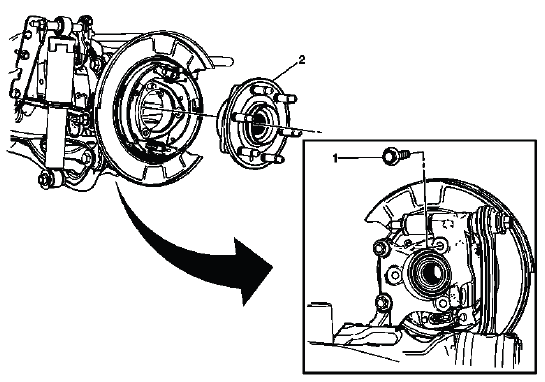
Fig. 2: Identifying Rear Wheel Bearing & Hub (FWD)
Rear Wheel Bearing and Hub Replacement (FWD)

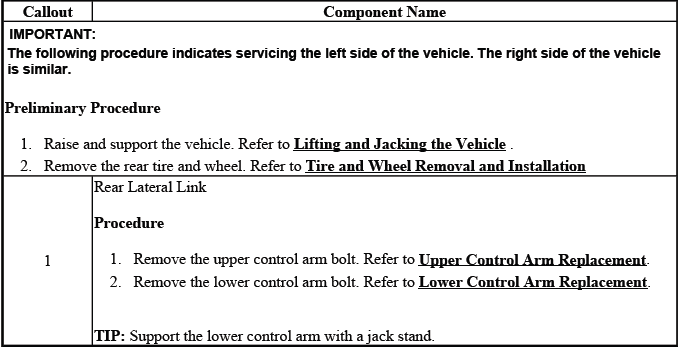
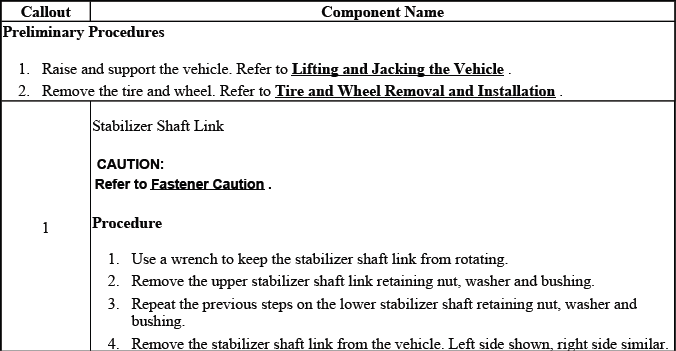
REAR SUSPENSION LINK REPLACEMENT - UPPER TO LOWER CONTROL ARM
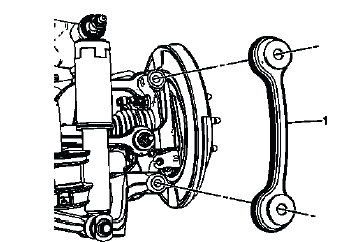
Fig. 3: Identifying Rear Suspension Link
Rear Suspension Link Replacement - Upper to Lower Control Arm
KNUCKLE REPLACEMENT
Removal Procedure
1. Raise and support the vehicle. Refer to Lifting and Jacking the Vehicle.
2. Remove the rear wheel bearing and hub. Refer to Rear Wheel Bearing and Hub Replacement (AWD) and Rear Wheel Bearing and Hub Replacement (FWD).
3. Remove the park brake backing plate assembly. Refer to Rear Parking Brake Anchor Backing Plate Replacement.
4. Remove the rear wheel drive shaft. Refer to Rear Wheel Drive Shaft and Rear Axle Shaft Seal Replacement.
5. Position a jack stand under the lower control arm.
6. Remove the nut from the bolt from the knuckle to the adjuster link.
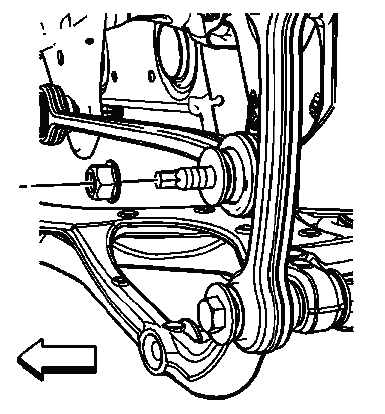
Fig. 4: Identifying Retaining Nut From Adjuster Link To Knuckle
7. Remove the bolt (1) from the knuckle to the adjuster link.
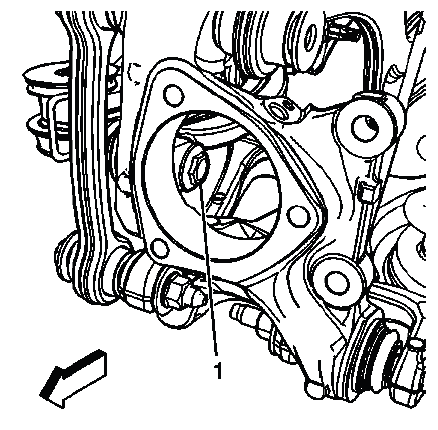
Fig. 5: Identifying Bolt From Knuckle To Adjuster Link
8. Remove the lower knuckle to lower control arm nut and bolt.
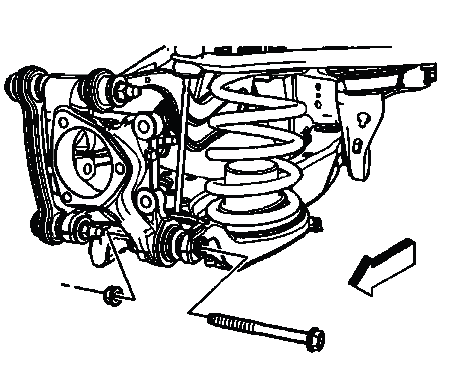
Fig. 6: Identifying Lower Knuckle To Lower Control Arm Nut And Bolt
NOTE: If removing the lower nut and bolt in step 8 or the upper nut and bolt in step 9, to service other suspension components, it is not necessary to remove the knuckle.
9. Remove the bolt and nut from the upper control arm to the knuckle.
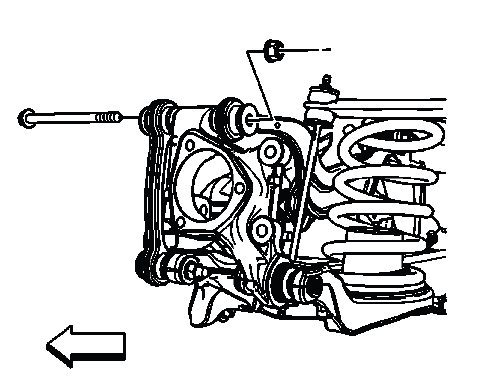
Fig. 7: Identifying Bolt & Nut From Upper Control Arm To Knuckle
10. Remove the knuckle from the upper and lower control arms.
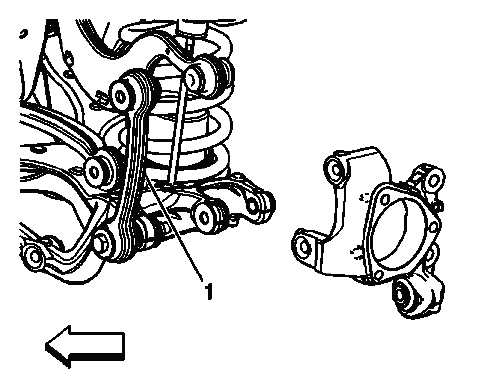
Fig. 8: Identifying Rear Suspension Link
NOTE: In the following service procedure, it is not necessary to remove the rear suspension link from the lower control arm. The link (1) can remain attached to the lower control arm.
Installation Procedure
NOTE: In steps 2-5, ensure that all the fasteners are installed loose in order to allow movement in the knuckle to allow for alignment all the mounting holes. After all the fasteners have been installed, then the proper torque specifications can be applied.
1. Position the knuckle in the upper and lower control arms.
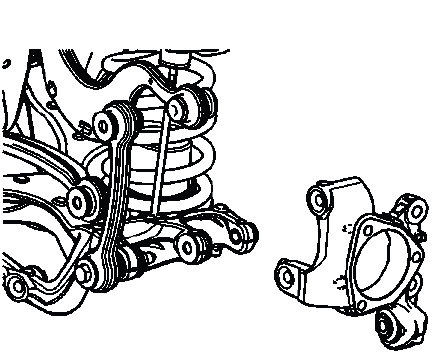
Fig. 9: Identifying Lower Knuckle
2. Install the bolt (1) from the knuckle to the adjuster link.
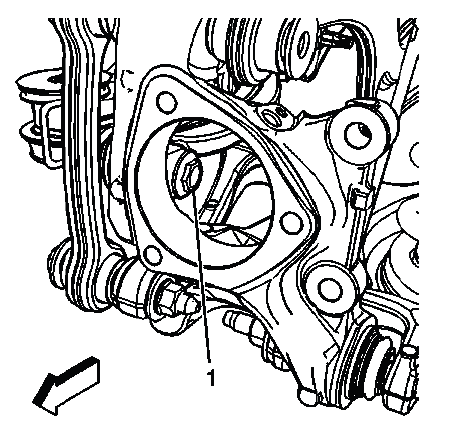
Fig. 10: Identifying Bolt From Knuckle To Adjuster Link
3. Tighten the nut for the bolt from the knuckle to the adjuster link to 75 N.m (55 lb ft) plus 60º.
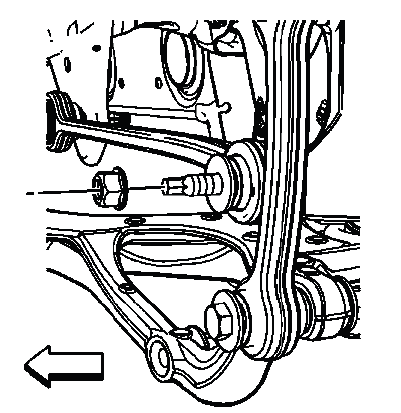
Fig. 11: Identifying Retaining Nut From Adjuster Link To Knuckle
CAUTION: Refer to Fastener Caution.
4. Install the bolt from the upper control arm to the knuckle and tighten to 100 N.m (74 lb ft) plus 90º.
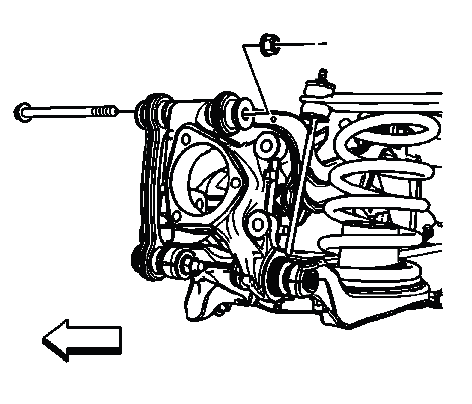
Fig. 12: Identifying Bolt & Nut From Upper Control Arm To Knuckle
NOTE: In steps 4 and 5, finger tighten the bolts. This will allow the alignment of the mounting holes in the control arms and the knuckle.
5. Install the bolt from the lower control arm to the knuckle and tighten to 100 N.m (74 lb ft) plus 90º.
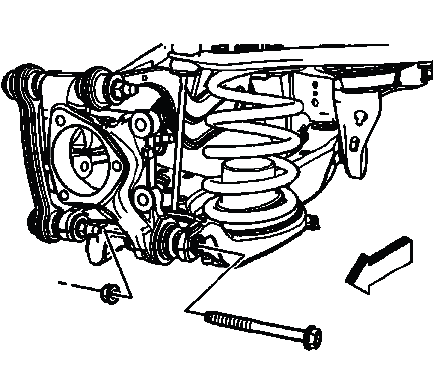
Fig. 13: Identifying Lower Knuckle To Lower Control Arm Nut And Bolt
6. Remove the jack stand from under the lower control arm.
7. Install the rear wheel drive shaft. Refer to Rear Wheel Drive Shaft and Rear Axle Shaft Seal Replacement.
8. Install the park brake backing plate assembly. Refer to Rear Parking Brake Anchor Backing Plate Replacement.
9. Install the rear wheel bearing and hub. Refer to Rear Wheel Bearing and Hub Replacement (AWD) and Rear Wheel Bearing and Hub Replacement (FWD).
10. Remove the support and lower the vehicle.
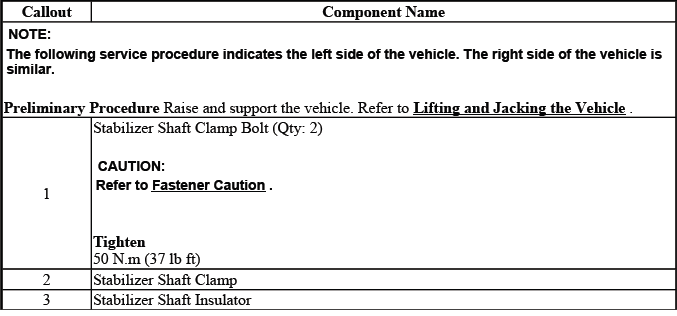
STABILIZER SHAFT REPLACEMENT
Removal Procedure
1. Raise and support the vehicle. Refer to Lifting and Jacking the Vehicle.
2. Remove the rear tires and wheels. Refer to Tire and Wheel Removal and Installation.
3. Remove the spare tire.
4. Insert a wrench (1) on the stabilizer shaft link (2) so as not to allow the stabilizer shaft link to rotate when removing or installing the retaining nut.
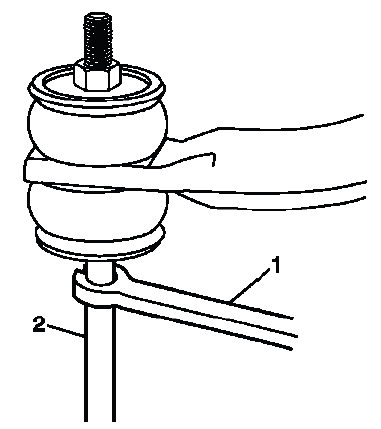
Fig. 14: Identifying Stabilizer Shaft Link
5. Remove the upper stabilizer shaft link retaining nut with washer (1) and bushing (2).

Fig. 15: Identifying Upper Stabilizer Shaft Link Retaining Nut With Washer &
Bushing
NOTE: It maybe necessary to apply a small amount of penetrating oil to the stabilizer shaft link retaining nut prior to removal.
6. Remove the stabilizer shaft clamp bolt (1) and the clamp (2).
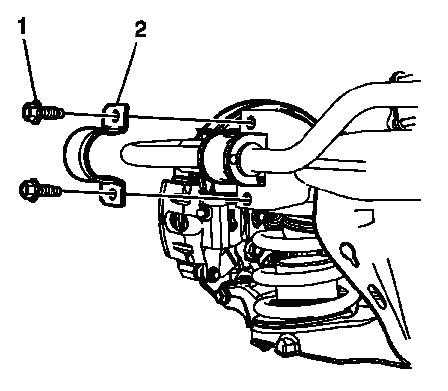
Fig. 16: Identifying Stabilizer Shaft Clamp & Bolts
7. Remove the stabilizer shaft (1) from the stabilizer shaft link (2).
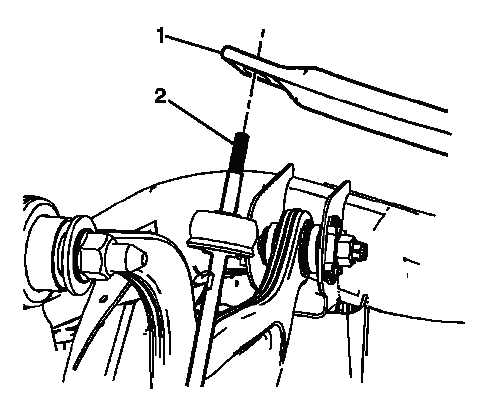
Fig. 17: Identifying Stabilizer Shaft & Stabilizer Shaft Link
8. Remove the stabilizer shaft (1) and bushing (2) from the vehicle.
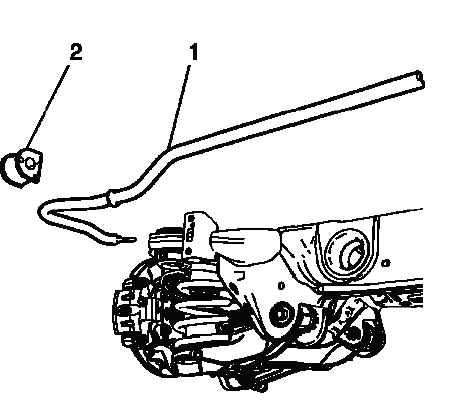
Fig. 18: Identifying Stabilizer Shaft & Bushing
NOTE: It maybe necessary to maneuver the stabilizer shaft in such away to remove it from the vehicle.
Installation Procedure
1. Install the bushing (2) on the stabilizer shaft (1).
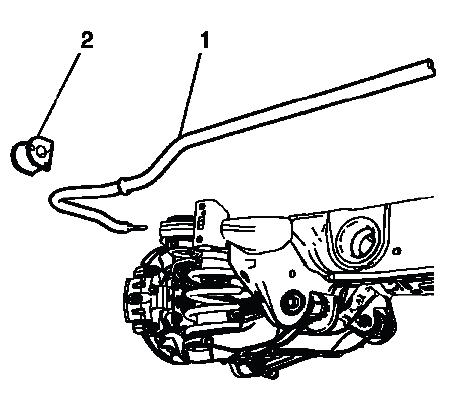
Fig. 19: Identifying Stabilizer Shaft & Bushing
2. Maneuver the stabilizer shaft in such away to properly install it on the frame.
3. Install the stabilizer shaft (1) on the stabilizer shaft link (2).
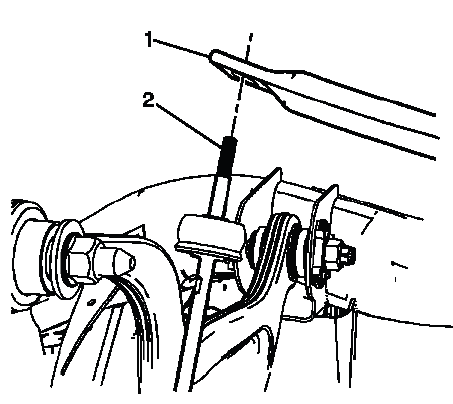
Fig. 20: Identifying Stabilizer Shaft & Stabilizer Shaft Link
4. Install the stabilizer shaft clamp (2) and the bolts (1).
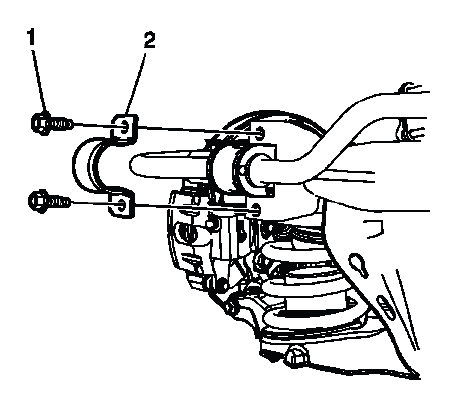
Fig. 21: Identifying Stabilizer Shaft Clamp & Bolts
NOTE: In steps 4 and 5, DO NOT tighten the bolts or nuts to specifications. Leave the bolts and nut loose.
5. Install the bushing (2) and the upper stabilizer shaft link retaining nut with washer (1).
6. Insert a wrench (1) on the stabilizer shaft link (2) so as not to allow the stabilizer shaft link to rotate when removing or installing the retaining nut.
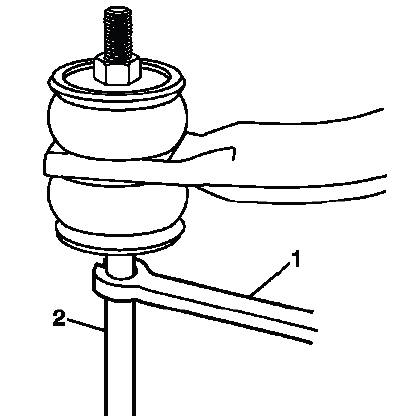
Fig. 22: Identifying Stabilizer Shaft Link
7. Tighten the upper stabilizer shaft link retaining nut.
CAUTION: Refer to Fastener Caution.
Tighten
- Tighten the retaining nut to 22 N.m (16 lb ft).
8. Tighten the stabilizer shaft clamp bolts.
Tighten
- Tighten the clamp bolts nut to 50 N.m (16 lb ft).
9. Install the spare tire.
10. Install the rear tires and wheels. Refer to Tire and Wheel Removal and Installation.
11. Remove the support and lower the vehicle.
STABILIZER SHAFT INSULATOR REPLACEMENT
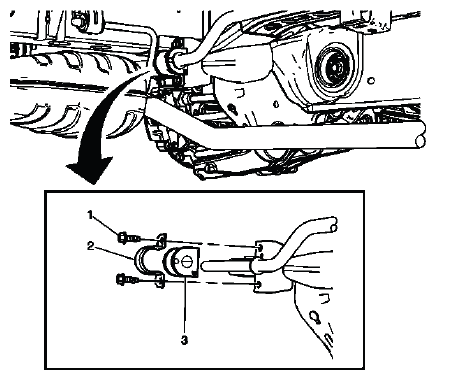
Fig. 23: Identifying Stabilizer Shaft Insulator
Stabilizer Shaft Insulator Replacement
STABILIZER SHAFT LINK REPLACEMENT
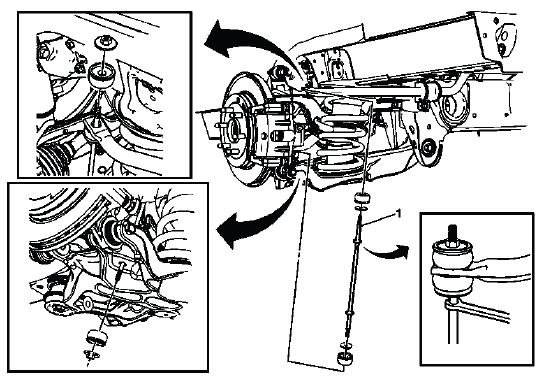
Fig. 24: Identifying Stabilizer Shaft Link
Stabilizer Shaft Link Replacement

STRUT AND SHOCK ABSORBER INSPECTION (SHOCK ABSORBER)
NOTE: The shock absorber assembly DOES NOT have to be removed from the vehicle to perform the following inspection procedure.
NOTE: A light film of oil on the top portion of the lower shock absorber tube is normal.
DO NOT replace the shock absorber for this condition.
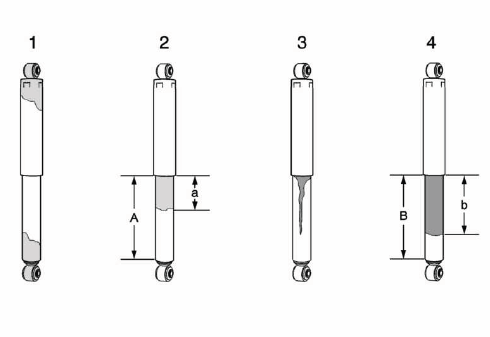
Fig. 25: Identifying Shock Absorber Conditions
Condition 1
Oil or fluid residue only on the bottom or top of the shock absorber and not originating from the shaft seal, is not a shock absorber related problem. DO NOT replace the shock absorber, look for other external leaks.
Condition 2
Light film/residue on approximately 1/3 (a) or less of the lower shock tube (A) and originating from the shaft seal, is a NORMAL condition. DO NOT replace the shock absorber.
Condition 3
Oil drip or trail down the lower shock tube and originating from the shaft seal, is an ABNORMAL condition.
Replace the shock absorber.
Condition 4
An extreme wet film of oil covering more than 1/3 (b) of the lower shock tube and originating from the shaft seal (B), is an ABNORMAL condition. Replace the shock absorber. Refer to Shock Absorber Replacement.
Inspection
1. Verify the customer's concern is present. If the concern is present, continue to the next step. If the concern is not present, then the vehicle is operating normally.
2. Raise and support the vehicle. Refer to Lifting and Jacking the Vehicle.
NOTE: The shock absorber assembly DOES NOT have to be removed from the vehicle to perform the following inspection procedure.
3. Visually inspect each of the shock absorbers for external fluid leaks. Refer to the following conditions 1, 2, 3 and 4 for visual inspection.
- If conditions 1 or 2 are found, continue to step 4.
- If conditions 3 or 4 are found, replace shock absorber. Refer to Shock Absorber Replacement.
4. If equipped with electronic suspension control system, ensure that the system is working properly. Refer to the appropriate Diagnostic Starting Point - Electronic Suspension Control information.
5. Use your hands in order to lift up and push down on each corner of the vehicle 3 times. Remove your hands from the vehicle. If the corner motion exceeds 2 cycles, replace the shock absorber. If the shock absorber does not exceed 2 cycles, NO repair is necessary.
SHOCK ABSORBER REPLACEMENT
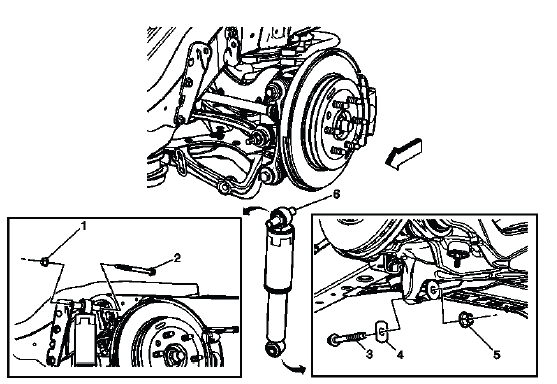
Fig. 26: Identifying Shock Absorber
Shock Absorber Replacement
SHOCK ABSORBER DISPOSAL
1. Make an indentation 10 mm (0.4 in) from the bottom (4) of the tube (3) using a centerpunch.
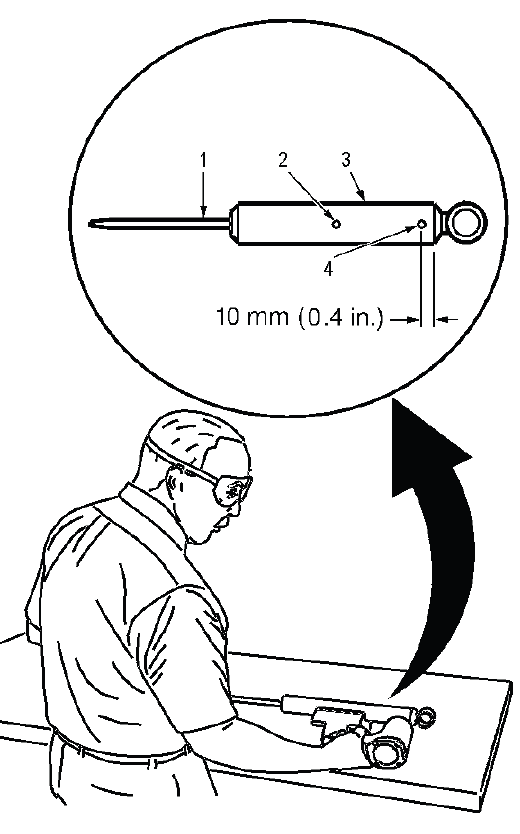
Fig. 27: Drilling Hole In Shock Absorber At Centerpunched Locations
WARNING: Gas charged shock absorbers contain high pressure gas. Do not remove the snap ring from inside the top of the tube. If the snap ring is removed, the contents of the shock absorber will come out with extreme force which may result in personal injury.
WARNING: To prevent personal injury, wear safety glasses when centerpunching and drilling the shock absorber. Use care not to puncture the shock absorber tube with the centerpunch.
2. Clamp the shock absorber in a vise horizontally with the shock absorber rod (1) completely extended.
3. Drill a hole in the shock absorber at the centerpunch (4) using a 5 mm (3/16 in) drill bit. Gas or a gas/oil mixture will exhaust when the drill bit penetrates the shock absorber. Use shop towels in order to contain the escaping oil.
4. Make an indentation in the middle (2) of the tube (3) with a centerpunch.
5. Drill a second hole in the shock absorber at the centerpunch (2) using a 5 mm (3/16 in) drill bit. Oil will exhaust when the drill bit penetrates the shock absorber. Use shop towels in order to contain the escaping oil.
6. Remove the shock absorber from the vise. Hold the shock absorber over a drain pan horizontally with the holes down. Move the rod (1) in and out of the tube (3) to completely drain the oil from the shock absorber.
REAR SPRING, INSULATOR AND JOUNCE BUMPER REPLACEMENT
Removal Procedure
1. Raise and support the vehicle. Refer to Lifting and Jacking the Vehicle.
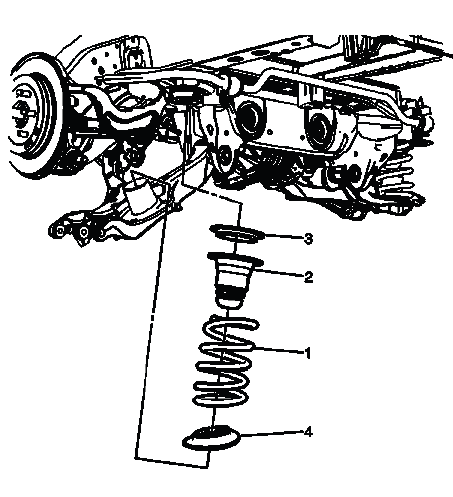
Fig. 28: Identifying Rear Spring & Insulator
2. Remove the rear tire and wheel. Refer to Tire and Wheel Removal and Installation.
3. Position an adjustable jack stand under the lower control arm.
4. Remove the lower stabilizer shaft link bushing and nut. Refer to Stabilizer Shaft Link Replacement.
5. Remove the lower shock absorber bolt. Refer to Shock Absorber Replacement.
6. Remove the lower bolts from the knuckle. Refer to Knuckle Replacement.
7. Using the adjustable jack stand, slowly lower the vehicle until the rear spring (1), insulator (4), jounce bumper (2) and the spring seat (3) can be removed.
Installation Procedure
1. Position the spring seat (3), jounce bumper (2), rear spring (1) and the insulator (4) on the lower control arm.
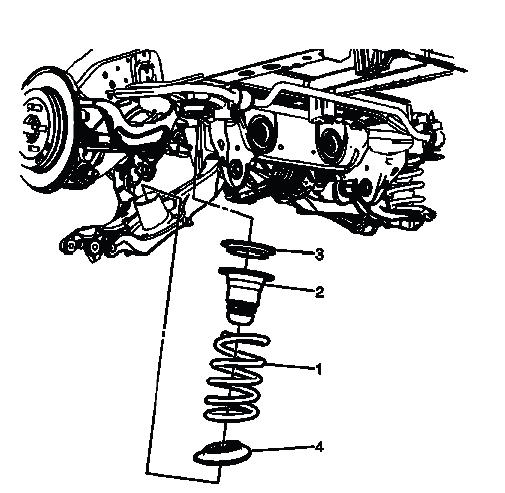
Fig. 29: Identifying Rear Spring & Insulator
2. Using the adjustable jack stand, raise the lower control arm until the lower bolts for the knuckle can be installed. Refer to Knuckle Replacement.
3. Remove the adjustable jack stand.
4. Install the lower stabilizer shaft link bushing and nut. Refer to Stabilizer Shaft Link Replacement.
5. Install the lower shock absorber bolt. Refer to Shock Absorber Replacement.
6. Install the rear tire and wheels. Refer to Tire and Wheel Removal and Installation.
7. Remove the support and lower the vehicle.
ADJUST LINK REPLACEMENT
Removal Procedure
NOTE: The following procedure indicates servicing the left side of the vehicle.
Servicing the right side of the vehicle is similar.
1. Raise and support the vehicle. Refer to Lifting and Jacking the Vehicle.
2. Remove the rear shock absorber. Refer to Shock Absorber Replacement.
3. Remove the retaining nut from the adjuster link to the knuckle.
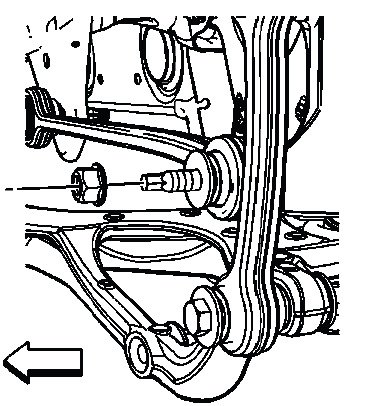
Fig. 30: Identifying Retaining Nut From Adjuster Link To Knuckle
4. Install a wrench to hold the adjuster cam bolt.
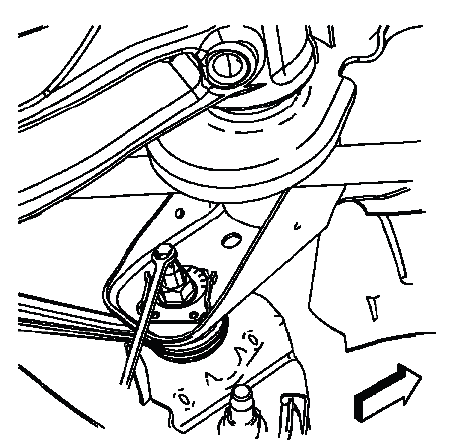
Fig. 31: Identifying Adjuster Cam Bolt
5. Mark a point of reference on the adjuster cam and the mounting bracket.
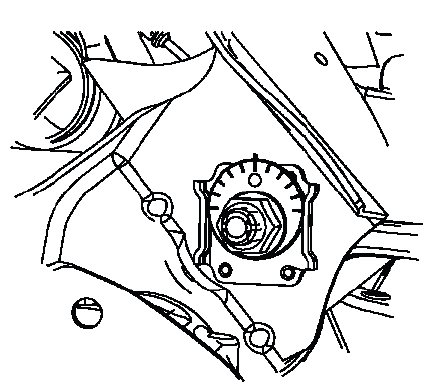
Fig. 32: Identifying Reference Marks On Adjuster Cam & Mounting Bracket
NOTE: In steps 5 and 6, if servicing other suspension components, mark the relationship of the adjuster cams to the mounting brackets to aid in the reinstallation of the adjustment link.
6. Remove the front adjuster nut (1) and the adjuster cam (2).

Fig. 33: Identifying Front Adjuster Nut & Adjuster Cam
7. Remove the rear adjuster nut (1), adjuster cam (2).
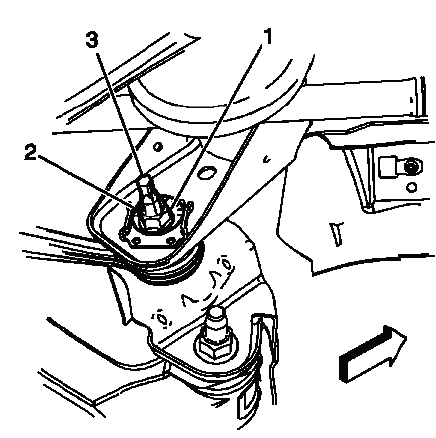
Fig. 34: Identifying Adjuster Bolt In Mounting Bracket & Adjuster Link
8. Maneuver the adjuster bolt (3) so as to remove it from the mounting bracket.
9. Remove the adjuster link from the knuckle and the mounting bracket.
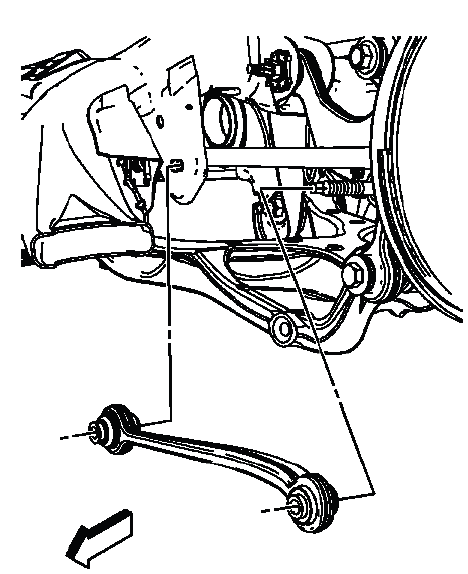
Fig. 35: Identifying Adjuster Link
Installation Procedure
1. Install the adjuster link on the knuckle and in the mounting bracket.
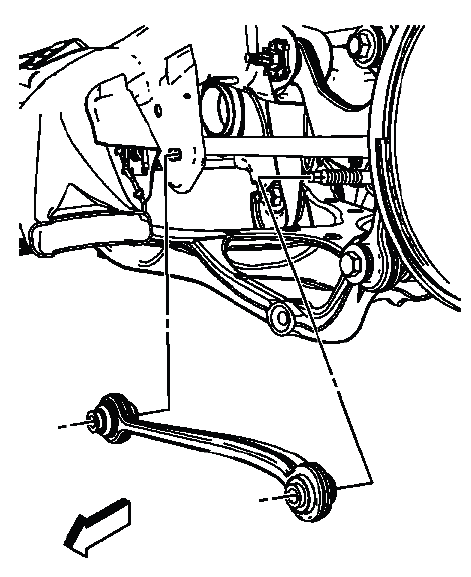
Fig. 36: Identifying Adjuster Link
2. Install the adjuster bolt (3) in the mounting bracket and adjuster link.
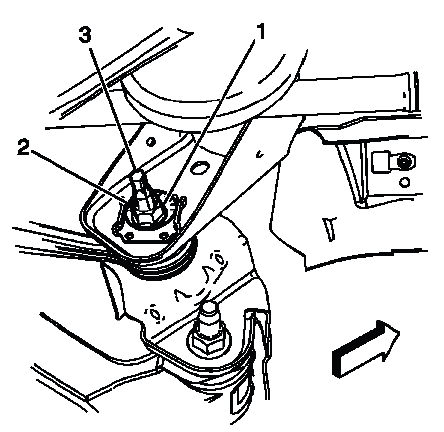
Fig. 37: Identifying Adjuster Bolt In Mounting Bracket & Adjuster Link
3. Install the rear adjuster cam (2) and adjuster nut (1). Finger tighten the nut at this time.
4. Install the front adjuster cam (2) and the adjuster nut (1). Finger tighten the nut at this time.
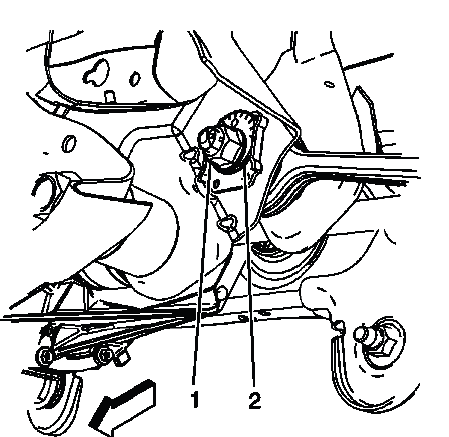
Fig. 38: Identifying Front Adjuster Nut & Adjuster Cam
5. Install the retaining nut for the adjuster link.
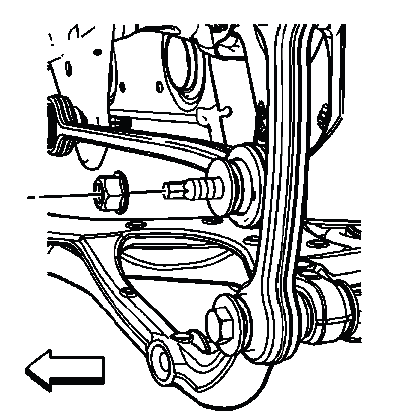
Fig. 39: Identifying Retaining Nut From Adjuster Link To Knuckle
CAUTION: Refer to Fastener Caution.
Tighten
- Tighten the retaining nut to 75 N.m (55 lb ft) plus 60º.
6. Install the rear shock absorber. Refer to Shock Absorber Replacement.
7. Align the reference marks on the adjuster cam and the mounting bracket.
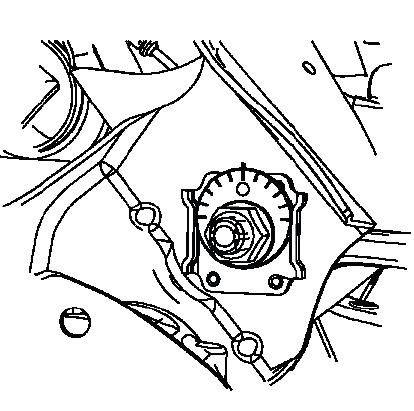
Fig. 40: Identifying Reference Marks On Adjuster Cam & Mounting Bracket
NOTE: If servicing other suspension components, align the relationship marks on the adjuster cam and the mounting brackets to aid in the re-installation of the adjustment link.
8. Install a wrench to hold the adjuster cam bolt.
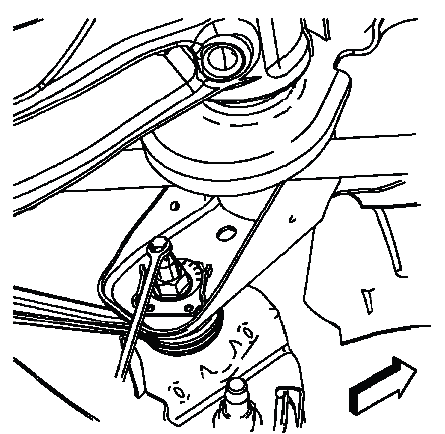
Fig. 41: Identifying Adjuster Cam Bolt
9. Tighten the adjuster cam nuts.
Tighten
- Tighten the adjuster cam nuts to 140 N.m (103 lb ft).
10. Remove the support and lower the vehicle.
11. Align the rear suspension. Refer to Wheel Alignment Specifications.
UPPER CONTROL ARM REPLACEMENT
Removal Procedure
NOTE: In the following service procedures, the left side is shown, the right side is similar.
1. Remove the tire and wheel assembly. Refer to Tire and Wheel Removal and Installation.
2. Scribe a reference mark on the adjuster cam and the bracket to aid in installing the upper control arm.
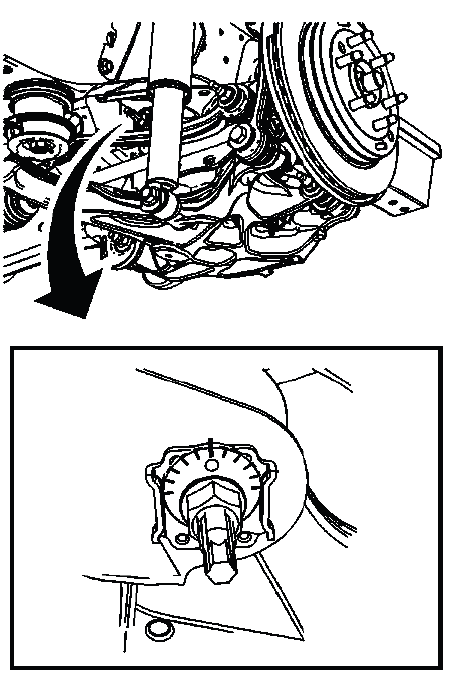
Fig. 42: Identifying Reference Marks On Adjuster Cam & Bracket
NOTE: If removing the upper control arm to service scribe a line on the front adjuster cam to aid in the realignment of the control arm.
3. Remove the speed sensor wiring harness retaining clips (1) and (2) from the upper control arm.
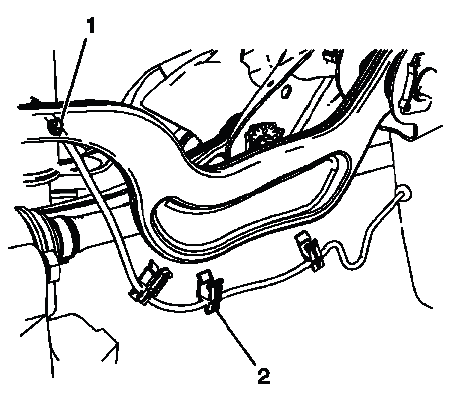
Fig. 43: Identifying Speed Sensor Wiring Harness Retaining Clips
4. Position a jack stand under the lower control arm.
5. Remove the upper control arm mounting nut (1) and bolt (2).
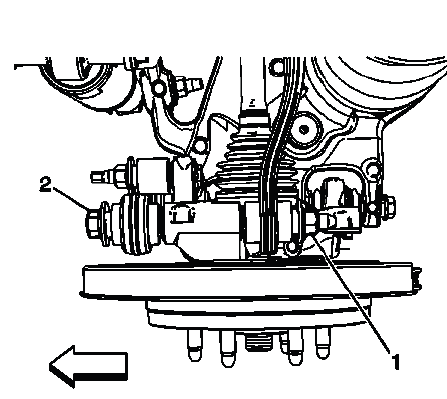
Fig. 44: Identifying Upper Control Arm Bolt & Nut
6. Use a wrench to hold the adjuster cam bolt.

Fig. 45: View Of A Wrench Holding Adjuster Cam Bolt In Place
7. Remove the rear upper adjuster cam bolt (1).
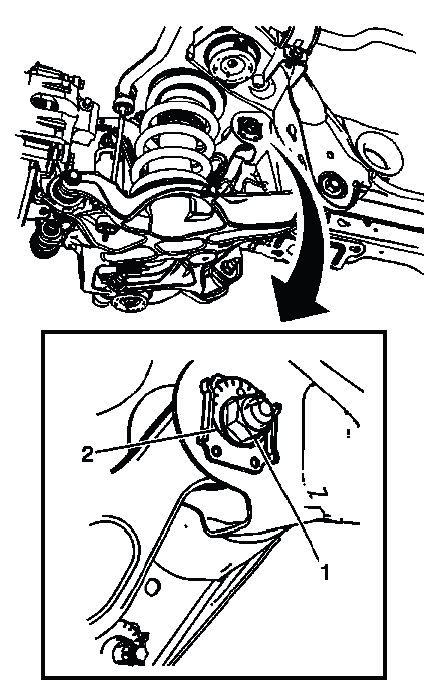
Fig. 46: Identifying Rear Upper Adjuster Cam & Cam Bolt
8. Remove the rear upper adjuster cam (2).
9. Remove front the adjuster cam nut (1).
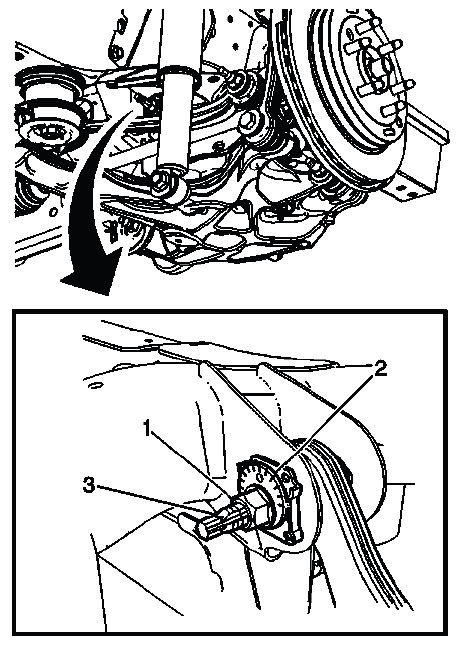
Fig. 47: Identifying Adjuster Cam, Cam Nut & Bolt
10. Remove the adjuster cam (2).
11. Remove the adjuster cam bolt (3).
12. Rotate the rear knuckle down to gain removal clearance for the upper control arm.
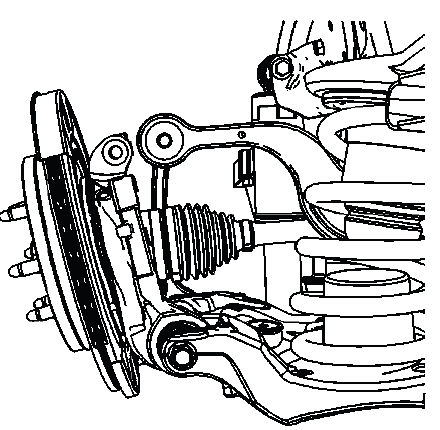
Fig. 48: Identifying Knuckle Assembly
13. Remove the upper control arm (1).
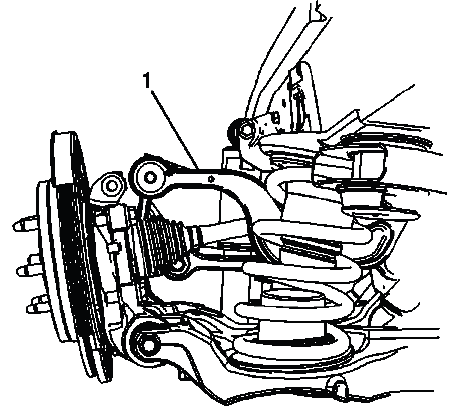
Fig. 49: Identifying Upper Control Arm
Installation Procedure
1. Install the upper control arm (1) in the mounting bracket.
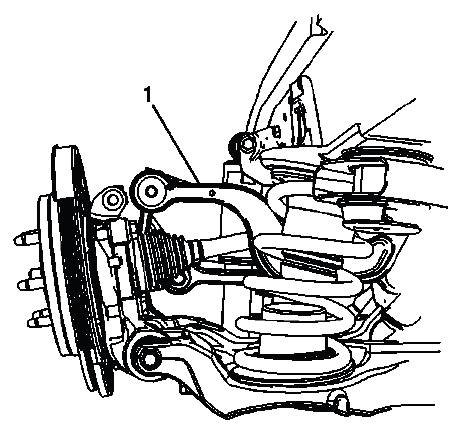
Fig. 50: Identifying Upper Control Arm
2. Rotate the knuckle assembly back into the proper position.
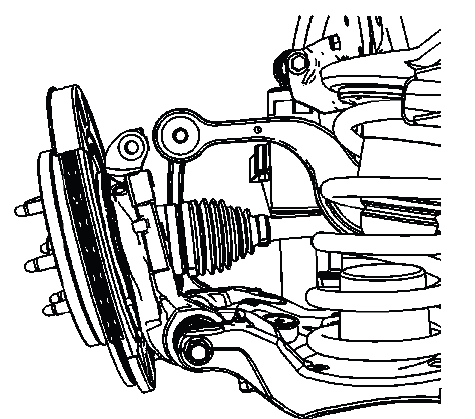
Fig. 51: Identifying Knuckle Assembly
3. Position the front adjuster cam (2) in the mounting bracket.
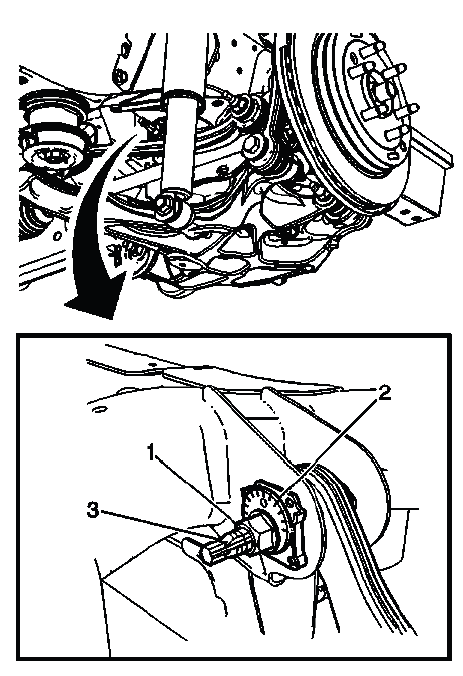
Fig. 52: Identifying Adjuster Cam, Cam Nut & Bolt
4. Install the adjuster cam bolt (3).
5. Finger tighten the front adjuster cam nut (1).
6. Position the rear adjuster cam (2) in the mounting bracket.

Fig. 53: Identifying Rear Upper Adjuster Cam & Cam Bolt
7. Finger tighten the rear adjuster cam nut (1).
8. Install the upper control arm bolt (2) and nut (1).
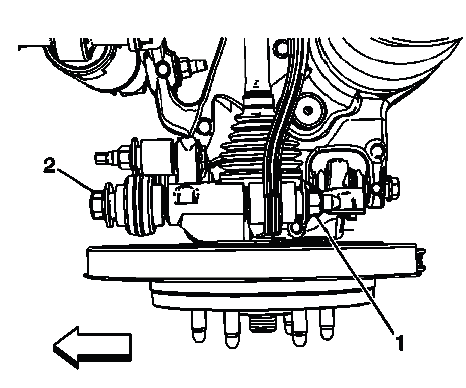
Fig. 54: Identifying Upper Control Arm Bolt & Nut
CAUTION: Refer to Fastener Caution.
Tighten
- Tighten the bolt to 100 N.m (74 lb ft) plus 90º.
9. Remove the jack stand from under the lower control arm.
10. Install the speed sensor wiring harness retaining clips (1) and (2) on the upper control arm.
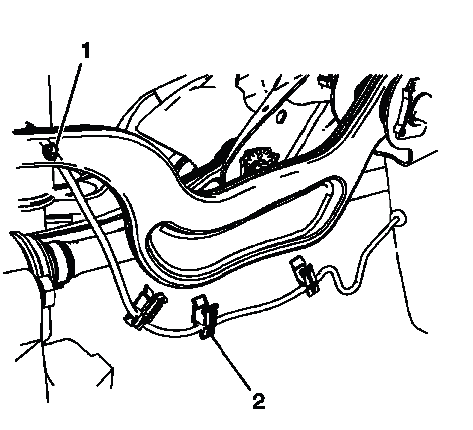
Fig. 55: Identifying Speed Sensor Wiring Harness Retaining Clips
11. Align the reference marks on the adjuster cam and bracket.

Fig. 56: Identifying Reference Marks On Adjuster Cam & Bracket
12. Using a wrench to hold the adjuster cam bolt in place, tighten all the adjuster cam nuts.
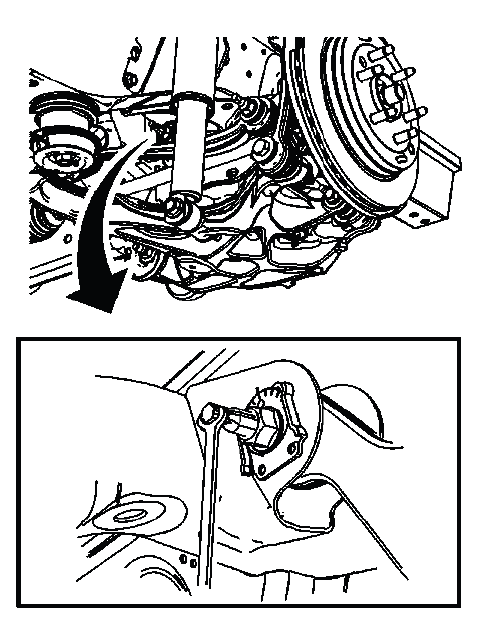
Fig. 57: View Of A Wrench Holding Adjuster Cam Bolt In Place
Tighten
- Tighten the nuts to 140 N.m (103 lb ft).
13. Install the tire and wheel assembly. Refer to Tire and Wheel Removal and Installation.
14. Verify wheel alignment. Refer to Wheel Alignment Specifications.
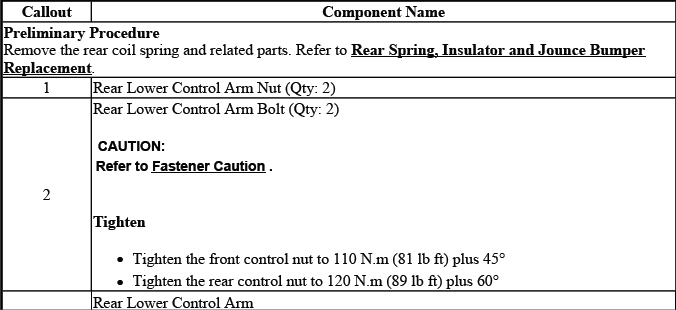
LOWER CONTROL ARM REPLACEMENT
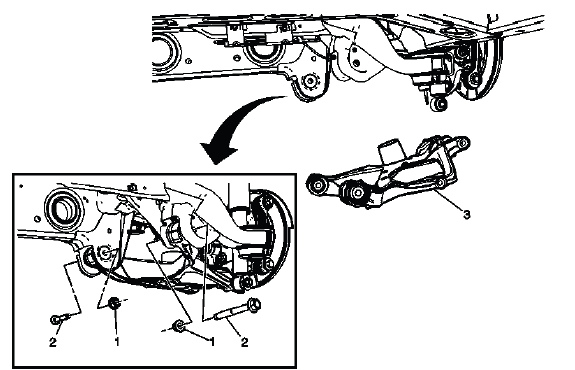
Fig. 58: Identifying Lower Control Arm
Lower Control Arm Replacement

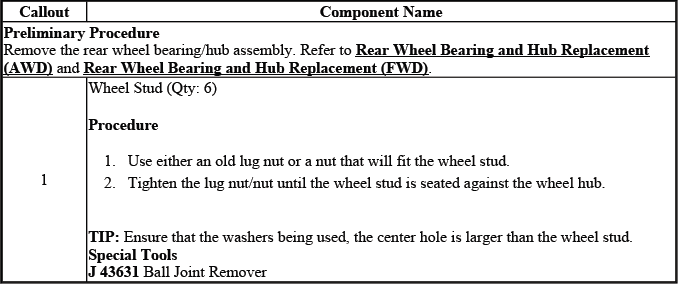
WHEEL STUD REPLACEMENT
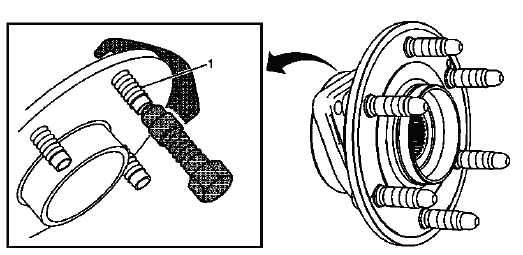
Fig. 59: Identifying Wheel Stud
Wheel Stud Replacement
DESCRIPTION AND OPERATION
REAR SUSPENSION DESCRIPTION AND OPERATION
The rear suspension system on this vehicle is the independent suspension type. The rear suspension system consists of the following components:
- The crossmember
- The knuckle
- The adjuster link
- The wheel bearing
- The upper control arms
- The lower control arms (with integral ball joints)
- The coils springs
- The stabilizer shaft
- The stabilizer shaft links
- The shock absorbers
- The coils springs
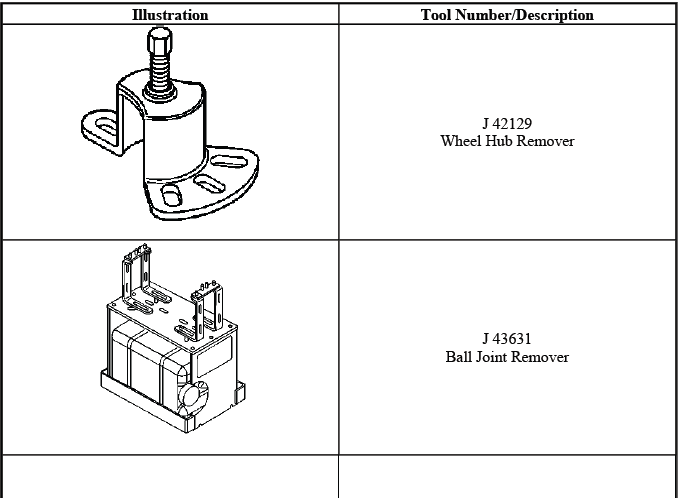
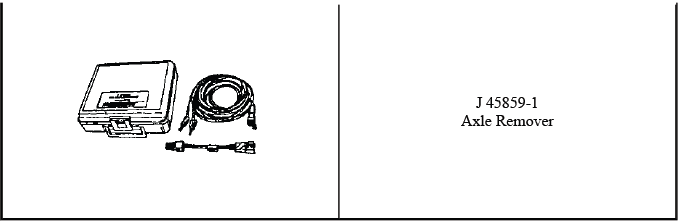
SPECIAL TOOLS AND EQUIPMENT
SPECIAL TOOLS