Buick Enclave: Specifications, Diagnostic Information and Procedures
SPECIFICATIONS
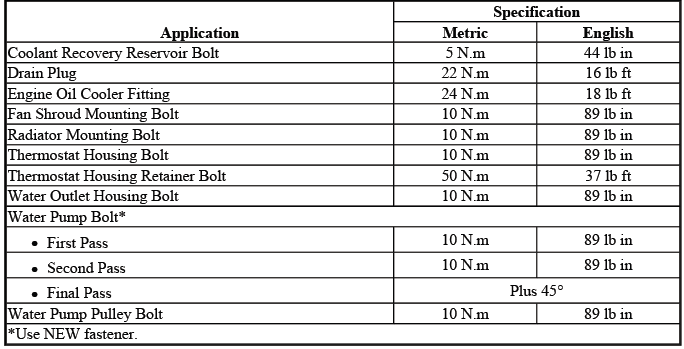
FASTENER TIGHTENING SPECIFICATIONS
Fastener Tightening Specifications
SCHEMATIC WIRING DIAGRAMS
ENGINE HEATING/COOLING WIRING SCHEMATICS
Engine Cooling
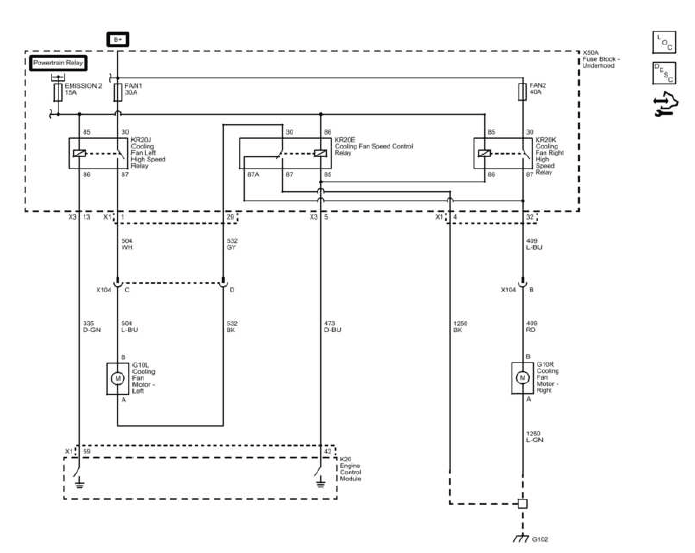
Fig. 1: Engine Cooling Wiring Schematics
DIAGNOSTIC INFORMATION AND PROCEDURES
DIAGNOSTIC CODE INDEX
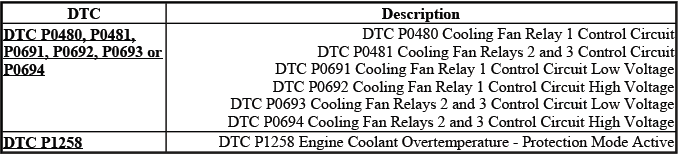
DTC P0480, P0481, P0691, P0692, P0693 OR P0694: COOLING FAN RELAY
Diagnostic Instructions
- Perform the Diagnostic System Check - Vehicle prior to using this diagnostic procedure.
- Review Strategy Based Diagnosis for an overview of the diagnostic approach.
- Diagnostic Procedure Instructions provides an overview of each diagnostic category.
DTC Descriptors
DTC P0480
- Cooling Fan Relay 1 Control Circuit
DTC P0481
- Cooling Fan Relays 2 and 3 Control Circuit
DTC P0691
- Cooling Fan Relay 1 Control Circuit Low Voltage
DTC P0692
- Cooling Fan Relay 1 Control Circuit High Voltage
DTC P0693
- Cooling Fan Relays 2 and 3 Control Circuit Low Voltage
DTC P0694
- Cooling Fan Relays 2 and 3 Control Circuit High Voltage
Diagnostic Fault Information
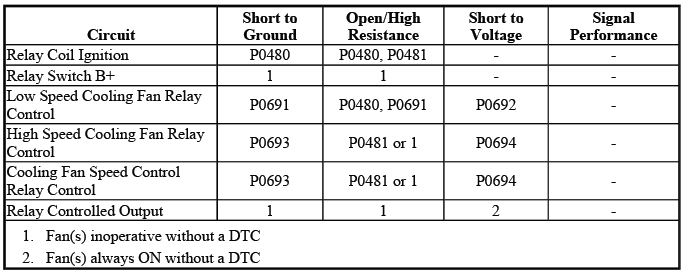
Circuit/System Description
The engine cooling fan system consists of a cooling fan assembly containing two electric cooling fans. The engine control module (ECM) uses two fan control circuits and a series of three relays to command the fans ON in either high speed or low speed, depending on cooling requirements. The ECM activates the applicable relay by grounding the control circuit with a solid state device called a driver. Each driver is equipped with a feedback circuit that is pulled-up to a voltage. The ECM can determine if the control circuit is open, shorted to ground or shorted to a voltage by monitoring the feedback voltage. In low speed, both fans are turned ON at a reduced speed. High speed has both fans turned ON at full speed.
Conditions for Running the DTC
- The ignition voltage is greater than 11 volts.
- The ECM driver transitions from ON to OFF or from OFF to ON.
- DTCs P0480, P0481, P0691, P0692, P0693 and P0694 run continuously when the conditions above are met.
Conditions for Setting the DTC
The commanded state of the ECM driver and the actual state of the control circuit do not match for greater than 5 seconds.
Action Taken When the DTC Sets
DTCs P0480, P0481, P0691, P0692, P0693 and P0694 are Type B DTCs.
Conditions for Clearing the MIL/DTC
DTCs P0480, P0481, P0691, P0692, P0693 and P0694 are Type B DTCs.
Diagnostic Aids
- The ECM has the capability of providing command to the fan relays even when a scan tool output control is being used. Always refer to the fan control command parameters on the scan tool to know which fans are being commanded ON by the ECM.
- The scan tool cooling fan output control operates as follows:
- Cooling Fan Relay 1 operates both fans at a low speed
- Cooling Fan Relays 2 and 3 operates one fan at a high speed
- Cooling Fan Relays 1, 2 and 3 operates both fans at a high speed
Reference Information
Schematic Reference
Engine Heating/Cooling Schematics
Connector End View Reference
- COMPONENT CONNECTOR END VIEWS - INDEX
- Electrical Center Identification Views
Description and Operation
Cooling Fan Description and Operation
Electrical Information Reference
- Circuit Testing
- Connector Repairs
- Testing for Intermittent Conditions and Poor Connections
- Wiring Repairs
DTC Type Reference
Powertrain Diagnostic Trouble Code (DTC) Type Definitions
Scan Tool Reference
Control Module References for scan tool information
Circuit/System Verification
1. Ignition ON.
2. Verify an audible click is heard or felt from cooling fan relays 1, 2 and 3 when commanding the cooling fans ON and OFF with a scan tool.
If a click is not heard or felt at one or more of the relays
Refer to Circuit/System Testing
If a click is heard or felt at each of the relays
3. Operate the vehicle within the Conditions for Running the DTC. You may also operate the vehicle within the conditions that you observed from the Freeze Frame/Failure Records data.
4. Verify the DTC does not set.
If the DTC sets
Refer to Circuit/System Testing
If the DTC does not set
5. All OK.
Circuit/System Testing
1. Ignition OFF, disconnect all of the cooling fan relays. Ignition ON.
2. Verify that a test lamp illuminates between ground and a relay coil ignition circuit terminal listed below:
NOTE: The following tests must be performed on all three fan relay circuits.
- KR20C Cooling Fan Low Speed Relay terminal 85/2
- KR20D Cooling Fan High Speed Relay terminal 86/1
- KR20E Cooling Fan Speed Control Relay terminal 86/1
If the test lamp does not illuminate
- Ignition OFF and all vehicle systems OFF. It may take up to 2 minutes for all vehicle systems to power down. Remove the test lamp.
- Test for less than 2 ohms in the ignition circuit of the appropriate cooling fan relay, end to end.
- If 2 ohms or greater, repair the open/high resistance in the circuit.
- If less than 2 ohms, verify the fuse is not open and there is voltage at the fuse.
If the test lamp does not illuminate and the circuit fuse is open
- Ignition OFF and all vehicle systems OFF. It may take up to 2 minutes for all vehicle systems to power down. Remove the test lamp.
- Test for infinite resistance between the appropriate cooling fan relay ignition circuit and ground.
- If less than infinite resistance, repair the short to ground on the circuit.
- If infinite resistance test or replace the appropriate cooling fan relay.
If the test lamp illuminates
3. Connect a DMM, set on the diode setting, between ground and a relay control circuit terminal listed below:
NOTE: The following tests must be performed on all three fan relay circuits.
- KR20C cooling fan low speed relay terminal 86/1
- KR20D cooling fan high speed relay terminal 85/2
- KR20E cooling fan speed control relay terminal 85/2
4. Verify the DMM reading is greater than 2.5 V or displays O.L with the cooling fan relays commanded OFF with a scan tool.
If 2.5 V or less
- Ignition OFF, disconnect the X1 harness connector at the K20 Engine Control Module.
- Test for infinite resistance between the appropriate relay coil control circuit and ground.
- If less than infinite resistance, repair the short to ground on the circuit.
- If infinite resistance, replace the K20 Engine Control Module.
If greater than 2.5 V or displays O.L.
5. Verify the DMM reading is less than 1 V when commanding the cooling fan relays ON with a scan tool.
If greater than 1 V or displays OL.
- Ignition OFF, disconnect the X1 harness connector at the K20 Engine Control Module, ignition ON.
- Test for less than 1 V between the appropriate cooling fan relay control circuit and ground.
- If 1 V or greater, repair the short to voltage on the circuit.
- If less than 1 V.
- Ignition OFF and all vehicle systems OFF. It may take up to 2 minutes for all vehicle systems to power down.
- Test for less than 2 ohms in the appropriate cooling fan relay control circuit end to end.
- If 2 ohms or greater, repair the open/high resistance in the circuit.
- If less than 2 ohms, replace the K20 Engine Control Module.
If less than 1 V
6. Test or replace the appropriate cooling fan relay.
Component Testing
1. Ignition OFF.
2. Disconnect a cooling fan relay.
3. Test for 70-110 ohms between terminals 85/2 and 86/1.
If less than 70 ohms or greater than 110 ohms
Replace the cooling fan relay.
If between 70-110 ohms
4. Test for infinite resistance between the following terminals:
- 30 and 86
- 30 and 87
- 30 and 85
- 85 and 87
OR
- 3 and 2
- 3 and 5
- 3 and 1
- 1 and 5
If less than infinite resistance
Replace the cooling fan relay.
If infinite resistance
5. Test for less than 2 ohms between KR20E Cooling Fan Speed Control Relay terminals 30/3 and 87A/4.
NOTE: This test only applies to the speed control relay.
If 2 ohms or greater
Replace the KR20E Cooling Fan Speed Control Relay.
If less than 2 ohms
6. Install a 10 A fused jumper wire between relay terminal 85 or 2 and 12 V.
7. Install a jumper wire between relay terminal 86 or 1 and ground.
8. Test for less than 2 ohms between terminals 3/30 and 5/87.
If 2 ohms or greater
Replace the cooling fan relay.
If less than 2 ohms
9. All OK.
Repair Instructions
Perform the Diagnostic Repair Verification after completing the diagnostic procedure.
- Relay Replacement (Within an Electrical Center) , Relay Replacement (Attached to Wire Harness)
- Control Module References for ECM replacement, setup and programming
DTC P1258: ENGINE COOLANT OVERTEMPERATURE - PROTECTION MODE ACTIVE
Diagnostic Instructions
- Perform the Diagnostic System Check - Vehicle prior to using this diagnostic procedure.
- Review Strategy Based Diagnosis for an overview of the diagnostic approach.
- Diagnostic Procedure Instructions provides an overview of each diagnostic category.
DTC Descriptors
DTC P1258
- Engine Coolant Overtemperature - Protection Mode Active
Circuit/System Description
The engine control module (ECM) uses the engine coolant temperature sensor to monitor the engine for an over-temperature condition. This condition occurs when the coolant temperature is above a calibrated value.
The ECM will alternately disable 2 groups of cylinders by turning OFF the fuel injectors. By switching between the 2 groups of cylinders, the ECM is able to reduce the temperature of the coolant.
Conditions for Running the DTC
- The engine is operating for greater than 30 seconds.
- DTC P1258 runs continuously once the conditions above have been met.
Conditions for Setting the DTC
The ECM detects that engine coolant temperature is warmer than 132ºC (270ºF) for 2 seconds or greater.
Action Taken When the DTC Sets
- DTC P1258 is a Type A DTC.
- The engine will operate in the Overheated Engine Protection Operating Mode.
- The IP will illuminate the coolant temperature indicator lamp and the driver information center (DIC), if equipped, may display a message.
- If the protection mode is active and an ECT sensor DTC sets, the protection mode will remain active at the start of the next drive cycle until the ECT sensor DTC runs and passes.
Conditions for Clearing the MIL/DTC
DTC P1258 is a Type A DTC.
Reference Information
Schematic Reference
Engine Controls Schematics
Connector End View Reference
COMPONENT CONNECTOR END VIEWS - INDEX
Description and Operation
- Cooling Fan Description and Operation
- Instrument Cluster Description and Operation
- Indicator/Warning Message Description and Operation
DTC Type Reference
Powertrain Diagnostic Trouble Code (DTC) Type Definitions
Scan Tool Reference
K20 Engine Control Module: Scan Tool Information (LLT) for scan tool information
Circuit/System Verification
1. Ignition ON.
2. Verify DTC P0480, P0481, P0691, P0692, P0693 or P0694 is not set.
If a DTC is set
Refer to DTC P0480, P0481, P0691, P0692, P0693 or P0694.
If no DTCs is set
3. Verify the cooling fan operates at each available speed as commanded with a scan tool.
NOTE: A short delay occurs before the ECM changes the cooling fan speed.
Cooling fan does not operate
Refer to Cooling Fan Inoperative.
Cooling fan operates
4. Verify that the engine does not overheat.
Engine overheats
Refer to Engine Overheating.
Engine does not overheat
5. Operate the vehicle within the Conditions for Running the DTC.
If the DTC sets
Refer to Symptoms - Engine Cooling.
If the DTC does not set
6. All OK
Repair Instructions
Perform the Diagnostic Repair Verification after completing the diagnostic procedure.
SYMPTOMS - ENGINE COOLING
Important Preliminary Inspections Before Starting
Before using the Symptom diagnosis, perform the following:
- Perform Diagnostic System Check - Vehicle and verify all of the
following items:
- Engine control module (ECM) and malfunction indicator lamp (MIL) are operating correctly.
- There are no diagnostic trouble codes (DTCs) stored.
- Scan tool data is within a normal operating range.
- Verify the customer concern.
- Perform the Visual/Physical Inspection in this section. The visual/physical inspection is extremely important and can lead to correcting a condition without additional testing. It may also help reveal the cause of an intermittent condition.
- Locate the correct symptom. Perform the tests and inspections associated with the symptom.
Review the entire cooling system operation in order to familiarize yourself with the system functions. Refer to Cooling Fan Description and Operation and Cooling System Description and Operation.
Visual/Physical Inspection
CAUTION: Use the connector test adapter kit EL-35616-F for any test that requires probing the following items:
- The control module harness connectors
- The electrical center fuse/relay cavities
- The component terminals
- The component harness connector
Using this kit will prevent damage caused by the improper probing of connector terminals.
Several of the symptom procedures call for a careful visual and physical inspection. This can lead to correcting a condition without further tests and can save time. This inspection should include the following:
- Ensure that the control module grounds are clean, tight and correctly located.
- Inspect cooling system hoses and pipes for splits, kinks and improper connections. Inspect thoroughly for any type of leak or restriction.
- Inspect for a dirty or restricted radiator or HVAC condenser.
- Inspect for aftermarket devices which could affect the operation of the cooling system.
- Inspect the easily accessible or visible system components for obvious damage or conditions which could cause the symptom.
- Inspect the coolant recovery reservoir for proper coolant level.
Identifying Intermittent Conditions
Many intermittent conditions occur with harness or connector movement due to engine torque, rough pavement, vibration or physical movement of a component. Refer to the following for a list to help isolate an intermittent condition:
- Water intrusion in connectors, terminals or components
- Poor connector mating
- Terminal contact
- High circuit or component resistance-High resistance can include any resistance, regardless of the amount, which can interrupt the operation of the component.
- Harness' that are routed too tight or chaffed circuits
- High or low ambient temperatures
- High or low engine coolant temperatures
- High underhood temperatures
- Heat build up in components or circuits due to circuit resistance, poor terminal contact or high electrical load
- High or low system voltage
- High vehicle load conditions
- Rough road surface
- Electro-magnetic interference (EMI)/circuit interference from relays, solenoids or other electrical surge
- Incorrect installation of non-factory, aftermarket or after factory add on accessories
If an intermittent fault is detected, refer to Testing for Intermittent Conditions and Poor Connections for specific strategies in diagnosing intermittent conditions.
Symptom List
Refer to a symptom diagnostic procedure from the following list in order to diagnose the symptom:
- Cooling Fan Always On
- Cooling Fan Inoperative
- Engine Overheating
- Loss of Coolant
- Thermostat Diagnosis
- Engine Fails To Reach Normal Operating Temperature
COOLING FAN ALWAYS ON
Diagnostic Instructions
- Perform the Diagnostic System Check - Vehicle prior to using this diagnostic procedure.
- Review Strategy Based Diagnosis for an overview of the diagnostic approach.
- Diagnostic Procedure Instructions provides an overview of each diagnostic category.
Circuit/System Description
The engine cooling fan system consists of a cooling fan assembly containing two electric cooling fans. The engine control module (ECM) uses two fan control circuits and a series of three relays to command the fans ON in either high speed or low speed, depending on cooling requirements. The ECM activates the applicable relay by grounding the control circuit with a solid state device called a driver. Each driver is equipped with a feedback circuit that is pulled-up to a voltage. The ECM can determine if the control circuit is open, shorted to ground or shorted to a voltage by monitoring the feedback voltage. In low speed, both fans are turned ON at a reduced speed. High speed has both fans turned ON at full speed.
Diagnostic Aids
- The scan tool cooling fan output control operates as follows:
- Cooling Fan Relay 1 operates both fans at a low speed
- Cooling Fan Relays 2 and 3 operates one fan at a high speed
- Cooling Fan Relays 1, 2 and 3 operates both fans at a high speed
- Certain resistance conditions with IAT or ECT sensors may cause unwarranted cooling fan activation. If the ECM is commanding the cooling fans ON for no apparent reason and without any component or system DTCs set, the IAT or ECT sensor may be skewed. If this condition is suspected, refer to the temperature versus resistance tables in the appropriate Engine Controls subsection.
Reference Information
Schematic Reference
Engine Heating/Cooling Schematics
Connector End View Reference
- COMPONENT CONNECTOR END VIEWS - INDEX
- Electrical Center Identification Views
Description and Operation
Cooling Fan Description and Operation
Electrical Information Reference
- Circuit Testing
- Connector Repairs
- Testing for Intermittent Conditions and Poor Connections
- Wiring Repairs
Scan Tool Reference
Control Module References for scan tool information
Circuit/System Verification
1. Ignition ON.
2. Verify that DTC P0480, P0481, P0691, P0692, P0693 or P0694 is not set.
If a DTC is set
Refer to DTC P0480, P0481, P0691, P0692, P0693 or P0694.
If no DTC is set
3. Verify the scan tool parameters listed below display OFF:
- Cooling Fan Relay 1 Command
- Cooling Fan Relays 2 and 3 Command
If a scan tool parameter displays ON
Refer to Diagnostic Aids and Symptoms - Engine Cooling for further diagnosis.
If both scan tool parameters display OFF
4. Verify that the fans are not activated.
If a fan is operating
Refer to Circuit/System Testing.
If both fans are OFF
5. All OK
Circuit/System Testing
Both Cooling Fans Always ON
1. Ignition OFF, disconnect KR20C Cooling Fan Low Speed Relay, ignition ON.
2. Verify that both cooling fans are OFF.
If the cooling fans are ON
- Ignition OFF, disconnect the harness connector at the G10R Cooling Fan Motor-Right, ignition ON.
- Test for less than 1 V between KR20C Cooling Fan Low Speed Relay
terminal 87/5 and ground.
- If 1 V or greater, repair the short to voltage in the relay controlled output circuit.
If the cooling fans are OFF
3. Test or replace the KR20C Cooling Fan Low Speed Relay.
One Cooling Fan Always ON
1. Ignition OFF, disconnect the KR20D Cooling Fan High Speed Relay, ignition ON.
2. Verify the cooling fan is OFF.
If the cooling fan is ON
- Ignition OFF, disconnect the harness connector at the G10L Cooling Fan Motor-Left, ignition ON.
- Test for less than 1 V between KR20D Cooling Fan High Speed Relay
terminal 30/3 and ground.
- If 1 V or greater, repair the short to voltage in the relay controlled output circuit.
If the cooling fan is OFF
3. Test or replace the KR20D Cooling Fan High Speed Relay.
Component Testing
1. Ignition OFF.
2. Disconnect a KR20 Cooling Fan Relay.
3. Test for 70-110 ohms between terminals 85/2 and 86/1.
If less than 70 ohms or greater than 110 ohms
Replace the KR20 cooling fan relay.
If between 70-110 ohms
4. Test for infinite resistance between the following terminals:
- 30/3 and 86/1
- 30/3 and 87/5
- 30/3 and 85/2
- 85/2 and 87/5
If less than infinite resistance
Replace the KR20 Cooling Fan Relay.
If infinite resistance
5. Test for less than 2 ohms between KR20E Cooling Fan Speed Control Relay terminals 30/3 and 87A/4.
NOTE: This test only applies to the speed control relay.
If 2 ohms or greater
Replace the KR20E Cooling Fan Speed Control Relay.
If less than 2 ohms
6. Install a 10 A fused jumper wire between relay terminal 85 or 2 and 12 V.
7. Install a jumper wire between relay terminal 86 or 1 and ground.
8. Test for less than 2 ohms between terminals 30/3 and 87/5.
If 2 ohms or greater
Replace the KR20 Cooling Fan Relay.
If less than 2 ohms
9. All OK.
Repair Instructions
Perform the Diagnostic Repair Verification after completing the diagnostic procedure.
Relay Replacement (Within an Electrical Center) , Relay Replacement (Attached to Wire Harness)
COOLING FAN INOPERATIVE
Diagnostic Instructions
- Perform the Diagnostic System Check - Vehicle prior to using this diagnostic procedure.
- Review Strategy Based Diagnosis for an overview of the diagnostic approach.
- Diagnostic Procedure Instructions provides an overview of each diagnostic category.
Circuit/System Description
The engine cooling fan system consists of a cooling fan assembly containing two electric cooling fans. The engine control module (ECM) uses two fan control circuits and a series of three relays to command the fans ON in either high speed or low speed, depending on cooling requirements. In low speed, both fans are turned ON at a reduced speed. High speed has both fans turned ON at full speed.
Diagnostic Aids
- The scan tool cooling fan output control operates as follows:
- Cooling Fan Relay 1 operates both fans at a low speed
- Cooling Fan Relays 2 and 3 operates one fan at a high speed
- Cooling Fan Relays 1, 2 and 3 operates both fans at a high speed
Reference Information
Schematic Reference
Engine Heating/Cooling Schematics
Connector End View Reference
- COMPONENT CONNECTOR END VIEWS - INDEX
- Electrical Center Identification Views
Description and Operation
Cooling Fan Description and Operation
Electrical Information Reference
- Circuit Testing
- Connector Repairs
- Testing for Intermittent Conditions and Poor Connections
- Wiring Repairs
Scan Tool Reference
Control Module References for scan tool information
Circuit/System Verification
1. Ignition ON.
2. Verify that DTC P0480, P0481, P0691, P0692, P0693 or P0694 is not set.
If a DTC is set
Refer to DTC P0480, P0481, P0691, P0692, P0693 or P0694.
If no DTCs is set
3. Verify that both cooling fans turn ON and OFF and operate at low and high speed, when commanding the appropriate cooling fan relays ON and OFF with a scan tool.
If a cooling fan does not operate
Refer to Circuit/System Testing
If both cooling fans operate
4. All OK.
Circuit/System Testing
1. Ignition OFF, disconnect all of the KR20 Cooling Fan Relays.
2. Ignition ON, verify a test lamp illuminates between ground and the B+ circuit terminals listed below:
- KR20C Cooling Fan Low Speed Relay B+ circuit terminal 85/1
- KR20C Cooling Fan Low Speed Relay B+ circuit terminal 30/3
- KR20D Cooling Fan High Speed Relay B+ circuit terminal 87/5
- KR20D Cooling Fan High Speed Relay B+ circuit terminal 86/2
- KR20E Cooling Fan Speed Control Relay B+ circuit terminal 86/2
If the test lamp does not illuminate and the circuit fuse is good
- Disconnect the appropriate cooling fan fuse or power source.
- Test for less than 2 ohms between the fuse and the appropriate relay B+
circuit terminal, end to
end.
- If 2 ohms or greater, repair the open/high resistance in the B+ circuit.
- If less than 2 ohms, verify the fuse is not open and there is voltage at the fuse.
If the test lamp does not illuminate and the circuit fuse is open
- Connect a DMM to the appropriate relay B+ circuit terminal.
- Test for infinite resistance between the B+ circuit and ground.
- If less than infinite resistance, repair the short to ground on the B+ circuit.
- If infinite resistance
- Disconnect the harness connector at the appropriate G10 Cooling Fan Motor.
- Test for infinite resistance between the appropriate relay controlled
output circuit terminal and
ground.
- KR20C Cooling Fan Low Speed Relay output circuit terminal 87/5
- KR20D Cooling Fan High Speed Relay output circuit terminal 30/3
- KR20E Cooling Fan Speed Control Relay circuit terminal 30/3
- If less than infinite resistance, repair the short to ground on the circuit.
- If infinite resistance, test or replace the appropriate G10 Cooling Fan Motor.
If the test lamp illuminates
3. Connect a DMM, set on the diode setting, between ground and a relay control circuit terminal listed below:
NOTE: The following tests must be performed on both fan relay circuits.
- KR20D Cooling Fan High Speed Relay terminal 85/2
- KR20E Cooling Fan Speed Control Relay terminal 85/2
4. Verify the DMM reading is less than 1 V when commanding the cooling fan relays ON with a scan tool.
If greater than 1 V or displays OL.
- Ignition OFF, disconnect the X1 harness connector at the K20 Engine Control Module, ignition ON.
- Test for less than 1 V between the appropriate cooling fan relay control
circuit and ground.
- If 1 V or greater, repair the short to voltage on the circuit.
- If less than 1 V.
- Ignition OFF and all vehicle systems OFF. It may take up to 2 minutes for all vehicle systems to power down.
- Test for less than 2 ohms between the KR20E Cooling Fan Speed Control
Relay terminal 85 and
KR20D Cooling Fan High Speed Relay terminal 85.
- If 2 ohms or greater, repair the open/high resistance in the circuit.
- If less than 2 ohms, replace the K20 Engine Control Module.
If less than 1 V
5. Ignition OFF and all vehicle systems OFF, disconnect the harness connector at the G10L Cooling Fan Motor - Left. It may take up to 2 minutes for all vehicle systems to power down.
6. Test for less than 5 ohms between the circuits listed below and ground:
- G10L Cooling Fan Motor - Left terminal A
- KR20E Cooling Fan Speed Control Relay terminal 87/5
If 5 ohms or greater
- Ignition OFF and all vehicle systems OFF, it may take up to 2 minutes for all vehicle systems to power down.
- Test for less than 2 ohms in the appropriate ground circuit end to end.
- If 2 ohms or greater, repair the open/high resistance in the circuit.
- If less than 2 ohms, repair the open/high resistance in the ground connection.
If less than 5 ohms
7. Connect the harness connector at the G10L Cooling Fan Motor - Left.
8. Connect a 50 A fused jumper between the KR20D Cooling Fan High Speed Relay terminals 30/3 and 87/5.
9. Ignition ON, verify the G10L Cooling Fan Motor - Left is activated at high speed.
If the cooling fan does not activate or jumper fuse opens
- Disconnect the harness connector at the G10L Cooling Fan Motor - Left.
- Test for less than 2 ohms in the circuit between KR20D Cooling Fan High
Speed Relay terminal
30/3 and the G10L Cooling Fan Motor - Left terminal B.
- If 2 ohms or greater, repair the open/high resistance in the circuit.
- If less than 2 ohms, replace the G10L Cooling Fan Motor - Left.
If the cooling fan activates
10. Ignition OFF, connect a fused jumper between the KR20E Cooling Fan Speed Control Relay switch circuit terminal 30/3 and the ground circuit terminal 87/5.
11. Connect a 40 A fused jumper between the KR20C Cooling Fan Low Speed Relay terminals 30/3 and 87/5.
12. Ignition ON, verify the G10R Cooling Fan Motor - Right is activated at high speed.
If the cooling fan does not activate
- Disconnect the harness connector at the G10R Cooling Fan Motor - Right.
- Test for less than 2 ohms in the circuit between KR20C Cooling Fan Low
Speed Relay terminal
87/5 and the G10R Cooling Fan Motor - Right terminal B.
- If 2 ohms or greater, repair the open/high resistance in the circuit.
- If less than 2 ohms
- Test for less than 2 ohms in the circuit between KR20E Cooling Fan Speed
Control Relay terminal
30/3 and the G10R Cooling Fan Motor - Right terminal A.
- If 2 ohms or greater, repair the open/high resistance in the circuit.
- If less than 2 ohms, replace the G10R Cooling Fan Motor - Right.
If the cooling fan activates
13. Ignition OFF, Install the KR20E Cooling Fan Speed Control Relay.
14. Ignition ON, verify both fan motors activate at low speed.
If both cooling fans do not activate at low speed
- Disconnect both cooling fan motor harness connectors and the KR20E Cooling Fan Speed Control Relay.
- Test for less than 2 ohms in circuit between KR20E Cooling Fan Speed
Control Relay terminal
87A/4 and the G10L Cooling Fan Motor - Left terminal B.
- If 2 ohms or greater, repair the open/high resistance in the circuit.
- If less than 2 ohms
- Test for infinite resistance between KR20E Cooling Fan Speed Control
Relay terminal listed below
and ground.
- KR20E Cooling Fan Speed Control Relay terminal 30/3
- KR20E Cooling Fan Speed Control Relay terminal 87A/4
- If less than infinite, repair the short to ground in the circuit.
- If infinite, replace the KR20E cooling fan speed control relay.
If both cooling fans activate
15. Ignition OFF, test or replace the cooling fan relay listed below as appropriate:
- KR20C Cooling Fan Low Speed Relay
- KR20D Cooling Fan High Speed Relay
Component Testing
1. Ignition OFF.
2. Disconnect a KR20 Cooling Fan Relay.
3. Test for 70-110 ohms between terminals 85/2 and 86/1.
If less than 70 ohms or greater than 110 ohms
Replace the KR20 cooling fan relay.
If between 70-110 ohms
4. Test for infinite resistance between the following terminals:
- 30 and 86
- 30 and 87
- 30 and 85
- 85 and 87
OR
- 3 and 2
- 3 and 5
- 3 and 1
- 1 and 5
If less than infinite resistance
Replace the KR20 Cooling Fan Relay.
If infinite resistance
5. Test for less than 2 ohms between KR20E Cooling Fan Speed Control Relay terminals 30/3 and 87A/4.
NOTE: This test only applies to the speed control relay.
If 2 ohms or greater
Replace the KR20E Cooling Fan Speed Control Relay.
If less than 2 ohms
6. Install a 20 A fused jumper wire between relay terminal 85 or 2 and 12 V.
7. Install a jumper wire between relay terminal 86 or 1 and ground.
8. Test for less than 2 ohms between terminals 3/30 and 87/5.
If 2 ohms or greater
Replace the KR20 Cooling Fan Relay.
If less than 2 ohms
9. All OK.
Repair Instructions
Perform the Diagnostic Repair Verification after completing the diagnostic procedure.
- Relay Replacement (Within an Electrical Center) , Relay Replacement (Attached to Wire Harness)
- Cooling Fan and Shroud Replacement
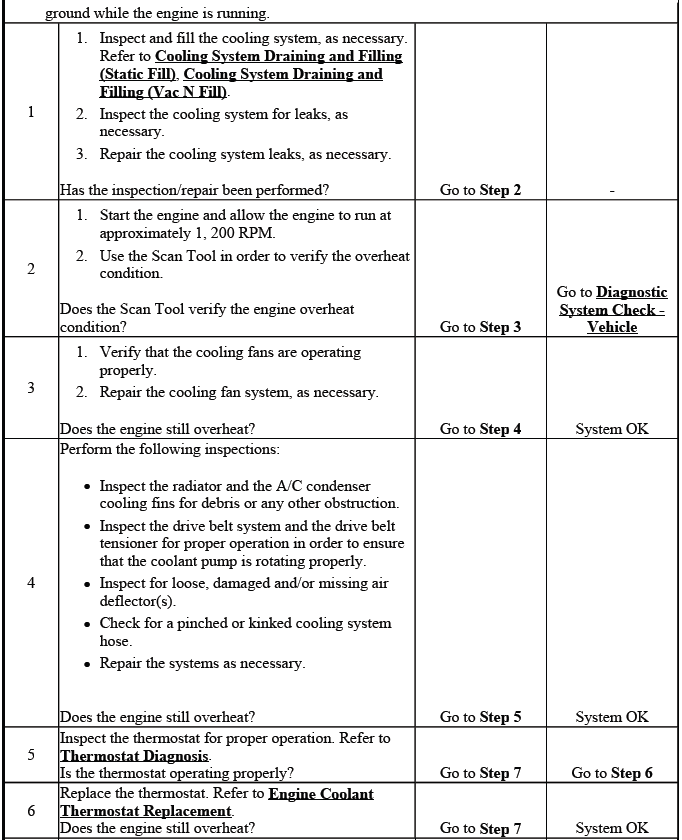
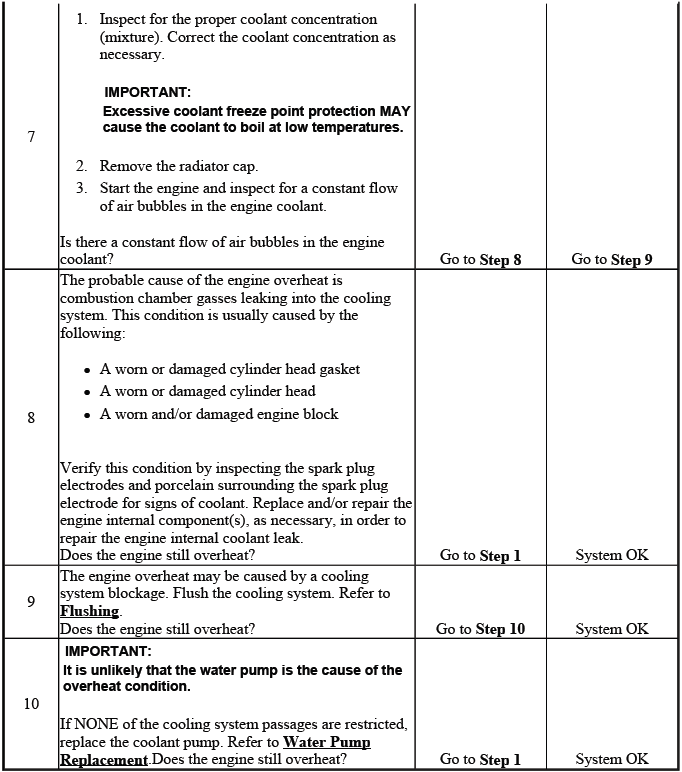
ENGINE OVERHEATING
Engine Overheating

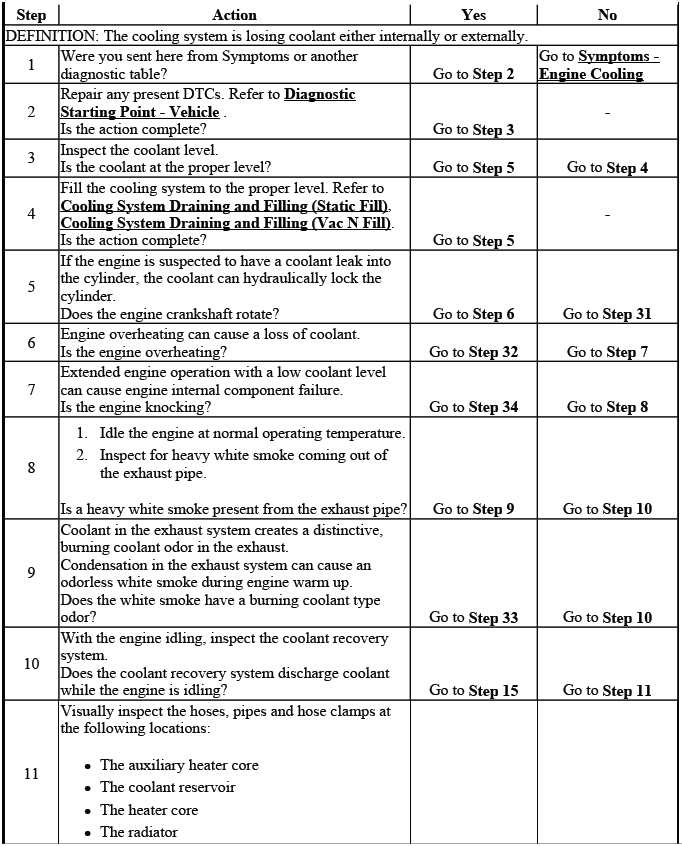
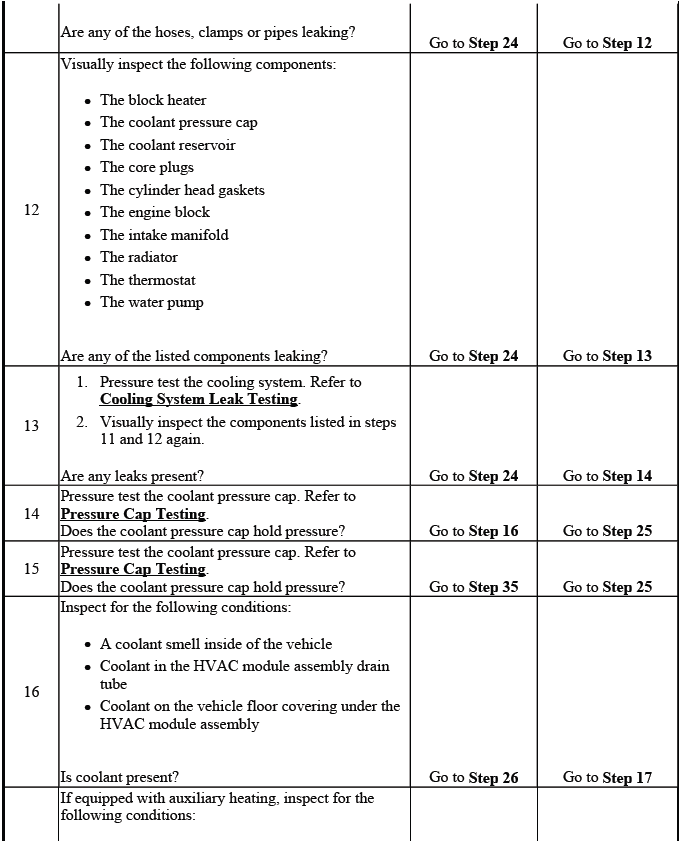
LOSS OF COOLANT
Loss of Coolant
THERMOSTAT DIAGNOSIS
Tools Required
- J 24731 188 Tempilstick
- J 24731 206 Tempilstick
The coolant thermostat can be tested using a temperature (tempil) stick. The temperature stick is a pencil-like device which has a wax material containing certain chemicals that melt at a given temperature. Temperature sticks can be used to determine a thermostat's operating range by rubbing 87ºC (188ºF) and 97ºC (206ºF) sticks on the outlet coolant pipe.
1. Use a tempilstick in order to find the opening and the closing temperatures of the thermostat.
- J 24731 188 Tempilstick melts at 87ºC (188ºF). The thermostat should begin to open at 90ºC (194ºF).
- J 24731 206 tempilstick melts at 97ºC (206ºF). The thermostat should be fully open at 107ºC (225ºF).
2. Replace the thermostat if it does not operate properly between this temperature range.
COOLANT HEATER INOPERATIVE
Diagnostic Instructions
- Perform the Diagnostic System Check - Vehicle prior to using this diagnostic procedure.
- Review Strategy Based Diagnosis for an overview of the diagnostic approach.
- Diagnostic Procedure Instructions provides an overview of each diagnostic category.
Circuit/System Description
The coolant heater operates using 110 V AC external power and is designed to warm the coolant in the engine block area for improved starting in very cold weather. The coolant heater also helps reduce fuel consumption when a cold engine is warming up. The unit is equipped with a detachable AC power cord. There is an internal thermal switch in the coolant heater cord that prevents operation above -18ºC (0ºF). A weather shield on the cord is provided to protect the plug when not in use.
Reference Information
Electrical Information Reference
- Circuit Testing
- Connector Repairs
- Testing for Intermittent Conditions and Poor Connections
- Wiring Repairs
Circuit/System Testing
NOTE: The coolant heater cord will read Open due to an internal thermal switch if the ambient temperature is above -18ºC (0ºF).
1. Ignition OFF, disconnect the coolant heater cord from the E19 Coolant Heater.
2. Test for 30-40 ohms between the terminals of the E19 Coolant Heater.
If not within 30-40 ohms
Replace the E19 Coolant Heater.
If within 30-40 ohms
3. Test for infinite resistance between each terminal of the E19 Coolant Heater and ground.
If less than infinite resistance
Replace the E19 Coolant Heater.
If infinite resistance
4. Test or replace the coolant heater cord.
Repair Instructions
Perform the Diagnostic Repair Verification after completing the diagnostic repair.
- Coolant Heater Replacement
- Coolant Heater Cord Replacement
ENGINE FAILS TO REACH NORMAL OPERATING TEMPERATURE
Engine Fails To Reach Normal Operating Temperature


PRESSURE CAP TESTING
Special Tools
- J 24460-01 Cooling System Pressure Tester
- J 42401 Radiator Cap/Surge Tank Test Adapter
Pressure Cap Testing
1. Remove the pressure cap.
CAUTION: To avoid being burned, do not remove the radiator cap or surge tank cap while the engine is hot. The cooling system will release scalding fluid and steam under pressure if radiator cap or surge tank cap is removed while the engine and radiator are still hot.
2. Wash the pressure cap sealing surface with water.
3. Use the J 24460-01 cooling system pressure tester (1) with J 42401 radiator cap/surge tank test adapter (2) in order to test the pressure cap.
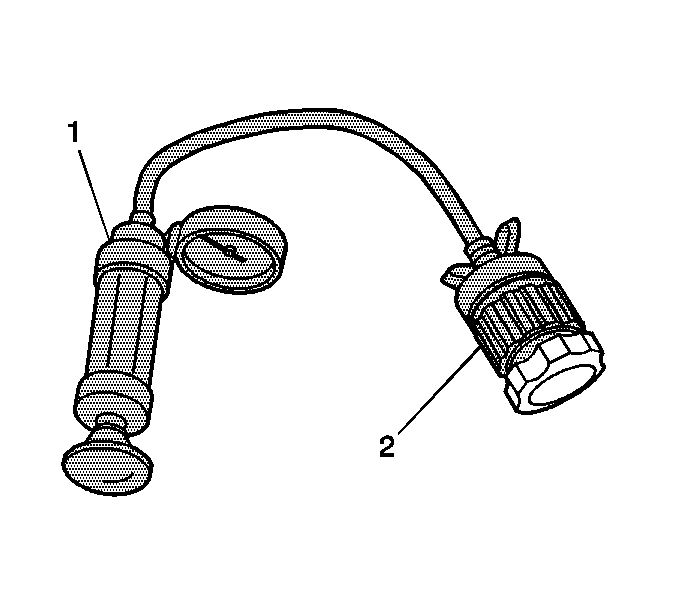
Fig. 2: Identifying Pressure Cap Testing Tool J 42401
IMPORTANT: Lubricate J-42401 and pressure cap o-rings with coolant and press cap to seat o-ring on J-42401 before turning to engage threads.
4. Test the pressure cap for the following conditions:
- Pressure release when the J 24460-01 cooling system pressure tester exceeds the pressure rating of the pressure cap.
- Maintain the rated pressure for at least 10 seconds.
Note the rate of pressure loss.
5. Replace the pressure cap under the following conditions:
- The pressure cap does not release pressure which exceeds the rated pressure of the cap.
- The pressure cap does not hold the rated pressure.
COOLING SYSTEM LEAK TESTING
Special Tools
- J-24460-01 Cooling System Pressure Tester
1. Remove the pressure cap.
WARNING: Under pressure, the temperature of the solution in the radiator can be considerably higher, without boiling. Removing the radiator cap while the engine is hot (pressure is high), will cause the solution to boil instantaneously, with explosive force. The solution will spew out over the engine, fenders and the person removing the cap.
Serious bodily injury may result. Flammable antifreeze, such as alcohol, is not recommended for use at any time. Flammable antifreeze could cause a serious fire.
WARNING: In order to help avoid being burned, do not remove the radiator cap while the engine and the radiator are hot. Scalding fluid and steam can be blown out under pressure if the cap is removed too soon.
2. Test the operation of the pressure cap. Refer to Pressure Cap Testing.
3. Use the J-24460-01 tester in order to apply pressure to the cooling system.
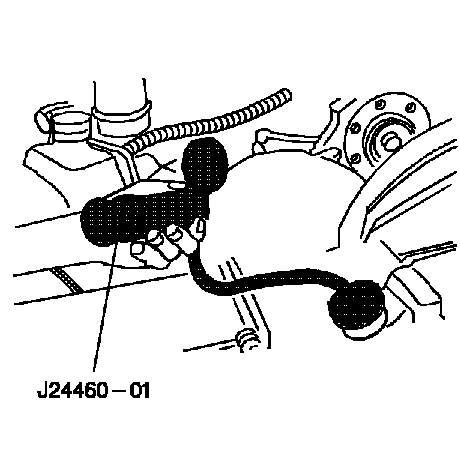
Fig. 3: Pressure Testing Cooling System Using J 24460-01
Do not exceed the pressure cap rating.
4. The cooling system should hold the rated pressure for at least 2 minutes.
Observe the gauge for any pressure loss.
5. Repair any leaks as required.

