Buick Enclave: Specifications, Diagnostic Information and Procedures
SPECIFICATIONS
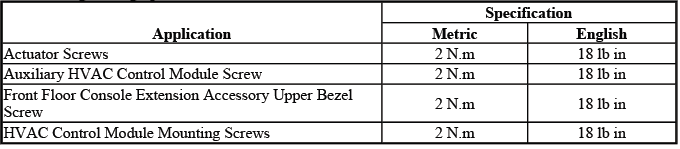
FASTENER TIGHTENING SPECIFICATIONS
Fastener Tightening Specifications
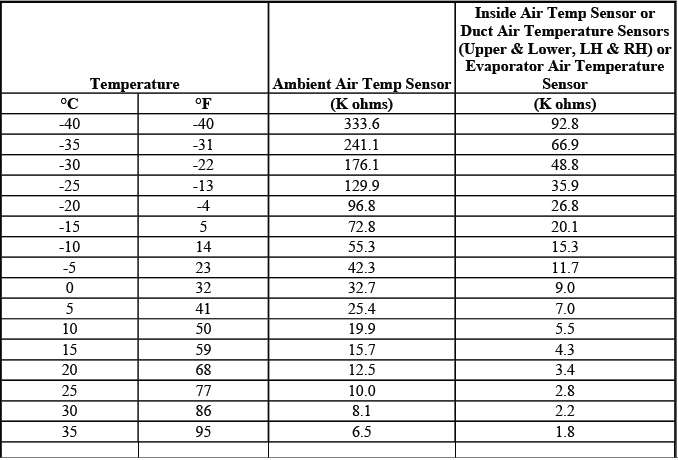
SENSOR RESISTANCE TABLE
Sensor Resistance Table
SCHEMATIC WIRING DIAGRAMS
HVAC SYSTEM SCHEMATICS
Power, Ground, Blower Control, Serial Data and Sunload Sensor
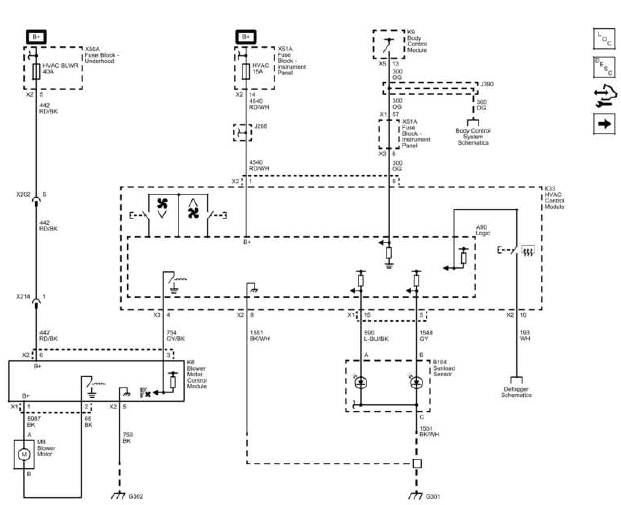
Fig. 1: Power, Ground, Blower Control, Serial Data And Sunload Sensor Wiring
Schematic
Actuators
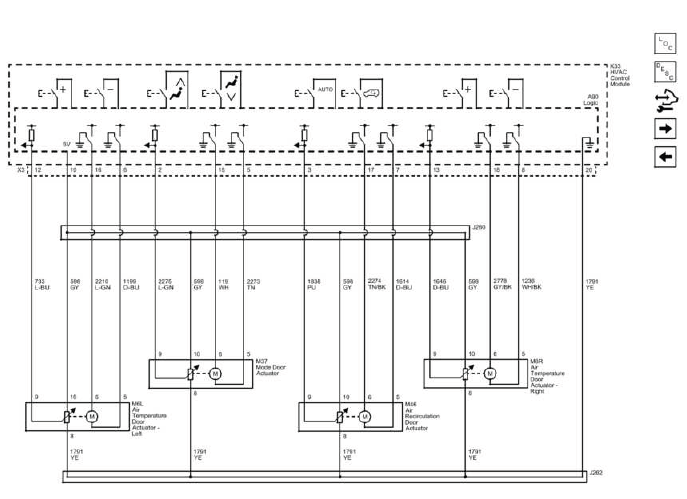
Fig. 2: Actuators Wiring Schematic
Temperature Sensors
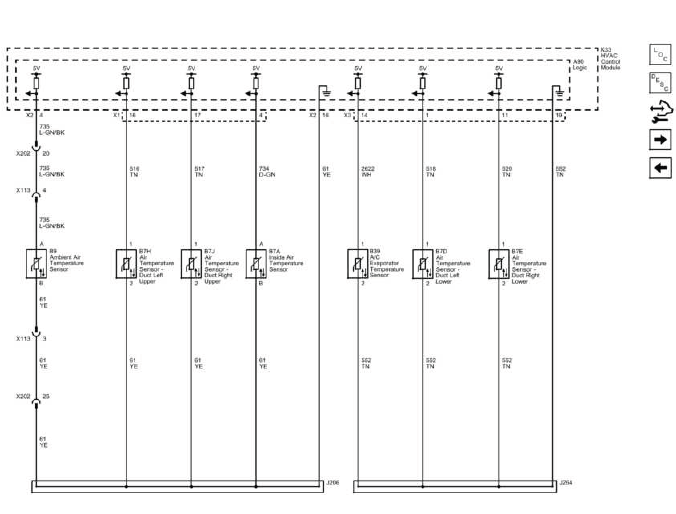
Fig. 3: Temperature Sensors Wiring Schematic
Compressor Controls
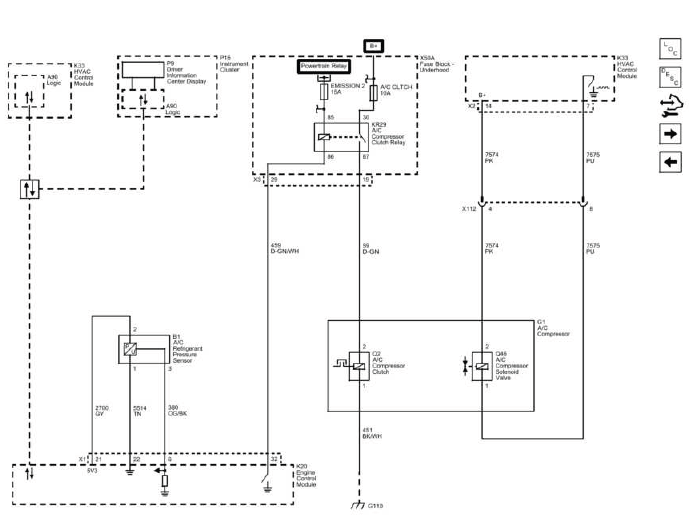
Fig. 4: Compressor Controls Wiring Schematic
Rear HVAC

Fig. 5: Rear HVAC Wiring Schematic
DIAGNOSTIC INFORMATION AND PROCEDURES
DIAGNOSTIC CODE INDEX
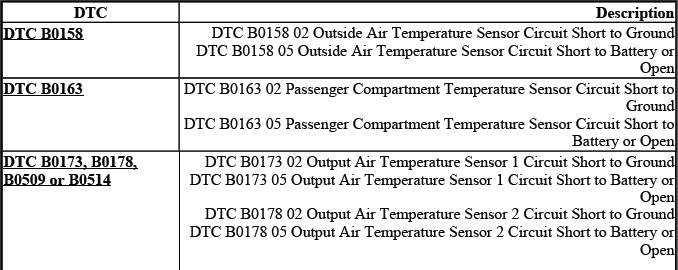
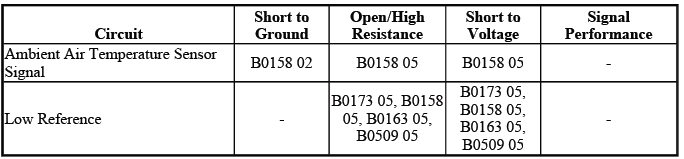
DTC B0158: OUTSIDE AIR TEMPERATURE SENSOR
Diagnostic Instructions
- Perform the Diagnostic System Check - Vehicle prior to using this diagnostic procedure.
- Review Strategy Based Diagnosis for an overview of the diagnostic approach.
- Diagnostic Procedure Instructions provides an overview of each diagnostic category.
DTC Descriptors
DTC B0158 02
Outside Air Temperature Sensor Circuit Short to Ground
DTC B0158 05
Outside Air Temperature Sensor Circuit Short to Battery or Open
Diagnostic Fault Information
Circuit/System Description
The HVAC control module monitors the ambient air temperature sensor with a low reference circuit and 5-volt signal circuit. The HVAC control module monitors the voltage drop across the sensor, which is proportional to temperature. When the ambient air temperatures are cold, the resistance of the sensor is high and the voltage signals are high. When the ambient air temperatures are hot, the resistance of the sensors is low and the voltage signals are low. The HVAC control module converts the voltage value to a temperature value of Celsius and Fahrenheit that will be displayed by the driver information center (DIC).
Conditions for Running the DTC
The ignition is turned ON.
Conditions for Setting the DTC
- The HVAC control module detects the sensor signal circuit is less than -35ºC (-39ºF).
- The HVAC control module detects the sensor signal circuit is more than 85ºC (185ºF).
Action Taken When the DTC Sets
The HVAC control module uses a default air temperature value for further automatic control calculations. The default values are not displayed on the scan tool.
Conditions for Clearing the DTC
- The DTC will become history if the HVAC control module no longer detects a failure.
- The history DTC will clear after 100 fault-free ignition cycles.
Reference Information
Schematic Reference
HVAC Schematics
Connector End View Reference
COMPONENT CONNECTOR END VIEWS - INDEX
Description and Operation
- Air Temperature Description and Operation
- Air Delivery Description and Operation
Electrical Information Reference
- Circuit Testing
- Connector Repairs
- Testing for Intermittent Conditions and Poor Connections
- Wiring Repairs
Scan Tool Reference
Control Module References for scan tool information
Circuit/System Verification
Ignition ON, observe the scan tool Outside Air Temp. Sensor Raw parameter. The reading should be between - 35ºC (-39ºF) and 85ºC (185ºF) and change with ambient air temperature changes.
Circuit/System Testing
IMPORTANT: An instant Outside Air Temperature (OAT) update must be performed by pressing the A/C and Recirc buttons at the same time before and after the system has been serviced to update the filtered ambient air temperature sensor.
1. Ignition OFF, disconnect the harness connector at the ambient air temp sensor.
2. Ignition OFF, test for less than 10 ohms between the low reference circuit terminal B and ground.
- If greater than the specified range, test the low reference circuit for an open/high resistance. If the circuit tests normal, replace the HVAC control module.
3. Ignition ON, verify the scan tool Outside Air Temp. Sensor Raw parameter is less than -35ºC (-39ºF).
- If greater than the specified range, test the signal circuit terminal A for a short to ground. If the circuit tests normal, replace the HVAC control module.
4. Install a 3A fused jumper wire between the signal circuit terminal A and the low reference circuit terminal B. Verify the scan tool Outside Air Temp. Sensor Raw parameter is greater than 85ºC (185ºF).
- If less than the specified range, test the signal circuit for a short to voltage or an open/high resistance. If the circuit tests normal, replace the HVAC control module.
5. If all circuits test normal, test or replace the ambient air temp sensor.
Component Testing
1. Test the ambient air temperature sensor by varying the sensor temperature while monitoring the sensor resistance.
2. Compare the readings with the Sensor Resistance Table and verify that the resistance is within 5% of the specification.
- If not within the specified range, replace the sensor.
Repair Instructions
Perform the Diagnostic Repair Verification after completing the diagnostic procedure.
- Ambient Air Temperature Sensor Replacement (Enclave, Traverse) , Ambient Air Temperature Sensor Replacement (Acadia)
- Control Module References for HVAC control module replacement, setup and programming
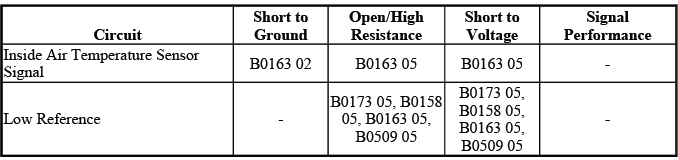
DTC B0163: PASSENGER COMPARTMENT TEMPERATURE SENSOR
Diagnostic Instructions
- Perform the Diagnostic System Check - Vehicle prior to using this diagnostic procedure.
- Review Strategy Based Diagnosis for an overview of the diagnostic approach.
- Diagnostic Procedure Instructions provides an overview of each diagnostic category.
DTC Descriptors
DTC B0163 02
- Passenger Compartment Temperature Sensor Circuit Short to Ground
DTC B0163 05
- Passenger Compartment Temperature Sensor Circuit Short to Battery or Open
Diagnostic Fault Information
Circuit/System Description
The HVAC control module supplies the inside air temperature sensor with a low reference circuit and 5-volt signal circuit. The HVAC control module determines the voltage drop across the sensor, which is proportional to temperature. As the air temperature increases, the sensor resistance decreases and the voltage signal decreases. As the air temperature decreases, the sensor resistance increases and the voltage signal increases.
Passenger compartment temperature sensor refers to the inside air temperature sensor.
Conditions for Running the DTC
The ignition is turned ON.
Conditions for Setting the DTC
The HVAC control module detects the inside air temperature sensor signal circuit is less than -36ºC (-38ºF) or greater than 215ºC (419ºF) for greater than 15 seconds.
Action Taken When the DTC Sets
The system operates using a default value.
Conditions for Clearing the DTC
- The DTC will become history if the HVAC control module no longer detects the condition that set the DTC.
- The history DTC will clear after 100 fault-free ignition cycles.
Reference Information
Schematic Reference
HVAC Schematics
Connector End View Reference
COMPONENT CONNECTOR END VIEWS - INDEX
Description and Operation
- Air Temperature Description and Operation
- Air Delivery Description and Operation
Electrical Information Reference
- Circuit Testing
- Connector Repairs
- Testing for Intermittent Conditions and Poor Connections
- Wiring Repairs
Scan Tool Reference
Control Module References for scan tool information
Circuit/System Verification
Ignition ON, observe the scan tool Inside Air Temperature Sensor parameter. The reading should be between - 35ºC (-39ºF) and 98ºC (208ºF) and change with inside air temperature changes.
Circuit/System Testing
1. Ignition OFF, disconnect the harness connector at the inside air temp sensor.
2. Ignition OFF, test for less than 10 ohms between the low reference circuit terminal B and ground.
- If greater than the specified range, test the low reference circuit for an open/high resistance. If the circuit tests normal, replace the HVAC control module.
3. Ignition ON, verify the scan tool inside Air Temp. Sensor parameter is less than -35ºC (-39ºF).
- If greater than the specified range, test the signal circuit terminal A for a short to ground. If the circuit tests normal, replace the HVAC control module.
4. Install a 3A fused jumper wire between the signal circuit terminal A and the low reference circuit terminal B. Verify the scan tool Inside Air Temp. Sensor parameter is greater than 85ºC (185ºF).
- If less than the specified range, test the signal circuit for a short to voltage or an open/high resistance. If the circuit tests normal, replace the HVAC control module.
5. If all circuits test normal, test or replace the inside air temp sensor.
Component Testing
1. Test the inside air temperature sensor by varying the sensor temperature while monitoring the sensor resistance.
2. Compare the readings with the Sensor Resistance Table and verify that the resistance is within 5 percent of the specification.
- If not within the specified range, replace the sensor.
Repair Instructions
Perform the Diagnostic Repair Verification after completing the diagnostic procedure.
- Inside Air Temperature Sensor Aspirator Replacement
- Control Module References for HVAC control module replacement, setup and programming
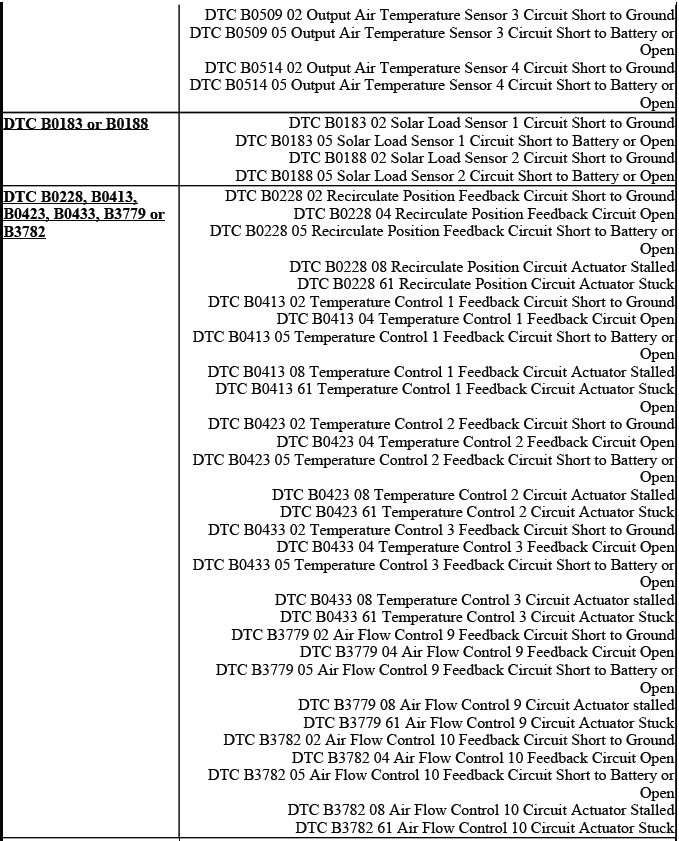
DTC B0173, B0178, B0509 OR B0514: OUTPUT AIR TEMPERATURE SENSOR 1-4
Diagnostic Instructions
- Perform the Diagnostic System Check - Vehicle prior to using this diagnostic procedure.
- Review Strategy Based Diagnosis for an overview of the diagnostic approach.
- Diagnostic Procedure Instructions provides an overview of each diagnostic category.
DTC Descriptors
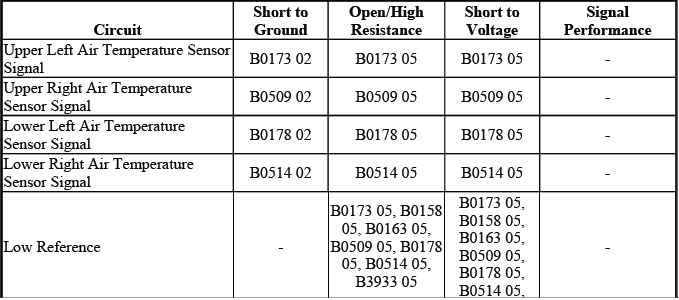
DTC B0173 02
- Output Air Temperature Sensor 1 Circuit Short to Ground
DTC B0173 05
- Output Air Temperature Sensor 1 Circuit Short to Battery or Open
DTC B0178 02
- Output Air Temperature Sensor 2 Circuit Short to Ground
DTC B0178 05
- Output Air Temperature Sensor 2 Circuit Short to Battery or Open
DTC B0509 02
- Output Air Temperature Sensor 3 Circuit Short to Ground
DTC B0509 05
- Output Air Temperature Sensor 3 Circuit Short to Battery or Open
DTC B0514 02
- Output Air Temperature Sensor 4 Circuit Short to Ground
DTC B0514 05
- Output Air Temperature Sensor 4 Circuit Short to Battery or Open
Diagnostic Fault Information

Circuit/System Description
The HVAC control module supplies the air duct temperature sensors with a low reference circuit and 5-volt signal circuit. The HVAC control module determines the voltage drop across the sensor, which is proportional to temperature. As the air temperature increases, the sensor resistance decreases and the voltage signal decreases. As the air temperature decreases, the sensor resistance increases and the voltage signal increases.
- DTC B0173 output Air Temperature Sensor 1 refers to the upper left air duct temperature sensor
- DTC B0178 output Air Temperature Sensor 2 refers to the lower left air duct temperature sensor
- DTC B0509 output Air Temperature Sensor 3 refers to the upper right air duct temperature sensor
- DTC B0514 output Air Temperature Sensor 4 refers to the lower right air duct temperature sensor
Conditions for Running the DTC
The ignition is turned ON.
Conditions for Setting the DTC
The HVAC control module detects the inside air temperature sensor signal circuit is less than -36ºC (-38ºF) or greater than 215ºC (419ºF) for greater than 15 seconds.
Action Taken When the DTC Sets
The system operates using a default value.
Conditions for Clearing the DTC
- The DTC will become history if the HVAC control module no longer detects the condition that set the DTC.
- The history DTC will clear after 100 fault-free ignition cycles.
Reference Information
Schematic Reference
HVAC Schematics
Connector End View Reference
COMPONENT CONNECTOR END VIEWS - INDEX
Description and Operation
- Air Temperature Description and Operation
- Air Delivery Description and Operation
Electrical Information Reference
- Circuit Testing
- Connector Repairs
- Testing for Intermittent Conditions and Poor Connections
- Wiring Repairs
Scan Tool Reference
Control Module References for scan tool information
Circuit/System Verification
Ignition ON, observe the appropriate scan tool air duct temperature sensor. The reading should be between -35º C (-39ºF) and 98ºC (208ºF) and change with duct air temperature changes.
Circuit/System Testing
IMPORTANT: If an air duct temperature sensor has an out of range condition caused by a short to voltage, short to ground or an open/high resistance, the scan tool will display the same value: 39ºF (4ºC).
1. Ignition OFF, disconnect the harness connector at the appropriate air duct temperature sensor.
2. Ignition OFF, test for less than 10 ohms between the low reference circuit terminal 2 and ground.
- If greater than the specified range, test the low reference circuit for an open/high resistance. If the circuit tests normal, replace the HVAC control module.
3. Ignition ON, test for 4.8-5.2 volts between the signal circuit terminal 1 and the low reference circuit terminal 2.
- If less than the specified range, test the signal circuit for a short to ground or open/high resistance.
- If the circuit tests normal, replace the HVAC control module.
- If greater than the specified range, test the signal circuit for a short to voltage. If the circuit tests normal, replace the HVAC control module.
4. If all circuits test normal, test or replace the air duct temperature sensor.
Component Testing
1. Test the air duct temperature sensor by varying the sensor temperature while monitoring the sensor resistance.
2. Compare the readings with the Sensor Resistance Table and verify that the resistance is within 5 percent of the specification.
- If not within the specified range, replace the sensor.
Repair Instructions
Perform the Diagnostic Repair Verification after completing the diagnostic procedure.
- Duct Air Temperature Sensor Replacement - Upper Right Side
- Duct Air Temperature Sensor Replacement - Upper Left Side
- Duct Air Temperature Sensor Replacement - Lower Left Side
- Duct Air Temperature Sensor Replacement - Lower Right Side
- Control Module References for HVAC control module replacement, setup and programming
DTC B0183 OR B0188: SOLAR LOAD SENSOR 1-2
Diagnostic Instructions
- Perform the Diagnostic System Check - Vehicle prior to using this diagnostic procedure.
- Review Strategy Based Diagnosis for an overview of the diagnostic approach.
- Diagnostic Procedure Instructions provides an overview of each diagnostic category.
DTC Descriptors
DTC B0183 02
- Solar Load Sensor 1 Circuit Short to Ground
DTC B0183 05
- Solar Load Sensor 1 Circuit Short to Battery or Open
DTC B0188 02
- Solar Load Sensor 2 Circuit Short to Ground
DTC B0188 05
- Solar Load Sensor 2 Circuit Short to Battery or Open
Diagnostic Fault Information

Circuit Description
The sunload sensor is a 2-wire photo diode. The vehicle uses left and right sunload sensors. The two sensors are integrated into the sunload sensor assembly along with the ambient light sensor. Ground and signal circuits enable the sensors to operate. As the sunload increases, the sensor signal decreases. The sensor signal varies between 0 and 5 volts. The HVAC control module converts the signal to a range between 0 and 255 counts. The sunload sensor provides the HVAC control module with a measurement of the amount of light shining on the vehicle. Bright or high intensity light causes the vehicles interior temperature to increase. The HVAC system compensates for the increased temperature by diverting additional cool air into the vehicle.
The following DTCs are for the left and right sunload sensors.
- B0183 is for the left sunload sensor.
- B0188 is for the right sunload sensor.
Conditions for Running the DTC
The ignition is ON.
Conditions for Setting the DTC
The HVAC control module detects the signal circuit is less than 5 counts or greater than 250 counts.
Action Taken When the DTC Sets
- The driver information center (DIC) will display SERVICE A/C SYSTEM.
- The system will operate as if no sunload condition exists.
Conditions for Clearing the DTC
- The DTC will become history if the HVAC control module no longer detects the condition that set the DTC.
- The history DTC will clear after 100 fault-free ignition cycles.
Reference Information
Schematic Reference
HVAC Schematics
Connector End View Reference
COMPONENT CONNECTOR END VIEWS - INDEX
Description and Operation
- Air Temperature Description and Operation
- Air Delivery Description and Operation
Electrical Information Reference
- Circuit Testing
- Connector Repairs
- Testing for Intermittent Conditions and Poor Connections
- Wiring Repairs
Scan Tool Reference
Control Module References for scan tool information
Circuit/System Verification
Ignition ON, observe the appropriate scan tool Sunload Sensor parameter. The reading should be between 5 and 250 counts and change with sunlight intensity.
Circuit/System Testing
IMPORTANT: If a solar load sensor has an out of range condition caused by a short to voltage, short to ground or an open/high resistance, the scan tool will display the same value: 225 counts.
1. Ignition OFF, disconnect the harness connector at the sunload sensor.
2. Test for less than 10 ohms between the ground circuit terminal C and ground.
- If greater than the specified range, test the ground circuit for an open/high resistance.
3. Ignition ON, test for 4.8-5.2 volts between the appropriate signal circuit terminal and the ground circuit terminal C.
- Left solar load sensor circuit terminal A.
- Right solar load sensor circuit terminal B.
- If less than the specified range, test the signal circuit for a short to
ground or open/high resistance.
If the circuit tests normal, replace the HVAC control module.
- If greater than the specified range, test the signal circuit for a short to voltage. If the circuit tests normal, replace the HVAC control module.
4. If all circuits test normal, test or replace the sunload sensor.
Repair Instructions
Perform the Diagnostic Repair Verification after completing the diagnostic procedure.
- Daytime Running Lamp (DRL) Ambient Light Sensor Replacement (Without UV6) , Daytime Running Lamp (DRL) Ambient Light Sensor Replacement (With UV6)
- Control Module References for HVAC control module replacement, setup and programming
DTC B0228, B0413, B0423, B0433, B3779 OR B3782: RECIRCULATE POSITION FEEDBACK/TEMPERATURE CONTROL 1-3 FEEDBACK
Diagnostic Instructions
- Perform the Diagnostic System Check - Vehicle prior to using this diagnostic procedure.
- Review Strategy Based Diagnosis for an overview of the diagnostic approach.
- Diagnostic Procedure Instructions provides an overview of each diagnostic category.
DTC Descriptors
DTC B0228 02
- Recirculate Position Feedback Circuit Short to Ground
DTC B0228 04
- Recirculate Position Feedback Circuit Open
DTC B0228 05
- Recirculate Position Feedback Circuit Short to Battery or Open
DTC B0228 08
- Recirculate Position Circuit Actuator Stalled
DTC B0228 61
- Recirculate Position Circuit Actuator Stuck
DTC B0413 02
- Temperature Control 1 Feedback Circuit Short to Ground
DTC B0413 04
- Temperature Control 1 Feedback Circuit Open
DTC B0413 05
- Temperature Control 1 Feedback Circuit Short to Battery or Open
DTC B0413 08
- Temperature Control 1 Feedback Circuit Actuator Stalled
DTC B0413 61
- Temperature Control 1 Feedback Circuit Actuator Stuck Open
DTC B0423 02
- Temperature Control 2 Feedback Circuit Short to Ground
DTC B0423 04
- Temperature Control 2 Feedback Circuit Open
DTC B0423 05
- Temperature Control 2 Feedback Circuit Short to Battery or Open
DTC B0423 08
- Temperature Control 2 Circuit Actuator Stalled
DTC B0423 61
- Temperature Control 2 Circuit Actuator Stuck
DTC B0433 02
- Temperature Control 3 Feedback Circuit Short to Ground
DTC B0433 04
- Temperature Control 3 Feedback Circuit Open
DTC B0433 05
- Temperature Control 3 Feedback Circuit Short to Battery or Open
DTC B0433 08
- Temperature Control 3 Circuit Actuator stalled
DTC B0433 61
- Temperature Control 3 Circuit Actuator Stuck
DTC B3779 02
- Air Flow Control 9 Feedback Circuit Short to Ground
DTC B3779 04
- Air Flow Control 9 Feedback Circuit Open
DTC B3779 05
- Air Flow Control 9 Feedback Circuit Short to Battery or Open
DTC B3779 08
- Air Flow Control 9 Circuit Actuator stalled
DTC B3779 61
- Air Flow Control 9 Circuit Actuator Stuck
DTC B3782 02
- Air Flow Control 10 Feedback Circuit Short to Ground
DTC B3782 04
- Air Flow Control 10 Feedback Circuit Open
DTC B3782 05
- Air Flow Control 10 Feedback Circuit Short to Battery or Open
DTC B3782 08
- Air Flow Control 10 Circuit Actuator Stalled
DTC B3782 61
- Air Flow Control 10 Circuit Actuator Stuck
Circuit/System Description
The actuators operate using 5 circuits. A 5-volt reference, low reference, signal circuit and two bi-directional 0 or 12 volt control circuits. The HVAC control module supplies a low reference and 5-volt reference to the potentiometer. The HVAC control module monitors the voltage drop across the potentiometer on the door position signal circuit. As the actuator door changes position the door position signal circuit voltage also changes. The two bi-directional control circuits enable the actuator to operate. Both circuits are set to 0 volts when the HVAC control module detects, from the feedback potentiometer, that the actuator is in the desired position. In order to move the actuator, the HVAC control module switches the appropriate control circuit to 12 volts.
- DTC B0228 is for the recirculate actuator
- DTC B0413 is for the left air temperature actuator
- DTC B0423 is for the right air temperature actuator
- DTC B0433 is for the auxiliary air temperature actuator
- DTC B3782 is for the auxiliary mode actuator
- DTC B3779 is for the mode actuator
Conditions for Running the DTC
- The ignition is ON.
- The HVAC module is ON.
Conditions for Setting the DTC
The actual door position differs from the commanded door position by more than 4 counts or the HVAC control module detects the door position signal circuit is less than 3 counts or greater than 253 counts.
Action Taken When the DTC Sets
The control circuit is deactivated for the appropriate actuator.
Conditions for Clearing the DTC
- The DTC becomes history when the HVAC control module no longer detects the condition that set the DTC.
- The history DTC will clear after 100 fault-free ignition cycles.
Reference Information
Schematic Reference
HVAC Schematics
Connector End View Reference
COMPONENT CONNECTOR END VIEWS - INDEX
Description and Operation
- Air Delivery Description and Operation
- Air Temperature Description and Operation
Electrical Information Reference
- Circuit Testing
- Connector Repairs
- Testing for Intermittent Conditions and Poor Connections
- Wiring Repairs
Scan Tool Reference
Control Module References for scan tool information
Circuit/System Verification
Ignition ON, command the appropriate actuator in both directions with a scan tool. The scan tool door position parameter reading should be between 3 and 253 counts.
Circuit/System Testing
1. Ignition OFF, disconnect all external devices to include the scan tool and battery charger. It will take more than 10 minutes for all vehicle systems to power down.
2. Disconnect the harness connector at the appropriate actuator.
3. Test for less than 10 ohms between the low reference circuit terminal 8 and ground.
- If greater than the specified range, test the low reference circuit for an open/high resistance. If the circuit tests normal, replace the HVAC control module.
NOTE: Ground measurements will be abnormally high if taken before all vehicle systems have powered down.
4. Ignition ON, test for 4.8-5.2 volts between the 5-volt reference circuit terminal 10 and ground.
- If less than the specified range, test the 5-volt reference circuit for a short to ground or an open/high resistance. If the circuit tests normal, replace the HVAC control module.
- If greater than the specified range, test the 5-volt reference circuit for a short to voltage. If the circuit tests normal, replace the HVAC control module.
5. Verify the scan tool Door Position parameter is greater than 250 counts.
- If less than the specified range, test the signal circuit terminal 9 for a short to ground. If the circuit tests normal, replace the HVAC control module.
6. Install a 3A fused jumper wire between the signal circuit terminal 9 and the low reference circuit terminal 8. Verify the scan tool Door Position parameter is less than 3 counts.
- If greater than the specified range, test the signal circuit for a short to voltage or an open/high resistance. If the circuit tests normal, replace the HVAC control module.
7. Ignition ON, test for less than 10 ohms between the control circuit terminal 5 and ground.
- If greater than the specified range, test the control circuit for a short to voltage or an open/high resistance. If circuit tests normal, replace the HVAC control module.
8. Ignition ON, test for less than 10 ohms between the control circuit terminal 6 and ground.
- If greater than the specified range, test the control circuit for a short to voltage or an open/high resistance. If circuit tests normal, replace the HVAC control module.
9. Connect a test lamp between control circuit terminal 5 and control circuit terminal 6.
10. Ignition ON, command the appropriate actuator door in both directions with a scan tool. The test lamp should turn ON and OFF when commanded in both directions.
- If the test lamp remains OFF during either of the commands, test for a short to ground on either control circuit. If the circuits test normal, replace the HVAC control module.
11. If both circuits test normal, test or replace the actuator.
Repair Instructions
Perform the Diagnostic Repair Verification after completing the repair.
- Air Inlet Valve Actuator Replacement
- Mode Valve Actuator Replacement
- Temperature Valve Actuator Replacement - Left Side
- Temperature Valve Actuator Replacement - Right Side
- Auxiliary Temperature Valve Actuator Replacement
- Auxiliary Mode Valve Actuator Replacement
- Control Module References for HVAC control module and HVAC Auxiliary control module or rear seat audio (RSA) replacement, setup and programming
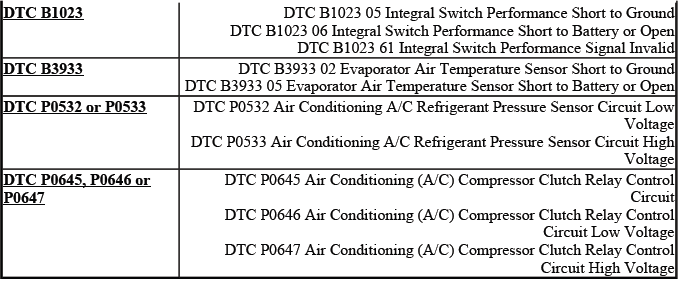
DTC B1023: INTEGRAL SWITCH PERFORMANCE
Diagnostic Instructions
- Perform the Diagnostic System Check - Vehicle prior to using this diagnostic procedure.
- Review Strategy Based Diagnosis for an overview of the diagnostic approach.
- Diagnostic Procedure Instructions provides an overview of each diagnostic category.
DTC Descriptors
DTC B1023 05
- Integral Switch Performance Short to Ground
DTC B1023 06
- Integral Switch Performance Short to Battery or Open
DTC B1023 61
- Integral Switch Performance Signal Invalid
Circuit/System Description
This DTC will be set by internal fault inside the HVAC control module for a stuck or shorted control button.
Conditions for Running the DTC
Battery voltage is between 9-16 volts and data link communications operate normally.
Conditions for Setting the DTC
The HVAC control module has internal fault inside the HVAC control module for a stuck or shorted control button.
Conditions for Clearing the DTC
- A current DTC clears when the malfunction is no longer present.
- A history DTC clears when the module ignition cycle counter reaches the reset threshold, without a repeat of the malfunction.
Reference Information
Schematic Reference
HVAC Schematics
Connector End View Reference
COMPONENT CONNECTOR END VIEWS - INDEX
Description and Operation
- Air Delivery Description and Operation
- Air Temperature Description and Operation
Electrical Information Reference
- Circuit Testing
- Connector Repairs
- Testing for Intermittent Conditions and Poor Connections
- Wiring Repairs
Scan Tool Reference
Control Module References for scan tool information
Circuit/System Verification
1. Reprogram the HVAC control module. The module should successfully reprogram.
- If the module will not reprogram, replace the HVAC control module that set the DTC.
2. With a scan tool, clear the DTC.
3. Ignition OFF.
4. Wait 60 seconds, then recheck for DTCs. DTC B1023 should not set.
- If DTC B1023 sets, replace the module.
Repair Instructions
Perform the Diagnostic Repair Verification after completing the diagnostic procedure.
Control Module References for control module replacement, setup and programming
DTC B3933: EVAPORATOR AIR TEMPERATURE SENSOR
Diagnostic Instructions
- Perform the Diagnostic System Check - Vehicle prior to using this diagnostic procedure.
- Review Strategy Based Diagnosis for an overview of the diagnostic approach.
- Diagnostic Procedure Instructions provides an overview of each diagnostic category.
DTC Descriptors
DTC B3933 02
- Evaporator Air Temperature Sensor Short to Ground
DTC B3933 05
- Evaporator Air Temperature Sensor Short to Battery or Open
Diagnostic Fault Information
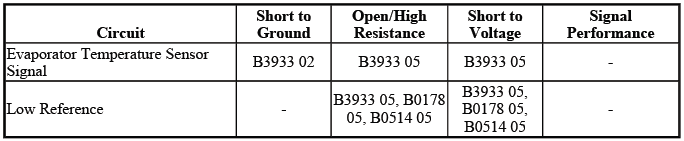
Circuit Description
The HVAC control module supplies the evaporator air temperature sensor with a low reference circuit and 5- volt signal circuit. The HVAC control module determines the voltage drop across the sensor, which is proportional to temperature. As the air temperature increases, the sensor resistance decreases and the voltage signal decreases. As the air temperature decreases, the sensor resistance increases and the voltage signal increases.
Conditions for Running the DTC
The ignition is turned ON.
Conditions for Setting the DTC
The HVAC control module detects the evaporator air temperature sensor signal circuit is less than -36ºC (-38º F) or more than 215ºC (419ºF) for more than 15 seconds.
Action Taken When the DTC Sets
The A/C compressor will be disabled.
Conditions for Clearing the DTC
- The DTC will become history if the HVAC control module no longer detects a failure.
- The history DTC will clear after 100 fault-free ignition cycles.
Reference Information
Schematic Reference
HVAC Schematics
Connector End View Reference
COMPONENT CONNECTOR END VIEWS - INDEX
Description and Operation
- Air Temperature Description and Operation
- Air Delivery Description and Operation
Electrical Information Reference
- Circuit Testing
- Connector Repairs
- Testing for Intermittent Conditions and Poor Connections
- Wiring Repairs
Scan Tool Reference
Control Module References for scan tool information
Circuit/System Verification
Ignition ON, observe the scan tool A/C Evaporator Temperature Sensor parameter. The reading should be between -39ºF (-35ºC) and 208ºF (98ºC) and change with evaporator air temperature changes.
Circuit/System Testing
IMPORTANT: If the evaporator air temperature sensor has an out of range condition caused by a short to voltage, short to ground or an open/high resistance, the scan tool will display the same value: 11ºC (51ºF).
1. Ignition OFF, disconnect the harness connector at the evaporator air temperature sensor.
2. Ignition OFF, test for less than 10 ohms between the low reference circuit terminal 2 and ground.
- If greater than the specified range, test the low reference circuit for an open/high resistance. If the circuit tests normal, replace the HVAC control module.
3. Ignition ON, test for 4.8-5.2 volts between the signal circuit terminal 1 and low reference circuit terminal 2.
- If less than the specified range, test the signal circuit for a short to
ground or open/high resistance.
If the circuit tests normal, replace the HVAC control module.
- If greater than the specified range, test the signal circuit for a short to voltage. If the circuit tests normal, replace the HVAC control module.
4. If all circuits test normal, test or replace the evaporator air temperature sensor.
Component Testing
1. Test the evaporator air temperature sensor by varying the sensor temperature while monitoring the sensor resistance.
2. Compare the readings with the Sensor Resistance Table and verify that the resistance is within 5 percent of the specification.
- If not within the specified range, replace the sensor.
Repair Instructions
Perform the Diagnostic Repair Verification after completing the diagnostic procedure.
- Evaporator Air Temperature Sensor Replacement
- Control Module References for HVAC control module replacement, setup and programming
DTC P0532 OR P0533: AIR CONDITIONING A/C REFRIGERANT PRESSURE SENSOR
Diagnostic Instructions
- Perform the Diagnostic System Check - Vehicle prior to using this diagnostic procedure.
- Review Strategy Based Diagnosis for an overview of the diagnostic approach.
- Diagnostic Procedure Instructions provides an overview of each diagnostic category.
DTC Descriptors
DTC P0532
- Air Conditioning A/C Refrigerant Pressure Sensor Circuit Low Voltage
DTC P0533
- Air Conditioning A/C Refrigerant Pressure Sensor Circuit High Voltage
Diagnostic Fault Information

Circuit/System Description
The engine control module (ECM) monitors the high side refrigerant pressure through the A/C refrigerant pressure sensor. The ECM supplies a 5-volt reference and a low reference to the sensor. Changes in the A/C refrigerant pressure cause the A/C refrigerant pressure sensor signal to the ECM to vary. When the pressure is low, the signal voltage is low. When the pressure is high, the ECM commands the cooling fans on. When pressure is too high or too low, the ECM will not allow the A/C compressor clutch to engage.
Conditions for Running the DTC
The engine is running.
Conditions for Setting the DTC
- The ECM detects that the A/C pressure is less than 1 psi (0.01 volt) sets DTC P0532.
- The ECM detects that the A/C pressure is greater than 425 psi (4.90 volts) sets DTC P0533.
Action Taken When the DTC Sets
- The ECM will not illuminate the malfunction indicator lamp (MIL).
- The ECM stores the failure records.
- The A/C compressor clutch is disabled.
Conditions for Clearing the DTC
- The DTC will become history if the ECM no longer detects a failure.
- The history DTC will clear after 40 consecutive ignition cycles have occurred without a malfunction.
Diagnostic Aids
A malfunction within the refrigerant system causing high pressure can cause DTC P0533 to set.
Reference Information
Schematic Reference
HVAC Schematics
Connector End View Reference
COMPONENT CONNECTOR END VIEWS - INDEX
Description and Operation
- Air Temperature Description and Operation
- Air Delivery Description and Operation
Electrical Information Reference
- Circuit Testing
- Connector Repairs
- Testing for Intermittent Conditions and Poor Connections
- Wiring Repairs
Scan Tool Reference
Control Module References for scan tool information
Circuit/System Verification
Ignition ON, observe the scan tool A/C Refrigerant Pressure Sensor parameter. The reading should be between 0.1 volts (1 psi) and 4.90 volts (425 psi) and change with A/C refrigerant pressure changes.
Circuit/System Testing
1. Ignition OFF, disconnect the harness connector at the A/C refrigerant pressure sensor.
2. Ignition OFF, test for less than 10 ohms between the low reference circuit terminal 1 and ground.
- If greater than the specified range, test the low reference circuit for an open/high resistance. If the circuit tests normal, replace the ECM.
3. Ignition ON, test for 4.8-5.2 volts between the 5-volt reference circuit terminal 2 and ground.
- If less than the specified range, test the 5-volt reference circuit for a short to ground or an open/high resistance. If the circuit tests normal, replace the ECM.
- If greater than the specified range, test the 5-volt reference circuit for a short to voltage. If the circuit tests normal, replace the ECM.
4. Verify the scan tool A/C High Side Pressure Sensor parameter is less than 0.1 volts (1 psi).
- If greater than the specified range, test the signal circuit terminal 3 for a short to voltage. If the circuit tests normal, replace the ECM.
5. Install a 3A fused jumper wire between the signal circuit terminal 3 and the 5-volt reference circuit terminal 2. Verify the scan tool A/C Refrigerant High Side Pressure Sensor parameter is greater than 4.90 volts (425 psi).
- If less than the specified range, test the signal circuit for short to
ground or an open/high resistance.
If the circuit tests normal, replace the ECM.
6. If all circuits test normal, test or replace the A/C refrigerant pressure sensor.
Repair Instructions
Perform the Diagnostic Repair Verification after completing the diagnostic procedure.
- Air Conditioning (A/C) Refrigerant Pressure Sensor Replacement
- Control Module References for the ECM replacement, setup and programming
DTC P0645, P0646 OR P0647: AIR CONDITIONING (A/C) COMPRESSOR CLUTCH RELAY
Diagnostic Instructions
- Perform the Diagnostic System Check - Vehicle prior to using this diagnostic procedure.
- Review Strategy Based Diagnosis for an overview of the diagnostic approach.
- Diagnostic Procedure Instructions provides an overview of each diagnostic category.
DTC Descriptor
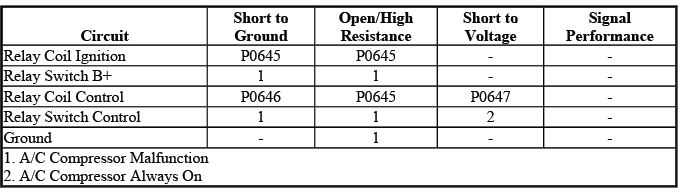
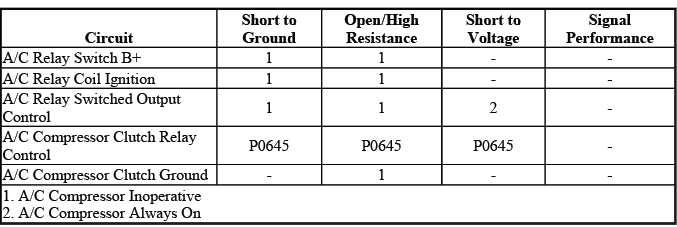
DTC P0645
- Air Conditioning (A/C) Compressor Clutch Relay Control Circuit
DTC P0646
- Air Conditioning (A/C) Compressor Clutch Relay Control Circuit Low Voltage
DTC P0647
- Air Conditioning (A/C) Compressor Clutch Relay Control Circuit High Voltage
Diagnostic Fault Information
Circuit System Description
When the A/C switch is pressed, the HVAC control module sends a serial data message to the ECM. This input will request the engine control module (ECM) to ground the A/C compressor clutch relay control circuit, which will switch the A/C CMPRSR CLUTCH relay on. With the relay contacts closed, battery voltage is supplied to the A/C compressor clutch assembly.
Conditions for Running the DTC
- The ignition voltage is between 11-18 volts.
- The engine speed is greater than 600 RPM.
- An A/C request is made.
Conditions for Setting the DTC
P0645 or P0646
The ECM detects a short to ground or an open at the A/C compressor clutch relay control circuit.
P0647
The ECM detects a short to voltage at the A/C compressor clutch relay control circuit.
Action Taken When the DTC Sets
P0645 or P0646
The A/C compressor is inoperative or always active. The A/C compressor solenoid is commanded to 0% displacement. This causes warm air from the ducts, even with unwanted clutch engagement.
P0647
The A/C compressor is inoperative.
Conditions for Clearing the DTC
A History DTC clears after 40 consecutive warm-up cycles have occurred without a malfunction.
Diagnostic Aids
The following conditions must be met in order for the ECM to turn on the compressor clutch:
- Battery voltage is between 9-18 volts.
- Engine coolant temperature (ECT) is less than 123ºC (253ºF).
- Engine speed is greater than 600 RPM.
- Engine speed is less than 4, 760 RPM.
- A/C high side pressure is between 269-2929 kPa (39-425 psi)-Refer to Air Conditioning (A/C) System Performance Test.
- Throttle position is less than 100 percent.
- Evaporator temperature is greater than 0ºC (32ºF).
- ECM does not detect excessive torque load.
- ECM does not detect insufficient idle quality.
- The ambient temperature is above 1ºC (34ºF).
Reference Information
Schematic Reference
HVAC Schematics
Connector End View Reference
COMPONENT CONNECTOR END VIEWS - INDEX
Description and Operation
- Air Delivery Description and Operation
- Air Temperature Description and Operation
Electrical Information Reference
- Circuit Testing
- Connector Repairs
- Testing for Intermittent Conditions and Poor Connections
- Wiring Repairs
Scan Tool Reference
Control Module References for scan tool information
Circuit/System Testing
1. Ignition OFF, disconnect the KR29 A/C compressor clutch relay, ignition ON.
2. Verify a test lamp illuminates between the B+ circuit terminal 30 and ground.
If the test lamp does not illuminate and the circuit fuse is good
- Ignition OFF.
- Test for less than 2 ohms in the B+ circuit end to end.
- If 2 ohms or greater, repair the open/high resistance in the circuit.
- If less than 2 ohms, verify the fuse is not open and there is voltage at the fuse.
If the test lamp does not illuminate and the circuit fuse is open
- Ignition OFF.
- Test for infinite resistance between the B+ circuit and ground.
- If less than infinite resistance, repair the short to ground on the circuit.
- If infinite resistance,
- Disconnect the harness connector at the Q2 A/C compressor clutch.
- Test for infinite resistance between the control circuit terminal 87 and
ground.
- If less than infinite resistance, repair the short to ground on the circuit.
- If infinite resistance, test or replace the Q2 A/C compressor clutch.
If the test lamp illuminates
3. Ignition ON.
4. Verify a test lamp illuminates between the ignition circuit terminal 85 and ground.
If the test lamp does not illuminate
Replace the X50A underhood fuse block.
If the test lamp illuminates
5. Connect a test lamp between the ignition circuit terminal 85 and the control circuit terminal 86.
6. Verify the test lamp turns ON and OFF when commanding the Engine Control Module A/C Compressor Clutch Relay ON and OFF with a scan tool.
If the test lamp is always OFF
- Ignition OFF, disconnect the harness connector at the K20 engine control module, ignition ON.
- Test for less than 1 V between the control circuit and ground.
- If 1 V or greater, repair the short to voltage on the circuit.
- If less than 1 V
- Ignition OFF.
- Test for less than 2 ohms in the control circuit end to end.
- If 2 ohms or greater, repair the open/high resistance in the circuit.
- If less than 2 ohms, replace the K20 engine control module.
If the test lamp is always ON
- Ignition OFF, disconnect the harness connector at the K20 engine control module,
- Test for infinite resistance between the control circuit and ground.
- If less than infinite resistance, repair the short to ground on the circuit.
- If infinite resistance, replace the K20 engine control module.
If the test lamp turns ON and OFF
7. Verify a test lamp does not illuminate between the control circuit terminal 87 and ground.
If the test lamp illuminates
Repair the short to voltage on the circuit.
If the test lamp does not illuminate
8. Ignition OFF and all vehicle systems OFF, disconnect the harness connector at the Q2 A/C compressor clutch. It may take up to 2 minutes for all vehicle systems to power down.
9. Test for less than 10 ohms between the ground circuit terminal 1 and ground.
If 10 ohms or greater
- Ignition OFF.
- Test for less than 2 ohms in the ground circuit end to end.
- If 2 ohms or greater, repair the open/high resistance in the circuit.
- If less than 2 ohms, repair the open/high resistance in the ground connection.
If less than 10 ohms
10. Connect the harness connector at the Q2 A/C compressor clutch.
11. Ignition ON, connect a 10 A fused jumper wire between the B+ circuit terminal 30 and the control circuit terminal 87.
12. Verify the Q2 A/C compressor clutch is activated.
If the Q2 A/C compressor clutch does not activate
- Ignition OFF, disconnect the harness connector at the Q2 A/C compressor clutch.
- Test for less than 2 ohms in the control circuit end to end.
- If 2 ohms or greater, repair the open/high resistance in the circuit.
- If less than 2 ohms, test or replace the Q2 A/C compressor clutch.
If the Q2 A/C compressor clutch activates
13. Test or replace the KR29 A/C compressor clutch relay.
Component Testing
1. Ignition OFF, disconnect the KR29 A/C compressor clutch relay.
2. Test for 60-180 ohms between terminals 85 and 86.
If not between 60-180 ohms
Replace the KR29 A/C compressor clutch relay.
If between 60-180 ohms
3. Test for infinite resistance between the terminals listed below:
- 30 and 86
- 30 and 87
- 30 and 85
- 85 and 87
If less than infinite resistance
Replace the KR29 A/C compressor clutch relay.
If infinite resistance
4. Install a 15 A fused jumper wire between terminal 85 and 12 V. Install a jumper wire between terminal 86 and ground.
5. Test for less than 2 ohms between terminals 30 and 87.
If 2 ohms or greater
Replace the KR29 A/C compressor clutch relay.
If less than 2 ohms
6. All OK.
Repair Instructions
Perform the Diagnostic Repair Verification after completing the repair.
- Air Conditioning Compressor Replacement
- Relay Replacement (Within an Electrical Center) , Relay Replacement (Attached to Wire Harness)
- Air Conditioning Clutch Assembly Replacement
- Control Module References for HVAC control module and ECM replacement, setup and programming
SYMPTOMS - HVAC SYSTEMS - AUTOMATIC
IMPORTANT: Review the system operation in order to familiarize yourself with the system functions. Refer to the following procedures:
- Air Delivery Description and Operation
- Air Temperature Description and Operation
Visual/Physical Inspection
- Inspect for aftermarket devices which could affect the operation of the HVAC System. Refer to Checking Aftermarket Accessories.
- Inspect the easily accessible or visible system components for obvious damage or conditions which could cause the symptom.
- Verify the A/C compressor clutch turns freely and is not seized.
- The A/C compressor will not operate in cold outside air temperatures. Refer to Air Temperature Description and Operation.
- The following could cause window fogging:
- Wet carpet or mats
- High humidity
- Interior water leak
- Blocked A/C evaporator drain tube
- Maximum passenger capacity
- Blocked body pressure relief valves
- Inspect the air distribution system for causes of reduced air flow:
- Obstructed or dirty passenger compartment air filter, if equipped
- Blocked or damaged air inlet or outlet vents
Intermittent
Faulty electrical connections or wiring may be the cause of intermittent conditions. Refer to Testing for Intermittent Conditions and Poor Connections.
Symptom List
Refer to a symptom diagnostic procedure from the following list in order to diagnose the symptom:
- Blower Motor Malfunction
- Auxiliary Blower Motor Malfunction
- Air Conditioning Compressor Malfunction
- Air Temperature Malfunction
- Leak Testing
- Noise Diagnosis - HVAC Module
- Noise Diagnosis - Air Conditioning (A/C) System
- Noise Diagnosis - Blower Motor
- Odor Diagnosis
AIR CONDITIONING COMPRESSOR MALFUNCTION
Diagnostic Instructions
- Perform the Diagnostic System Check - Vehicle prior to using this diagnostic procedure.
- Review Strategy Based Diagnosis for an overview of the diagnostic approach.
- Diagnostic Procedure Instructions provides an overview of each diagnostic category.
Diagnostic Fault Information
Circuit System Description
When the A/C switch is pressed, the HVAC control module sends a serial data message to the ECM. This input will request the engine control module (ECM) to ground the A/C compressor clutch relay control circuit, which will switch the A/C CMPRSR CLUTCH relay on. With the relay contacts closed, battery voltage is supplied to the A/C compressor clutch assembly.
Diagnostic Aids
The following conditions must be met in order for the ECM to turn on the compressor clutch:
- Battery voltage is between 9-18 volts
- Engine coolant temperature (ECT) is less than 123ºC (253ºF)
- Engine speed is greater than 600 RPM
- Engine speed is less than 4, 760 RPM
- A/C high side pressure is between 2929-269 kPa (39-425 psi) Air Conditioning (A/C) System Performance Test
- Throttle position is less than 100 percent
- Evaporator temperature is greater than 0ºC (32ºF)
- ECM does not detect excessive torque load
- ECM does not detect insufficient idle quality
- The ambient temperature is above 1ºC (34ºF)
Reference Information
Schematic Reference
HVAC Schematics
Connector End View Reference
COMPONENT CONNECTOR END VIEWS - INDEX
Description and Operation
- Air Temperature Description and Operation
- Air Delivery Description and Operation
Electrical Information Reference
- Circuit Testing
- Connector Repairs
- Testing for Intermittent Conditions and Poor Connections
- Wiring Repairs
Scan Tool Reference
Control Module References for scan tool information
Circuit/System Verification
Engine running place the mode switch in the defrost position. The A/C compressor clutch should engage.
- If the clutch does not engage refer to Air Conditioning (A/C) System Performance Test
Circuit/System Testing
1. Ignition OFF, disconnect the A/C relay.
2. Ignition ON, verify that a test lamp does not illuminate between the control circuit terminal 86 and ground.
- If the test lamp illuminates, test the control circuit for a short to voltage.
3. Verify that a test lamp illuminates between the ignition circuit terminal 85 and ground.
- If the test lamp does not illuminate, test the ignition circuit for a short to ground or a open/high resistance. If the circuit tests normal and ignition circuit fuse is open, test all components connected to the ignition circuit and replace as necessary.
4. Verify that a test lamp illuminates between the relay B+ circuit terminal 30 and ground.
- If the test lamp does not illuminate, test the B+ circuit for a short to
ground or a open/high
resistance. If the circuit tests normal and B+ circuit fuse is open, repla

