Buick Enclave: Specifications, Diagnostic Information and Procedures
SPECIFICATIONS
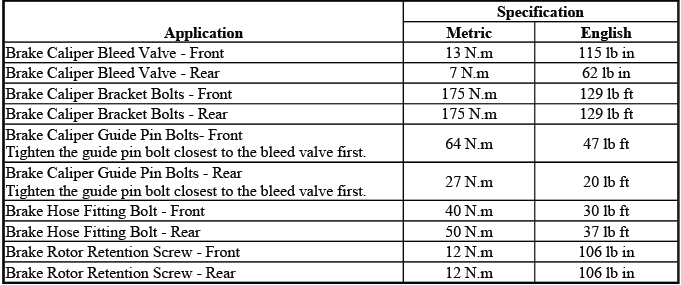
FASTENER TIGHTENING SPECIFICATIONS
Fastener Tightening Specifications
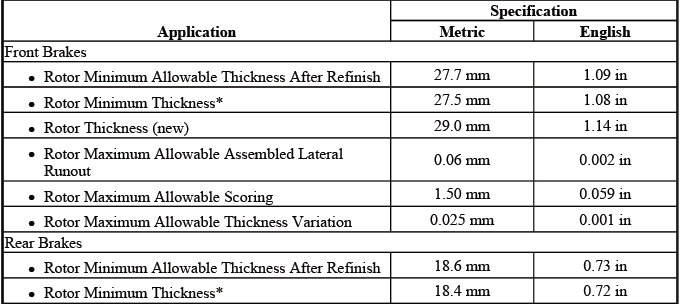
DISC BRAKE COMPONENT SPECIFICATIONS
General Specifications

DIAGNOSTIC INFORMATION AND PROCEDURES
BRAKE ROTOR THICKNESS MEASUREMENT
WARNING: Refer to Brake Dust Warning.
1. Clean the brake pad lining contact surface of the brake rotor with denatured alcohol or an equivalent brake cleaner.
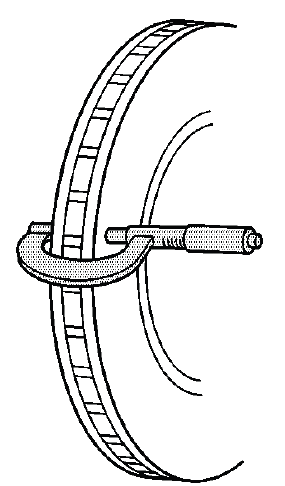
Fig. 1: Measuring Brake Rotor Thickness
2. Using a micrometer calibrated in ten-thousandths of a millimeter or ten-thousandths of an inch, measure and record the lowest thickness of the brake rotor at four or more points, equally spaced around the rotor.
Ensure that the measurements are only taken within the brake pad lining contact area and that the micrometer is positioned the same distance from the outside edge of the rotor for each measurement.
3. Compare the lowest thickness measurement recorded to the specifications. Refer to Disc Brake Component Specifications.
4. If the lowest thickness measurement of the brake rotor is above the brake rotor minimum thickness specification; the rotor may be refinished, depending upon the surface and wear conditions which may be present.
5. If the lowest thickness measurement of the brake rotor is below the minimum thickness specification; the rotor requires replacement.
BRAKE ROTOR THICKNESS VARIATION MEASUREMENT
WARNING: Refer to Brake Dust Warning.
NOTE: Any disc brake rotor that exhibits thickness variation exceeding the maximum acceptable level must be refinished or replaced. Thickness variation exceeding the maximum acceptable level can cause brake pulsation.
1. If the inboard friction surface of the brake rotor is not accessible, reposition and support the caliper with the brake pads. Refer to Front Disc Brake Pads Replacement and/or Rear Disc Brake Pads Replacement.
2. Clean the friction surfaces of the brake rotor with denatured alcohol or an equivalent approved brake cleaner.
3. Using a micrometer (1) calibrated in thousandths-of-a-millimeter or ten-thousandths-of-an-inch, measure and record the thickness of the brake rotor at 4 or more points, evenly spaced around the rotor.
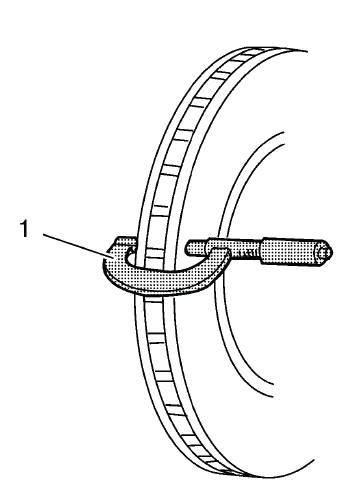
Fig. 2: Micrometer On Brake Rotor
Ensure that the measurements are only taken within the friction surfaces and that the micrometer is positioned the same distance from the outer edge of the rotor, about 13 mm (1/2 in), for each measurement.
4. Calculate the difference between the highest and lowest thickness measurements recorded to obtain the amount of thickness variation.
5. Compare the thickness variation measurement to the following specification:
Specification
Brake rotor maximum allowable thickness variation: 0.025 mm (0.001 in)
6. If the brake rotor thickness variation measurement exceeds the specification, the rotor requires refinishing or replacement.
NOTE: Whenever a brake rotor is refinished or replaced, the assembled lateral runout (LRO) of the rotor must be measured to ensure optimum performance of the disc brakes.
BRAKE ROTOR SURFACE AND WEAR INSPECTION
WARNING: Refer to Brake Dust Warning.
1. If the inboard friction surface of the brake rotor is not accessible, reposition and support the caliper with the brake pads. Refer to Front Disc Brake Pads Replacement and/or Rear Disc Brake Pads Replacement.
2. Clean the friction surfaces of the brake rotor with denatured alcohol or an equivalent approved brake cleaner.
3. Inspect the friction surfaces of the brake rotor for the following Braking Surface Conditions:
- Heavy rust and/or pitting
Light surface rust can be removed with an abrasive disc. Heavy surface rust and/or pitting must be removed by refinishing the rotor.
- Cracks and/or heat spots
- Excessive blueing discoloration
4. If the friction surfaces of the brake rotor exhibit one or more of the Braking Surface Conditions, the rotor requires refinishing or replacement.
5. Using a micrometer (1) calibrated in thousandths-of-a-millimeter or ten-thousandths-of-an-inch, measure and record the scoring depth of any grooves present on the rotor friction surfaces.
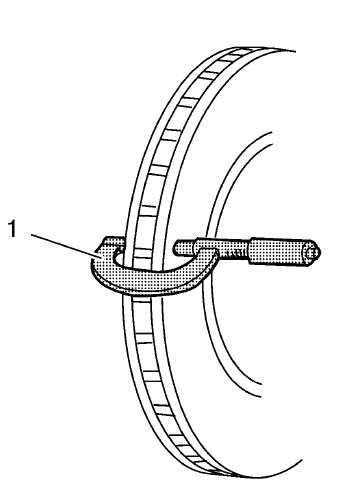
Fig. 3: Micrometer On Brake Rotor
6. Compare the groove scoring depth recorded to the following specification:
Specification
- Brake rotor maximum allowable scoring: 1.50 mm (0.059 in)
7. If the brake rotor scoring depth exceeds the specification or if an excessive amount of scoring is present, the rotor requires refinishing or replacement.
BRAKE ROTOR ASSEMBLED LATERAL RUNOUT MEASUREMENT
Special Tools
- CH-41013 Rotor Resurfacing Kit
- CH-42450-A Wheel Hub Resurfacing Kit
- CH-45101 Hub and Wheel Runout Gauge
- CH-45101-100 Conical Brake Rotor Washers
For equivalent regional tools, refer to Special Tools.
WARNING: Refer to Brake Dust Warning.
NOTE:
- Brake rotor assembled lateral runout (LRO) exceeding the maximum allowable specification can cause thickness variation to develop in the brake rotor over time, usually between 4, 800-11, 300 km (3, 000-7, 000 mi).
- Brake rotor thickness variation MUST be checked BEFORE checking for assembled lateral runout (LRO). Thickness variation exceeding the maximum acceptable level can cause brake pulsation. Refer to Brake Rotor Thickness Variation Measurement.
1. Matchmark the position of the brake rotor to the wheel studs if this has not been done already.
2. Inspect the mating surface of the hub/axle flange and the brake rotor to ensure that there are no foreign particles, corrosion, rust or debris remaining. If the wheel hub/axle flange and/or if the brake rotor mating surfaces exhibit these conditions, perform the following steps:
NOTE: Whenever the brake rotor has been separated from the hub/axle flange, any rust or contaminants should be cleaned from the hub/axle flange and the brake rotor mating surfaces. Failure to do this may result in excessive assembled lateral runout (LRO) of the brake rotor, which could lead to brake pulsation.
- Remove the brake rotor from the vehicle. Refer to Front Brake Rotor Replacement and/or Rear Brake Rotor Replacement.
- Using the CH-42450-A wheel hub resurfacing kit, thoroughly clean any rust or corrosion from the mating surface of the hub/axle flange.
- Using the CH-41013 rotor resurfacing kit, thoroughly clean any rust or corrosion from the mating surface of the brake rotor.
- Clean the friction surfaces of the brake rotor with denatured alcohol or an equivalent approved brake cleaner.
3. Install the rotor to the hub/axle flange using the matchmark made prior to removal.
4. Hold the rotor firmly in place against the hub/axle flange and install one of the CH-45101-100 conical brake rotor washers (1) and one lug nut (2) onto the upper-most wheel stud.
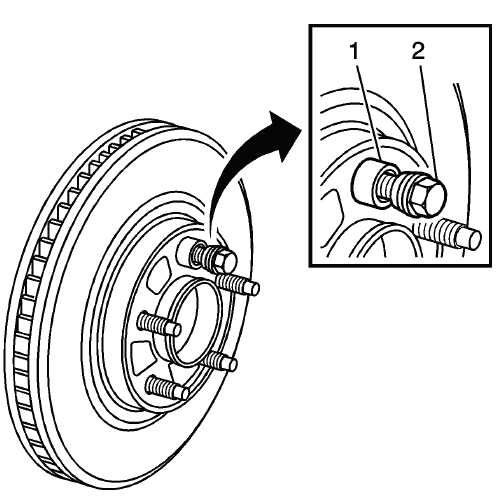
Fig. 4: Identifying Special Tool J 45101-100 & Lug Nut
5. Continue to hold the rotor secure and tighten the lug nut firmly by hand.
6. Install the remaining CH-45101-100 conical brake rotor washers and lug nuts onto the wheel studs and tighten the nuts firmly by hand in a star-pattern.
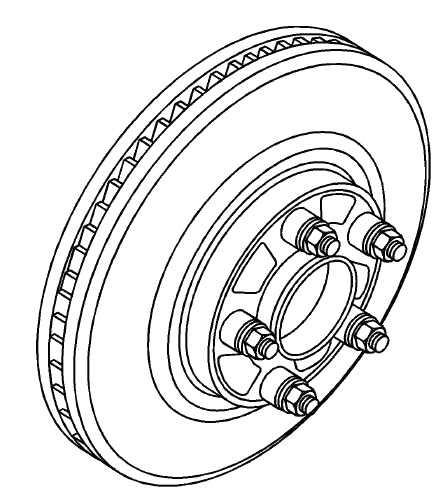
Fig. 5: Identifying All Special Tools J 45101-100s & Lug Nuts
7. Tighten the lug nuts in a star-pattern to specification. Refer to Tire and Wheel Removal and Installation.
8. If the brake rotor has been REFINISHED or REPLACED with a new rotor, proceed to step 14.
9. If the brake rotor meets the following criteria, proceed to step 10.
- The rotor is within specifications and is being REUSED.
- The rotor has NOT been refinished.
- The rotor does NOT exhibit thickness variation exceeding the maximum allowable level.
10. Mount a dial indicator, CH-45101 hub and wheel runout gauge or equivalent, to the steering knuckle and position the indicator button so it contacts the brake rotor friction surface at a 90 degree angle, approximately 13 mm (0.5 in) from the outer edge of the rotor.
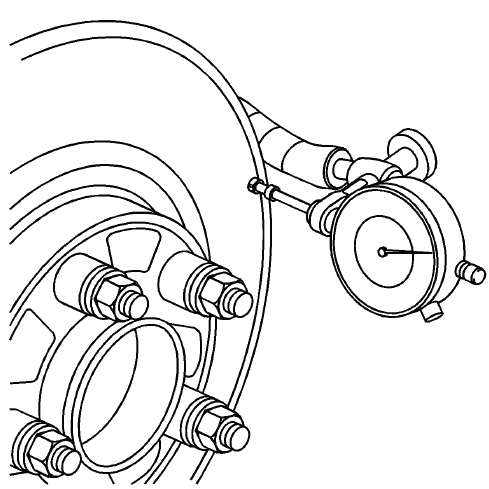
Fig. 6: Using Dial Indicator To Measure Lateral Runout
11. Measure and record the assembled LRO of the brake rotor.
- Rotate the rotor until the lowest reading is displayed on the indicator dial, then set the dial to zero.
- Rotate the rotor until the highest reading is displayed on the dial.
- Mark the location of the high spot relative to the nearest wheel stud or studs.
- Measure and record the amount of LRO.
12. Compare the brake rotor assembled LRO to the following specification:
Specification
- Front brake rotor maximum allowable assembled lateral runout: 0.05 mm (0.002 in)
- Rear brake rotor maximum allowable assembled lateral runout: 0.05 mm (0.002 in)
13. If the brake rotor assembled LRO is within specifications, proceed to step 18.
If the brake rotor assembled LRO exceeds the specification, refinish the rotor to ensure true parallelism.
Refer to Brake Rotor Refinishing. After refinishing the rotor, proceed to step 14.
14. Mount a dial indicator, CH-45101 hub and wheel runout gauge or equivalent, to the steering knuckle and position the indicator button so it contacts the brake rotor friction surface at a 90º angle, approximately 13 mm (0.5 in) from the outer edge of the rotor.
15. Measure and record the assembled LRO of the brake rotor.
- Rotate the rotor until the lowest reading is displayed on the indicator dial, then set the dial to zero.
- Rotate the rotor until the highest reading is displayed on the dial.
- Mark the location of the high spot relative to the nearest wheel stud or studs.
- Measure and record the amount of LRO.
16. Compare the brake rotor assembled LRO to the following specification:
Specification
- Front brake rotor maximum allowable assembled lateral runout: 0.05 mm (0.002 in)
- Rear brake rotor maximum allowable assembled lateral runout: 0.05 mm (0.002 in)
17. If the brake rotor assembled LRO measurement exceeds the specification, bring the LRO to within specifications. Refer to Brake Rotor Assembled Lateral Runout Correction.
18. If the brake rotor assembled LRO measurement is within specification, install the brake caliper and depress the brake pedal several times to secure the rotor in place before removing the CH-45101-100 conical brake rotor washers and the lug nuts.
BRAKE PAD INSPECTION
1. Inspect the disc brake pads at regular intervals or whenever the tire and wheel assemblies are removed from the vehicle.
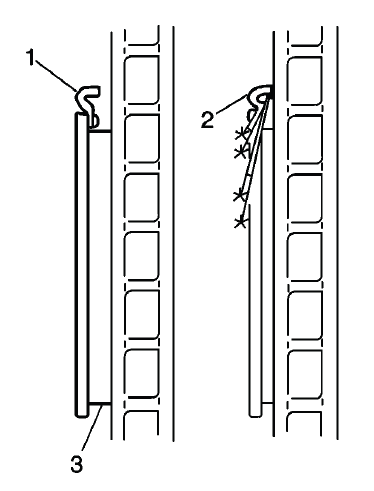
Fig. 7: View Of Brake Pads & Audible Wear Sensors
WARNING: Refer to Brake Dust Warning.
2. If replacement is necessary, always replace disc brake pads in axle sets.
3. Inspect both edges of the disc brake pad friction surfaces (3). The highest rate of wear normally occurs at the trailing edge of the disc brake pads.
4. Inspect the thickness of the disc brake pads (3) in order to ensure that they have not worn prematurely.
The disc brake pad wear should be approximately even per axle set.
5. Both front and rear disc brake pads have integral, audible wear sensors (1). When the disc brake pad wear reaches the minimum allowable thickness, the wear sensor contacts the disc brake rotor (2). The wear indicator will then produce an audible, high-pitched warning noise during wheel rotation.
NOTE: When replacing the disc brake pads, maintain the same disc brake pad wear sensor orientation.
6. Replace the disc brake pads when the friction surface (3) is worn to within 0.76 mm (0.030 in) of the mounting plates.
7. Remove the brake calipers and inspect the friction surfaces of the inner and outer disc brake pads to ensure that they are level. Place the disc brake pad friction surfaces together and measure the gap between the surfaces. If more than 0.13 mm (0.005 in) gap exists midway between the length of the disc brake pads, replace the disc brake pads.
8. Verify that any disc brake pad shims that may be required are in place and not damaged or excessively corroded. Replace any missing or damaged shims in order to preserve proper disc brake performance.
9. Replace the disc brake pads if any have separated from the mounting plates.
10. Inspect the disc brake pads friction surfaces for cracks, fractures or damage which may cause noise or otherwise impair disc brake performance.
BRAKE CALIPER INSPECTION
1. Inspect the brake caliper housing (1) for cracks, excess wear, and/or damage. If any of these conditions are present, the brake caliper requires replacement.
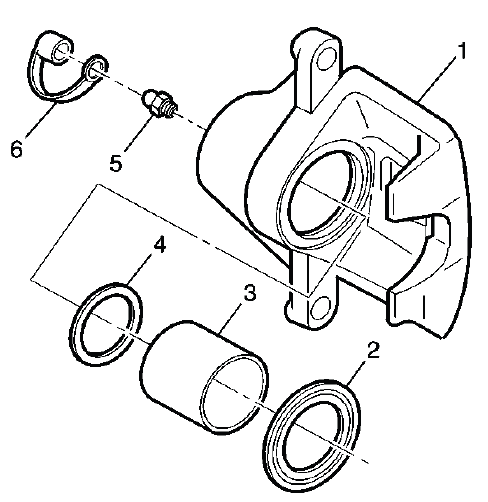
Fig. 8: Exploded View Of Brake Caliper
WARNING: Refer to Brake Dust Warning.
2. Inspect the caliper piston dust boot seal (2) for cracks, tears, cuts, deterioration and/or improper seating in the caliper body. If any of these conditions are present, the brake caliper requires overhaul or replacement.
3. Inspect for brake fluid leakage around the caliper piston dust boot seal (2) and on the disc brake pads. If there is any evidence of brake fluid leakage, the brake caliper requires overhaul or replacement.
4. Inspect for smooth and complete travel of the caliper pistons into the caliper bores:
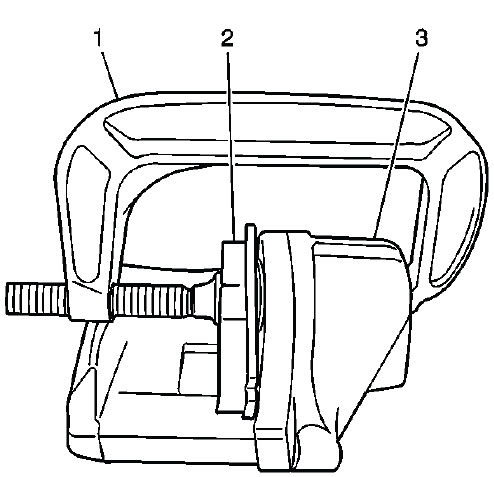
Fig. 9: Compressing Caliper Piston
The movement of the caliper pistons into the caliper bores should be smooth and even. If the caliper piston is frozen or difficult to bottom, the caliper requires overhaul or replacement.
- For single piston caliper applications, insert a discarded inner brake pad (2) or block of wood in front of the piston. Using a large C-clamp (1) installed over the body of the caliper (3) and against the brake pad or block of wood, slowly bottom the piston in the bore.
- For dual piston caliper applications, insert a discarded inner brake pad (2) or block of wood in front of the pistons. Using 2 large C-clamps (1) installed over the body of the caliper (3) and against the brake pad or block of wood, slowly bottom the pistons evenly into the bores.
FRONT DISC BRAKE MOUNTING AND HARDWARE INSPECTION
WARNING: Refer to Brake Dust Warning.
1. Inspect the fluid level in the brake master cylinder reservoir.
2. If the brake fluid level is midway between the maximum-full point and the minimum allowable level then no brake fluid needs to be removed from the reservoir before proceeding.
3. If the brake fluid level is higher than midway between the maximum-full point and the minimum allowable level then remove brake fluid to the midway point before proceeding.
4. Raise and support the vehicle. Refer Lifting and Jacking the Vehicle.
5. Remove the tire and wheel assembly. Refer to Tire and Wheel Removal and Installation.
6. Grasp the brake caliper housing and try to move the brake caliper housing up/down and forward/reverse in relation to the brake caliper mounting bracket. If excessive looseness is observed the brake caliper bracket bushings and/or the brake caliper mounting bolts may need to be replaced.
7. Compress the front caliper pistons.
- Install a large C-clamp over the top of the caliper housing and against the back of the outboard pad.
- Slowly tighten the C-clamp until the pistons are pushed completely into the caliper bores.
- Remove the C-clamp from the caliper.
8. With the pistons compressed into the caliper bores, grasp the brake caliper housing and slide it back and forth on the brake caliper mounting bolts. Check for smooth operation. If the brake caliper housing slide force is high or the brake caliper housing does not slide smoothly, inspect the brake caliper mounting bolts and/or the brake caliper mounting bracket bushings for wear or damage. If wear or damage conditions are found, replacement of the brake caliper mounting bolts and/or the brake caliper mounting bracket bushings is necessary.
9. Remove the brake caliper mounting bolts from the brake caliper mounting bracket and support the brake caliper using heavy mechanics wire. Do Not remove the hydraulic brake hose from the caliper. Refer to Front Brake Caliper Replacement.
10. Remove the disc brake pads from the brake caliper mounting bracket.
NOTE: When replacing the disc brake pads, maintain the same disc brake pad wear sensor orientation.
11. Inspect the disc brake pad mounting hardware for the following:
- Missing mounting hardware
- Excessive corrosion
- Bent mounting tabs
- Looseness at the brake caliper mounting bracket
- Looseness at the disc brake pads
- Excessive contaminants in the brake caliper mounting bracket surface and threads.
12. If any of the conditions listed are found, the disc brake pad mounting hardware requires replacement.
13. Ensure the disc brake pads are held firmly in place on the brake caliper mounting bracket, yet slide easily on the mounting hardware without binding.
14. Inspect the brake caliper guide pin bolt (1), brake caliper (2), caliper bracket (3) and the guide pin seal (4) for the following:
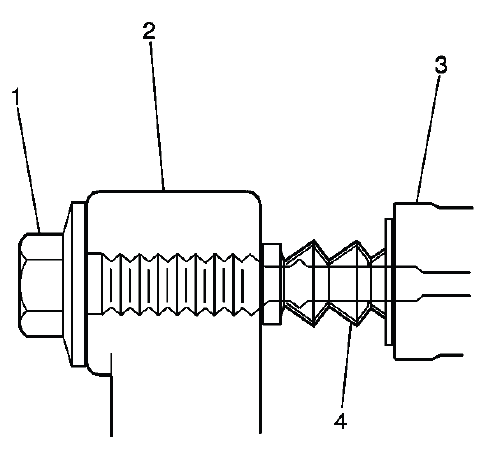
Fig. 10: View Of Caliper, Pin, Boots & Caliper Mounting Bracket
- Binding
- Seizing
- Looseness in the brake caliper mounting bracket
- Bent or damaged brake caliper mounting bolts
- Cracked or torn boots
- Missing boots
- Bent or damaged brake caliper mounting bracket
15. If any of the conditions listed are found then the brake caliper mounting hardware requires replacement.
16. Install the disc brake pads to the brake caliper mounting bracket.
17. Install the disc brake caliper to the brake caliper mounting bracket. Refer to Front Brake Caliper Replacement.
REAR DISC BRAKE MOUNTING AND HARDWARE INSPECTION
WARNING: Refer to Brake Dust Warning.
1. Inspect the fluid level in the brake master cylinder reservoir.
2. If the brake fluid level is midway between the maximum-full point and the minimum allowable level then no brake fluid needs to be removed from the reservoir before proceeding.
3. If the brake fluid level is higher than midway between the maximum-full point and the minimum allowable level then remove brake fluid to the midway point before proceeding.
4. Raise and support the vehicle. Refer Lifting and Jacking the Vehicle.
WARNING: Do not use a service jack in locations other than those specified to lift this vehicle. Lifting the vehicle with a jack in those other locations could cause the vehicle to slip off the jack and roll; this could cause injury or death.
5. Remove the tire and wheel assembly. Refer to Tire and Wheel Removal and Installation.
6. Grasp the brake caliper housing and try to move the brake caliper housing up/down and forward/reverse in relation to the brake caliper mounting bracket. If excessive looseness is observed the brake caliper bracket bushings and/or the brake caliper mounting bolts may need to be replaced.
7. Compress the rear caliper piston.
- Install a large C-clamp over the top of the caliper housing and against the back of the outboard pad.
- Slowly tighten the C-clamp until the piston is pushed completely into the caliper bores.
- Remove the C-clamp from the caliper.
8. With the piston compressed into the caliper bore, grasp the brake caliper housing and slide it back and forth on the brake caliper mounting bolts. Check for smooth operation. If the brake caliper housing slide force is high or the brake caliper housing does not slide smoothly, inspect the brake caliper mounting bolts and/or the brake caliper mounting bracket bushings for wear or damage. If wear or damage conditions are found, replacement of the brake caliper mounting bolts and/or the brake caliper mounting bracket bushings is necessary.
9. Remove the brake caliper mounting bolts from the brake caliper mounting bracket and support the brake caliper using heavy mechanics wire. Do not disconnect the hydraulic brake hose from the caliper. Refer to Rear Brake Caliper Replacement.
10. Remove the disc brake pads from the brake caliper mounting bracket.
11. Inspect the disc brake pad mounting hardware for the following:
- Missing mounting hardware
- Excessive corrosion
- Bent mounting tabs
- Looseness at the brake caliper mounting bracket
- Looseness at the disc brake pads
- Excessive contaminants in the brake caliper mounting bracket surface and threads.
12. If any of the conditions listed are found, the disc brake pad mounting hardware requires replacement.
13. Ensure the disc brake pads are held firmly in place on the brake caliper mounting bracket, yet slide easily on the mounting hardware without binding.
14. Inspect the caliper bolts (1) for the following:
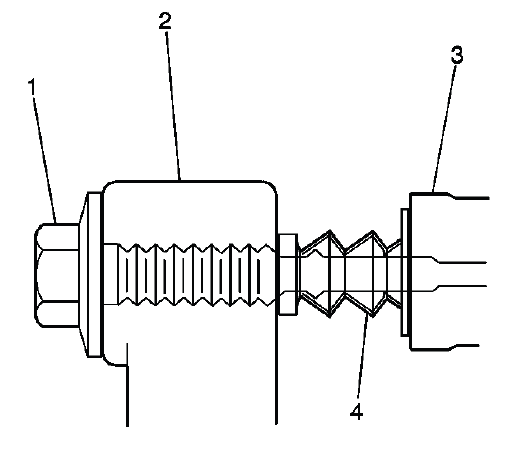
Fig. 11: View Of Caliper, Pin, Boots & Caliper Mounting Bracket
- Binding
- Seizing
- Looseness in the brake caliper mounting bracket (3)
- Bent or damaged brake caliper mounting bolts
- Cracked or torn boots (4)
- Missing boots
- Bent or damaged brake caliper mounting bracket (3)
15. If any of the conditions listed are found then the brake caliper mounting hardware requires replacement.
16. Install the disc brake pads to the brake caliper mounting bracket.
17. Install the disc brake caliper to the brake caliper mounting bracket. Refer to Rear Brake Caliper Replacement.

