Buick Enclave: Repair Instructions - On Vehicle
TRANSFER CASE FLUID REPLACEMENT
Removal Procedure
1. Raise and support the vehicle. Refer to Lifting and Jacking the Vehicle.
2. Remove the drain plug.
Fig. 2: Identifying Drain Plug
3. Remove the fill plug.
Fig. 3: Identifying Fill Plug
Installation Procedure
1. Clean the drain plug.
Fig. 4: Identifying Drain Plug
2. Install the drain plug and tighten to 39 (29 lb ft).
CAUTION: Refer to Component Fastener Tightening Caution.
3. Fill the transfer case with lubricant to the bottom of the fill plug or 1 Liter (34 oz). Refer to Adhesives, Fluids, Lubricants and Sealers for lubricant recommendation.
Fig. 5: Identifying Fill Plug
4. Clean the fill plug.
5. Install the fill plug and tighten to 39 (29 lb ft).
6. Lower the vehicle.
FILL PLUG REPLACEMENT
Removal Procedure
1. Remove the fill plug.
Fig. 6: Identifying Fill Plug
Installation Procedure
1. Install the fill plug and tighten to 39 (29 lb ft).
Fig. 7: Identifying Fill Plug
CAUTION: Refer to Component Fastener Tightening Caution.
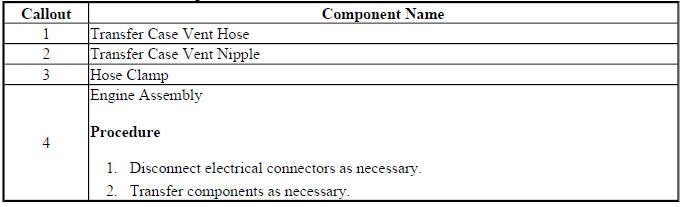
TRANSFER CASE VENT HOSE REPLACEMENT
Fig. 8: Transfer Case Vent Hose
Transfer Case Vent Hose Replacement
REAR OUTPUT SHAFT SEAL REPLACEMENT
Removal Procedure
1. Raise and support the vehicle. Refer to Lifting and Jacking the Vehicle.
2. Drain the transfer case fluid. Refer to Transfer Case Fluid Replacement.
3. Remove the rear propeller shaft. Refer to Propeller Shaft Replacement.
4. Remove the rear output shaft housing. Refer to Rear Output Shaft Housing Removal in Transfer Case Disassemble.
5. Remove the transfer case rear output shaft flange and seal. Refer to Rear Output Shaft Housing Disassembly in Transfer Case Disassemble.
Installation Procedure
1. Install the transfer case rear output shaft seal. Refer to Rear Output Shaft Housing Assembly and Output Flange Installation in Transfer Case Assemble.
2. Install the rear output shaft housing. Refer to Rear Output Shaft Housing Installation in Transfer Case Assemble.
3. Install the rear propeller shaft. Refer to Propeller Shaft Replacement.
4. Fill the transfer case with fluid. Refer to Transfer Case Fluid Replacement.
5. Lower the vehicle.
REAR OUTPUT SHAFT FLANGE REPLACEMENT
Removal Procedure
1. Raise and support the vehicle. Refer to Lifting and Jacking the Vehicle.
2. Drain the transfer case fluid. Refer to Transfer Case Fluid Replacement.
3. Remove the rear propeller shaft. Refer to Propeller Shaft Replacement.
4. Remove the rear output shaft housing. Refer to Rear Output Shaft Housing Removal in Transfer Case Disassemble.
5. Remove the transfer case rear output shaft flange. Refer to Rear Output Shaft Housing Disassembly in Transfer Case Disassemble.
Installation Procedure
1. Install the transfer case rear output shaft flange and slinger. Refer to Rear Output Shaft Housing Assembly and Output Flange Installation in Transfer Case Assemble.
2. Install the rear output shaft housing. Refer to Rear Output Shaft Housing Installation in Transfer Case Assemble.
3. Install the rear propeller shaft. Refer to Propeller Shaft Replacement.
4. Fill the transfer case with fluid. Refer to Transfer Case Fluid Replacement.
5. Lower the vehicle.
REAR OUTPUT FLANGE OIL SLINGER REPLACEMENT
Removal Procedure
1. Raise and support the vehicle. Refer to Lifting and Jacking the Vehicle.
2. Drain the transfer case fluid. Refer to Transfer Case Fluid Replacement.
3. Remove the rear propeller shaft. Refer to Propeller Shaft Replacement.
4. Remove the rear output shaft housing. Refer to Rear Output Shaft Housing Removal in Transfer Case Disassemble.
5. Remove the transfer case rear output shaft flange. Refer to Rear Output Shaft Housing Disassembly in Transfer Case Disassemble.
6. Remove the transfer case rear output shaft oil slinger from the transfer case rear output shaft flange.
Installation Procedure
1. Install the transfer case rear output shaft flange and slinger. Refer to Rear Output Shaft Housing Assembly and Output Flange Installation in Transfer Case Assemble.
2. Install the rear output shaft housing. Refer to Rear Output Shaft Housing Installation in Transfer Case Assemble.
3. Install the rear propeller shaft. Refer to Propeller Shaft Replacement.
4. Fill the transfer case with fluid. Refer to Transfer Case Fluid Replacement.
5. Lower the vehicle.
INTERMEDIATE DRIVE SHAFT REPLACEMENT
Removal Procedure
1. Raise and support the vehicle. Refer to Lifting and Jacking the Vehicle.
2. Drain the transfer case fluid. Refer to Transfer Case Fluid Replacement.
3. Remove the transfer case assembly (2). Refer to Transfer Case Assembly Replacement.
Fig. 9: Identifying Transfer Case & Bolts
4. Remove the intermediate shaft snap ring and intermediate drive shaft from the transfer case. Refer to Intermediate Drive Shaft Removal in Transfer Case Disassemble.
5. Remove the O-ring, half shaft retainer, intermediate shaft bearing retainer and bearing from the intermediate drive shaft. Refer to Intermediate Drive Shaft Disassembly in Transfer Case Disassemble.
Installation Procedure
1. Install the O-ring, half shaft retainer, intermediate shaft bearing retainer and bearing to the intermediate drive shaft. Refer to Intermediate Drive Shaft Assembly in Transfer Case Assemble.
2. Install the intermediate shaft and snap ring into the transfer case. Refer to Intermediate Drive Shaft Assembly in Transfer Case Assemble.
NOTE: Special tool DT-48094 must be used to install the intermediate shaft.
3. Install the transfer case assembly (2). Refer to Transfer Case Assembly Replacement.
Fig. 10: Identifying Transfer Case & Bolts
4. Fill the transfer case with fluid. Refer to Transfer Case Fluid Replacement.
5. Lower the vehicle.
INTERMEDIATE DRIVE SHAFT BEARING REPLACEMENT
Removal Procedure
1. Raise and support the vehicle. Refer to Lifting and Jacking the Vehicle.
2. Drain the transfer case fluid. Refer to Transfer Case Fluid Replacement.
3. Remove the transfer case assembly (2). Refer to Transfer Case Assembly Replacement.
Fig. 11: Identifying Transfer Case & Bolts
4. Remove the intermediate shaft snap ring and intermediate drive shaft from the transfer case. Refer to Intermediate Drive Shaft Removal in Transfer Case Disassemble.
5. Remove the intermediate shaft bearing retainers and bearing from the intermediate drive shaft. Refer to Intermediate Drive Shaft Disassembly in Transfer Case Disassemble.
Installation Procedure
1. Install the intermediate shaft bearing and retainers to the intermediate drive shaft. Refer to Intermediate Drive Shaft Assembly in Transfer Case Assemble.
2. Install the intermediate shaft and snap ring into the transfer case. Refer to Intermediate Drive Shaft Assembly in Transfer Case Assemble.
NOTE: Special tool DT-48094 must be used to install the intermediate shaft.
3. Install the transfer case assembly (2). Refer to Transfer Case Assembly Replacement.
Fig. 12: Identifying Transfer Case & Bolts
4. Fill the transfer case with fluid. Refer to Transfer Case Fluid Replacement.
5. Lower the vehicle.
INTERMEDIATE DRIVE SHAFT SEAL REPLACEMENT
Removal Procedure
1. Raise and support the vehicle. Refer to Lifting and Jacking the Vehicle.
2. Drain the transfer case fluid. Refer to Transfer Case Fluid Replacement.
3. Remove the transfer case assembly (2). Refer to Transfer Case Assembly Replacement.
Fig. 13: Identifying Transfer Case & Bolts
4. Remove the intermediate shaft snap ring and intermediate drive shaft from the transfer case. Refer to Intermediate Drive Shaft Removal in Transfer Case Disassemble.
5. Remove the half shaft retainer and O-ring seal from the intermediate drive shaft. Refer to Intermediate Drive Shaft Disassembly in Transfer Case Disassemble.
Installation Procedure
1. Install the O-ring seal and half shaft retainer to the intermediate drive shaft. Refer to Intermediate Drive Shaft Assembly in Transfer Case Assemble.
2. Install the intermediate shaft and snap ring into the transfer case. Refer to Intermediate Drive Shaft Assembly in Transfer Case Assemble.
NOTE: Special tool DT-48094 must be used to install the intermediate shaft.
3. Install the transfer case assembly (2). Refer to Transfer Case Assembly Replacement.
Fig. 14: Identifying Transfer Case & Bolts
4. Fill the transfer case with fluid. Refer to Transfer Case Fluid Replacement.
5. Lower the vehicle.
REAR OUTPUT SHAFT HOUSING O-RING SEAL REPLACEMENT
Removal Procedure
1. Raise and support the vehicle. Refer to Lifting and Jacking the Vehicle.
2. Drain the transfer case fluid. Refer to Transfer Case Fluid Replacement.
3. Remove the rear propeller shaft. Refer to Propeller Shaft Replacement.
4. Remove the rear output shaft housing. Refer to Rear Output Shaft Housing Removal in Transfer Case Disassemble.
5. Remove the transfer case rear output shaft housing seal O-ring.
Installation Procedure
1. Install the transfer case rear output shaft housing seal O-ring.
2. Install the rear output shaft housing. Refer to Rear Output Shaft Housing Installation in Transfer Case Assemble.
3. Install the rear propeller shaft. Refer to Propeller Shaft Replacement.
4. Fill the transfer case with fluid. Refer to Transfer Case Fluid Replacement.
5. Lower the vehicle.
TRANSFER CASE ASSEMBLY REPLACEMENT
Removal Procedure
1. Raise and support the vehicle. Refer to Lifting and Jacking the Vehicle.
2. Drain the transfer case fluid. Refer to Transfer Case Fluid Replacement.
3. Drain the transmission fluid. Refer to Transmission Fluid Drain and Fill.
4. Remove the propeller shaft. Refer to Propeller Shaft Replacement.
5. Remove the right wheel drive shaft. Refer to Front Wheel Drive Shaft Replacement.
6. Remove the exhaust flexible pipe. Refer to Exhaust Flexible Pipe Replacement.
7. Support the transaxle with a jackstand.
8. Remove the engine rear mount bracket. Refer to Engine Rear Mount Bracket Replacement (Front Wheel Drive) and Engine Rear Mount Bracket Replacement (All Wheel Drive).
9. Remove the transfer case bolts (1).
Fig. 15: Identifying Transfer Case & Bolts
10. Remove the transfer case (2).
Installation Procedure
1. Lubricate the O-rings (2, 3) with automatic transmission fluid.
Fig. 16: Identifying Transfer Case O-Ring Seal, Half Shaft Retainer &
Intermediate Shaft Seals
2. Install the NEW transfer case O-ring seal (3).
3. Carefully insert a clean soft cloth into the transmission torque converter housing differential bore to prevent debris from entering the transmission.

Fig. 17: View Of Torque Converter Housing Differential Bore
NOTE: Oxidation must be removed from the transmission torque converter housing bore before installation of the transfer case. A clean bore will prevent oxidation build up from scuffing or cutting the O-ring seal upon transfer case installation, resulting in a leak.
4. Clean the oxidation from the transmission torque converter housing differential bore surface using steel wool or crocus cloth.
5. Carefully remove any debris and the cloth from the transmission torque converter housing differential bore.
6. Fabricate 2 guide pins by cutting the heads off of 2 bolts M12x1.75x75. chamfer and remove burrs from the cut end of the bolt.
Fig. 18: Identifying Guide Pins
NOTE: Use guide pins to aid in alignment and installation of the transfer case to the transmission. Failure to use guide pins may result in cutting the transfer case O-ring seal during installation of the transfer case causing a fluid leak.
7. Hand thread the guide pins (1) into the transmission upper and lower transfer case mounting bolt holes.
8. Thoroughly clean the transmission bore and ribbing of fluid and debris immediately prior to installing the transfer case.
NOTE: Transmission fluid may creep from the transmission bore during installation.
9. Install the transfer case (1) to the transmission.
Fig. 19: View Of Transfer Case & Transmission
10. Remove the guide pins (2).
11. Install the transfer case to transmission bolts (1) and tighten to 50 N.m (37 lb ft).
Fig. 20: View Of Transfer Case & Bolts
CAUTION: Refer to Fastener Caution.
12. Install the engine rear mount bracket. Refer to Engine Rear Mount Bracket Replacement (Front Wheel Drive) , Engine Rear Mount Bracket Replacement (All Wheel Drive).
13. Remove the jackstand from under the transaxle.
14. Install the exhaust flexible pipe. Refer to Exhaust Flexible Pipe Replacement.
15. Install the right wheel drive shaft. Refer to Front Wheel Drive Shaft Replacement.
16. Install the propeller shaft. Refer to Propeller Shaft Replacement.
17. Fill the transfer case with fluid. Refer to Transfer Case Fluid Replacement.
18. Fill the transmission fluid. Refer to Transmission Fluid Drain and Fill.
19. Lower the vehicle.
INPUT SHAFT SEAL REPLACEMENT
Removal Procedure
1. Raise and support the vehicle. Refer to Lifting and Jacking the Vehicle.
2. Drain the transfer case fluid. Refer to Transfer Case Fluid Replacement.
3. Remove the propeller shaft. Refer to Propeller Shaft Replacement.
4. Remove the right wheel drive shaft. Refer to Front Wheel Drive Shaft Replacement.
5. Remove the exhaust flexible pipe. Refer to Exhaust Flexible Pipe Replacement.
6. Support the transaxle with a jackstand.
7. Remove the engine rear mount bracket. Refer to Engine Rear Mount Replacement.
8. Remove the transfer case bolts (1).
Fig. 21: Identifying Transfer Case & Bolts
9. Remove the transfer case (2).
Installation Procedure
1. Lubricate the O-rings (2, 3) with automatic transmission fluid.
Fig. 22: Identifying Transfer Case O-Ring Seal, Half Shaft Retainer &
Intermediate Shaft Seals
2. Install the NEW transfer case O-ring seal (3).
3. Carefully insert a clean soft cloth into the transmission torque converter housing differential bore to prevent debris from entering the transmission.
Fig. 23: View Of Torque Converter Housing Differential Bore
NOTE: Oxidation must be removed from the transmission torque converter housing bore before installation of the transfer case. A clean bore will prevent oxidation build up from scuffing or cutting the O-ring seal upon transfer case installation, resulting in a leak.
4. Clean the oxidation from the transmission torque converter housing differential bore surface using steel wool or crocus cloth.
5. Carefully remove any debris and the cloth from the transmission torque converter housing differential bore.
6. Fabricate 2 guide pins by cutting the heads off of 2 bolts M12x1.75x75. chamfer and remove burrs from the cut end of the bolt.
Fig. 24: Identifying Guide Pins
NOTE: Use guide pins to aid in alignment and installation of the transfer case to the transmission. Failure to use guide pins may result in cutting the transfer case O-ring seal during installation of the transfer case causing a fluid leak.
7. Hand thread the guide pins (1) into the transmission upper and lower transfer case mounting bolt holes.
8. Thoroughly clean the transmission bore and ribbing of fluid and debris immediately prior to installing the transfer case.
NOTE: Transmission fluid may creep from the transmission bore during installation.
9. Install the transfer case (1) to the transmission.
Fig. 25: View Of Transfer Case & Transmission
10. Remove the guide pins (2).
11. Install the transfer case to transmission bolts (1) and tighten to 50 N.m (37 lb ft).
Fig. 26: View Of Transfer Case & Bolts
CAUTION: Refer to Fastener Caution.
12. Install the engine rear mount bracket. Refer to Engine Rear Mount Replacement.
13. Remove the jackstand from under the transaxle.
14. Install the exhaust flexible pipe. Refer to Exhaust Flexible Pipe Replacement.
15. Install the right wheel drive shaft. Refer to Front Wheel Drive Shaft Replacement.
16. Install the propeller shaft. Refer to Propeller Shaft Replacement.
17. Fill the transfer case with fluid. Refer to Transfer Case Fluid Replacement.
18. Lower the vehicle.

